ResoNix Sound Solutions

Premium Automotive Sound Treatment Solutions

How to sound deaden car doors

Porsche 911 GT3 Sound Deadening & Noise Reduction

Elevating the Porsche 911 Driving Experience: The Magic of Sound Deadening

       In the realm of luxury sports cars, the unique allure of Porsche 911 sound deadening and interior noise reduction is becoming increasingly recognized. Every Porsche 911 owner knows the thrill that comes with turning the ignition and hearing that iconic engine roar to life. The 911 isn’t just a car; it’s a symphony of mechanical wonders. But like any intricate symphony, unwanted noise – rattles, buzzes, tire hums, and the oft-debated exhaust drone – can creep into that harmonious experience. These unwelcome guests can detract from the pure joy of driving one of the most legendary vehicles in automotive history. However, there’s a solution that many Porsche enthusiasts swear by: sound deadening.

       For those passionate about their 911s, the pursuit of perfection is never-ending. While its natural acoustics have a charm of their own, ensuring that every note is intentional and desired can transform the driving experience from merely thrilling to absolutely euphoric. Enter the world of sound deadening – a subtle art and science that promises to attenuate the disturbances, letting you focus on what truly matters: the unparalleled pleasure of piloting your Porsche 911. In this post, we’ll delve into how sound deadening can serve as your personal conductor, orchestrating every auditory aspect of your drive to pure perfection.

Understanding the Triad of Noise Disturbances in the Porsche 911

       For the Porsche enthusiast, the 911 isn’t just a vehicle – it’s an extension of oneself, a statement of style and performance. However, amidst its brilliance, some Porsche 911 owners have brought to our attention three distinct types of noises that can affect the driving experience. Understanding these noises is the first step to achieving the pinnacle of auditory pleasure in your 911.


1. Rattles and Buzzes: The Unwanted Companions

       The intricacy of a Porsche 911’s design means that over time, parts can become susceptible to vibrations, leading to rattles and buzzes. Whether it’s the dashboard, door panels, or the occasional loose fitting, these sounds can be distracting, especially when cruising at low speeds or on bumpy roads.

       Sound deadening materials can be strategically placed to reduce these annoyances. These materials absorb vibrations and prevent them from reaching the car’s interior, ensuring that the only sound you hear is the pure, unadulterated note of your engine. Remember, sound reduction isn’t always about completely eliminating noise, but oftentimes refining it. By targeting these rattles and buzzes, we make the Porsche 911 experience even more sublime.


2. Tire Noise: The Road’s Echo

       One of the most common grievances is the hum or roar of tire noise. As the rubber meets the road, vibrations are produced. At high speeds or on rough terrains, these vibrations become more pronounced. The wide and performance-oriented tires of the 911, while exceptional for grip and handling, can sometimes be culprits for this noise.

       Thankfully, sound deadening can combat tire noise. By applying sound reduction materials beneath the cabin and around the wheel wells, the noise generated by the tires is significantly diminished. The result? A quieter cabin that allows for conversations, music appreciation, or simply soaking in the purr of that flat-six engine without the interference of tire noise.


3. Exhaust Drone and Body Resonance: The Deep Hum

       A Porsche 911’s exhaust note is music to many ears. However, at certain RPMs, the exhaust can produce a drone – a continuous, low-frequency hum that reverberates within the car’s cabin. This, coupled with the natural resonance of the body, can sometimes create a sound environment that’s less than ideal.

       Sound deadening shines once again in addressing this issue. By introducing materials that absorb these low-frequency sounds, one can mitigate the exhaust drone and the resonance of the body. This ensures that what you hear is a clear, crisp exhaust note – a sound that embodies the essence of the Porsche brand without the overbearing hum.

       In the journey of enhancing the auditory experience of your Porsche 911, understanding and addressing these noises is paramount. Sound deadening doesn’t just reduce noise; it refines and elevates the driving experience, allowing you to connect even more deeply with your beloved 911. Whether it’s the chatter of rattles, the echo of the road, or the drone of the exhaust, sound reduction is the key to unlocking pure, undisturbed driving pleasure.


Buckle up, it’s about to get very detailed..

Before we get into this, it is important to note that every situation is different, every application is different, and everyone’s needs/wants are different. For our specific clients goals, which was to reduce outside noise and drone without adding too much weight, while still retaining the enjoyable sound of a 911 GT3 engine at higher RPM’s. If you would like guidance that is specific to your situation, please do not hesitate to reach out to us.

Contact ResoNix

Below is the full installation log that we posted on Rennlist

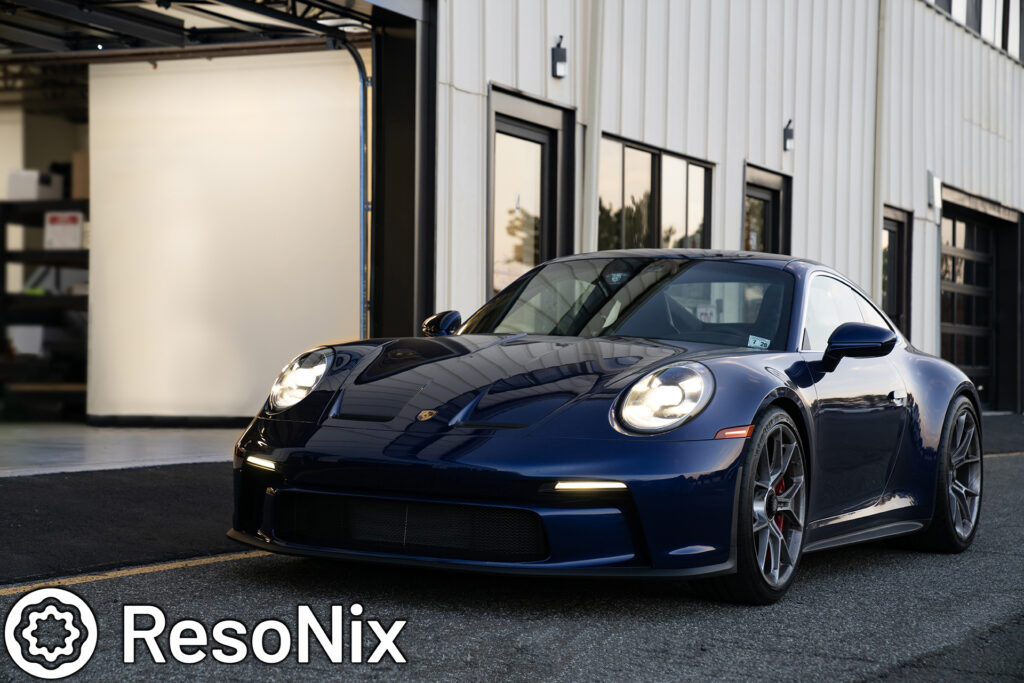
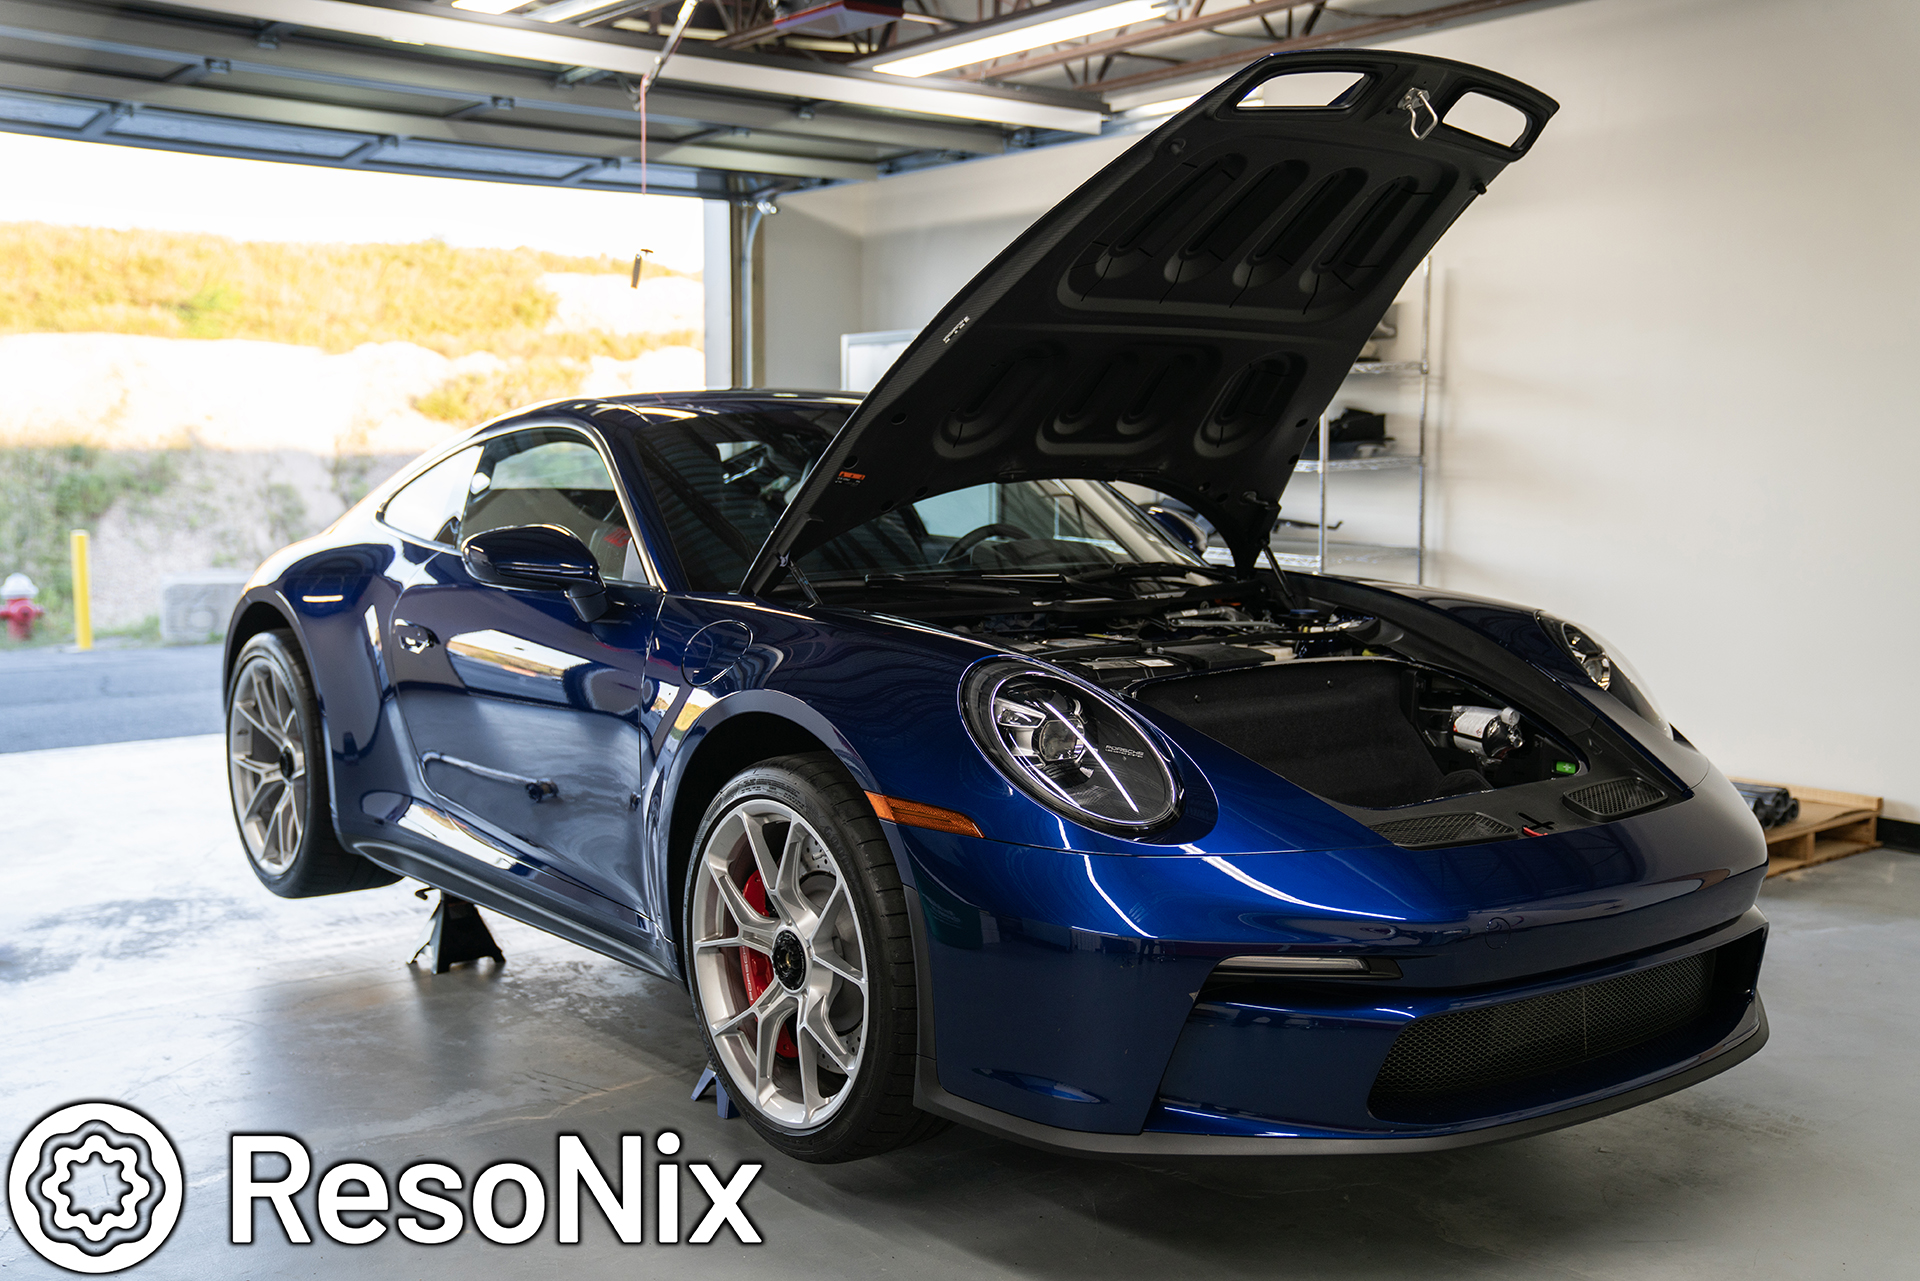
       Hey everyone! Nick from ResoNix Sound Solutions here. I wanted to show a solution that I have for something that I see and hear a lot of 911 owners, especially GT models complain about: unwanted rattles and resonance. 911’s, believe it or not, are probably the one car model that I get the most inquiries about regarding reducing unwanted rattles, resonance, and gravel noise. Maybe tied with Tesla Model 3/Y and Ford Broncos for the most inquiries, but, whatever.. The point is, this is a commonly asked about problem and I finally got my hands on a brand new GT3 Touring that I was able to document exactly how I would go about reducing unwanted rattles and resonance without taking away from the enjoyable sound of the engine and exhaust of this car at higher RPM’s, and without adding too much weight.


We ended up using for Porsche 911 Sound Deadening:


Or, you can check out our ResoNix Porsche 911 Sound Deadening Treatment Kit to easily purchase.


       These products were used in the doors, rear parcel shelf/quarter panel area, and the wheel wells. In total, we added approximately 40lbs and had a drastic difference before and after. On to the build log


       Hello everybody! Yes, it has certainly been a while. But I am back and providing you all with install photo goodies, as well as sound treatment before & after data!
That said, I have recently rented a small shop with the intentions of hosting training classes, and doing installs, but that has also had to be put on pause until an unknown date due to having to get everything back and set up in the new shop. We have a good amount of crazy installs lined up, and those will start as soon as I can, but this vehicle in particular wanted to have something done first that I could do without anything but my hand tools, and something we are the experts of the subject in our industry: Sound Treatment.

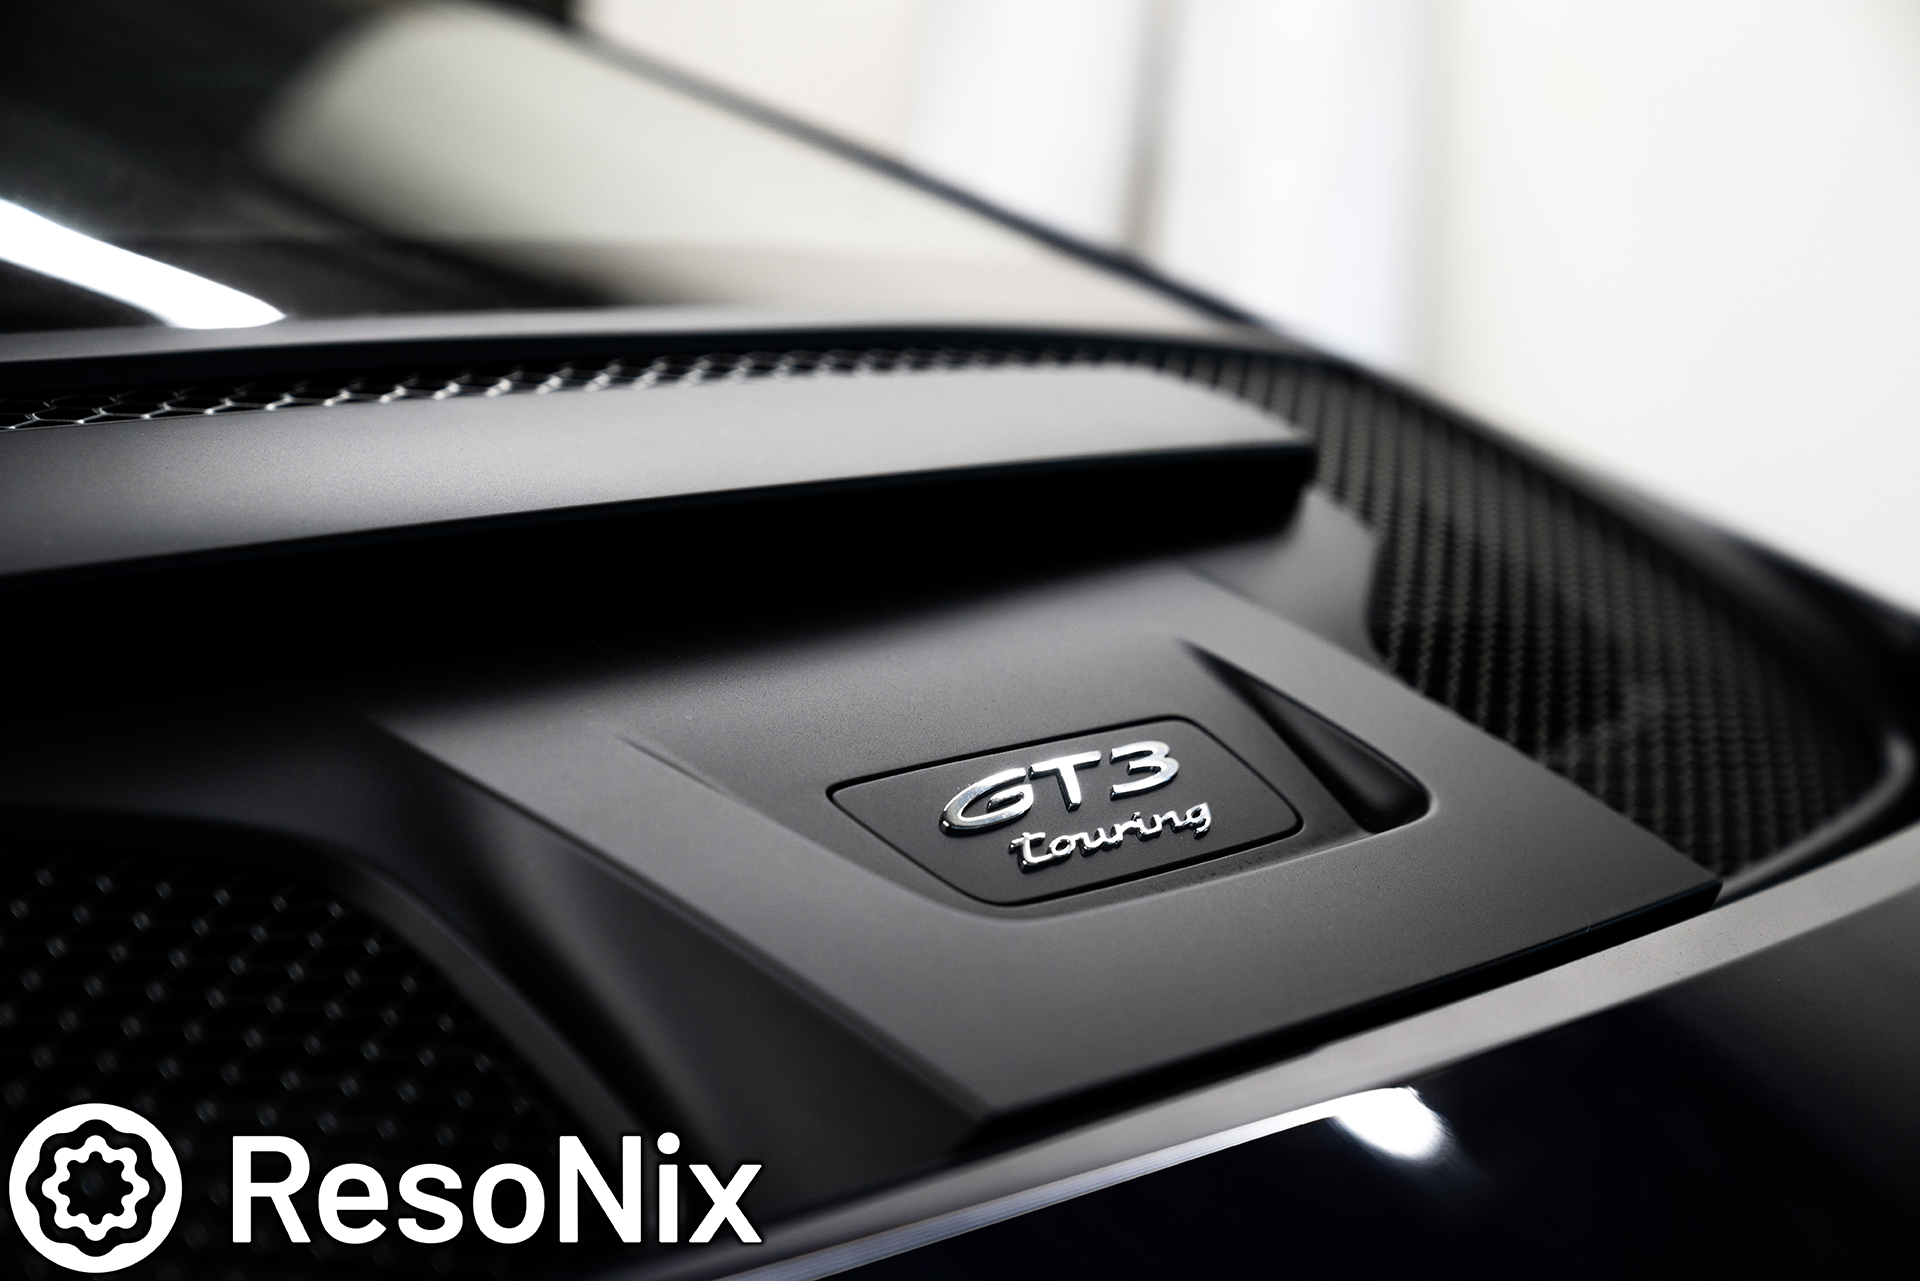
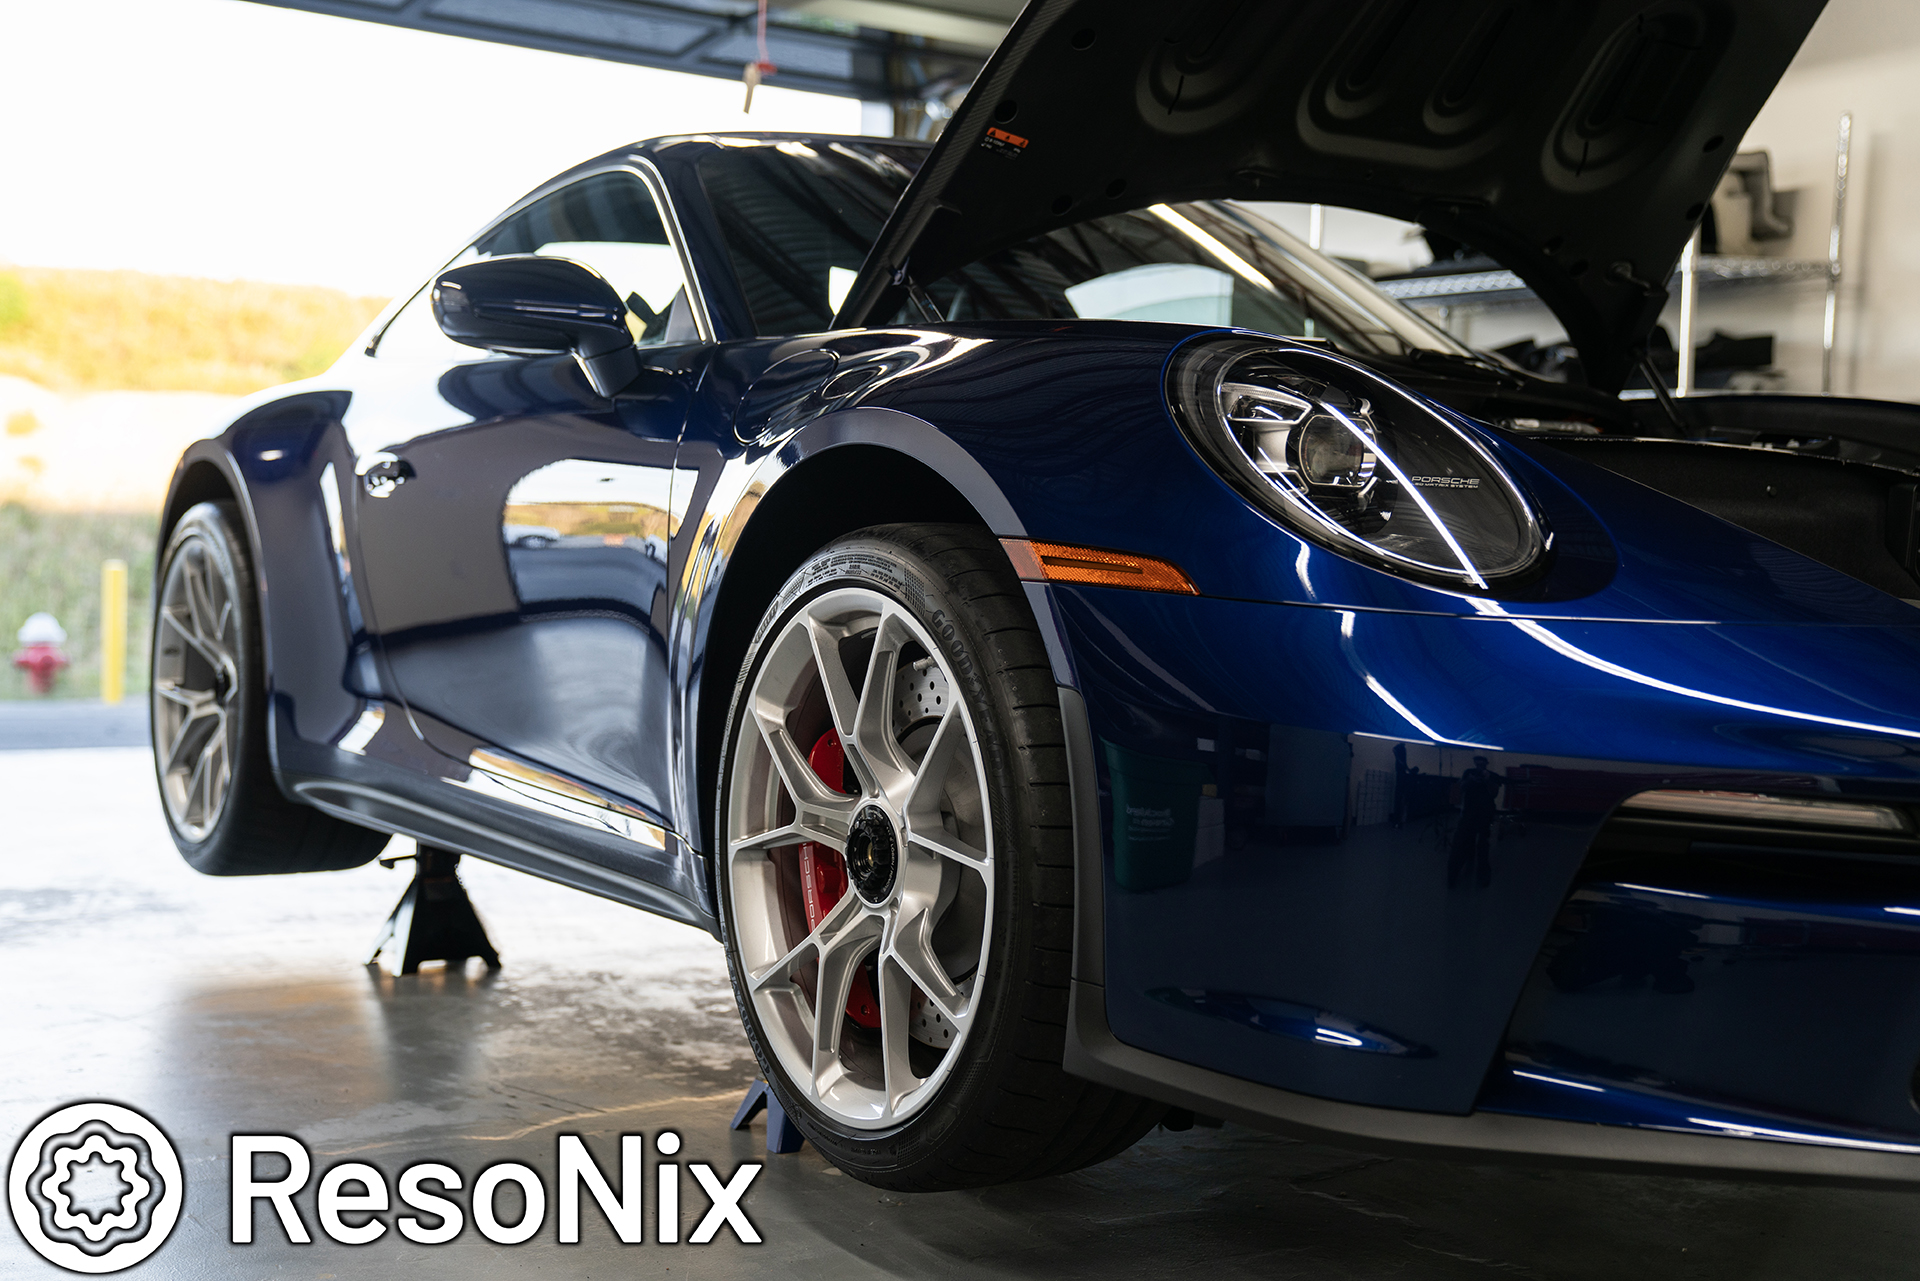
       My client took delivery of this 2023 Porsche GT3 Touring recently, and immediately noticed how unnecessarily loud it was, but not in the ways you’d expect a naturally aspirated daily-drivable race car from a luxury brand such as Porsche would be. The panel resonance, rattles, and body drone was absolutely through the roof, and was to the point where his wife didn’t even want to drive in the car with him. The problems were relayed to me as accurately as possible, and we came up with a game plan to reduce the rattles, drone, and tire/gravel noises that my client described to me. That said, when on the phone, I was almost in disbelief at the level of noise he was claiming, especially considering it is the Touring model. I have driven many Porsche’s, including GT3’s, but never a 992 GT3, or a GT3 Touring. It just didn’t make sense that the car would be THAT loud. Upon drop off and my initial test drive with it, I immediately understood where he was coming from. It was bad. Lets get into the “before” details of what I personally heard.


Porsche 911 Sound Deadening Treatment Locations Of Interest

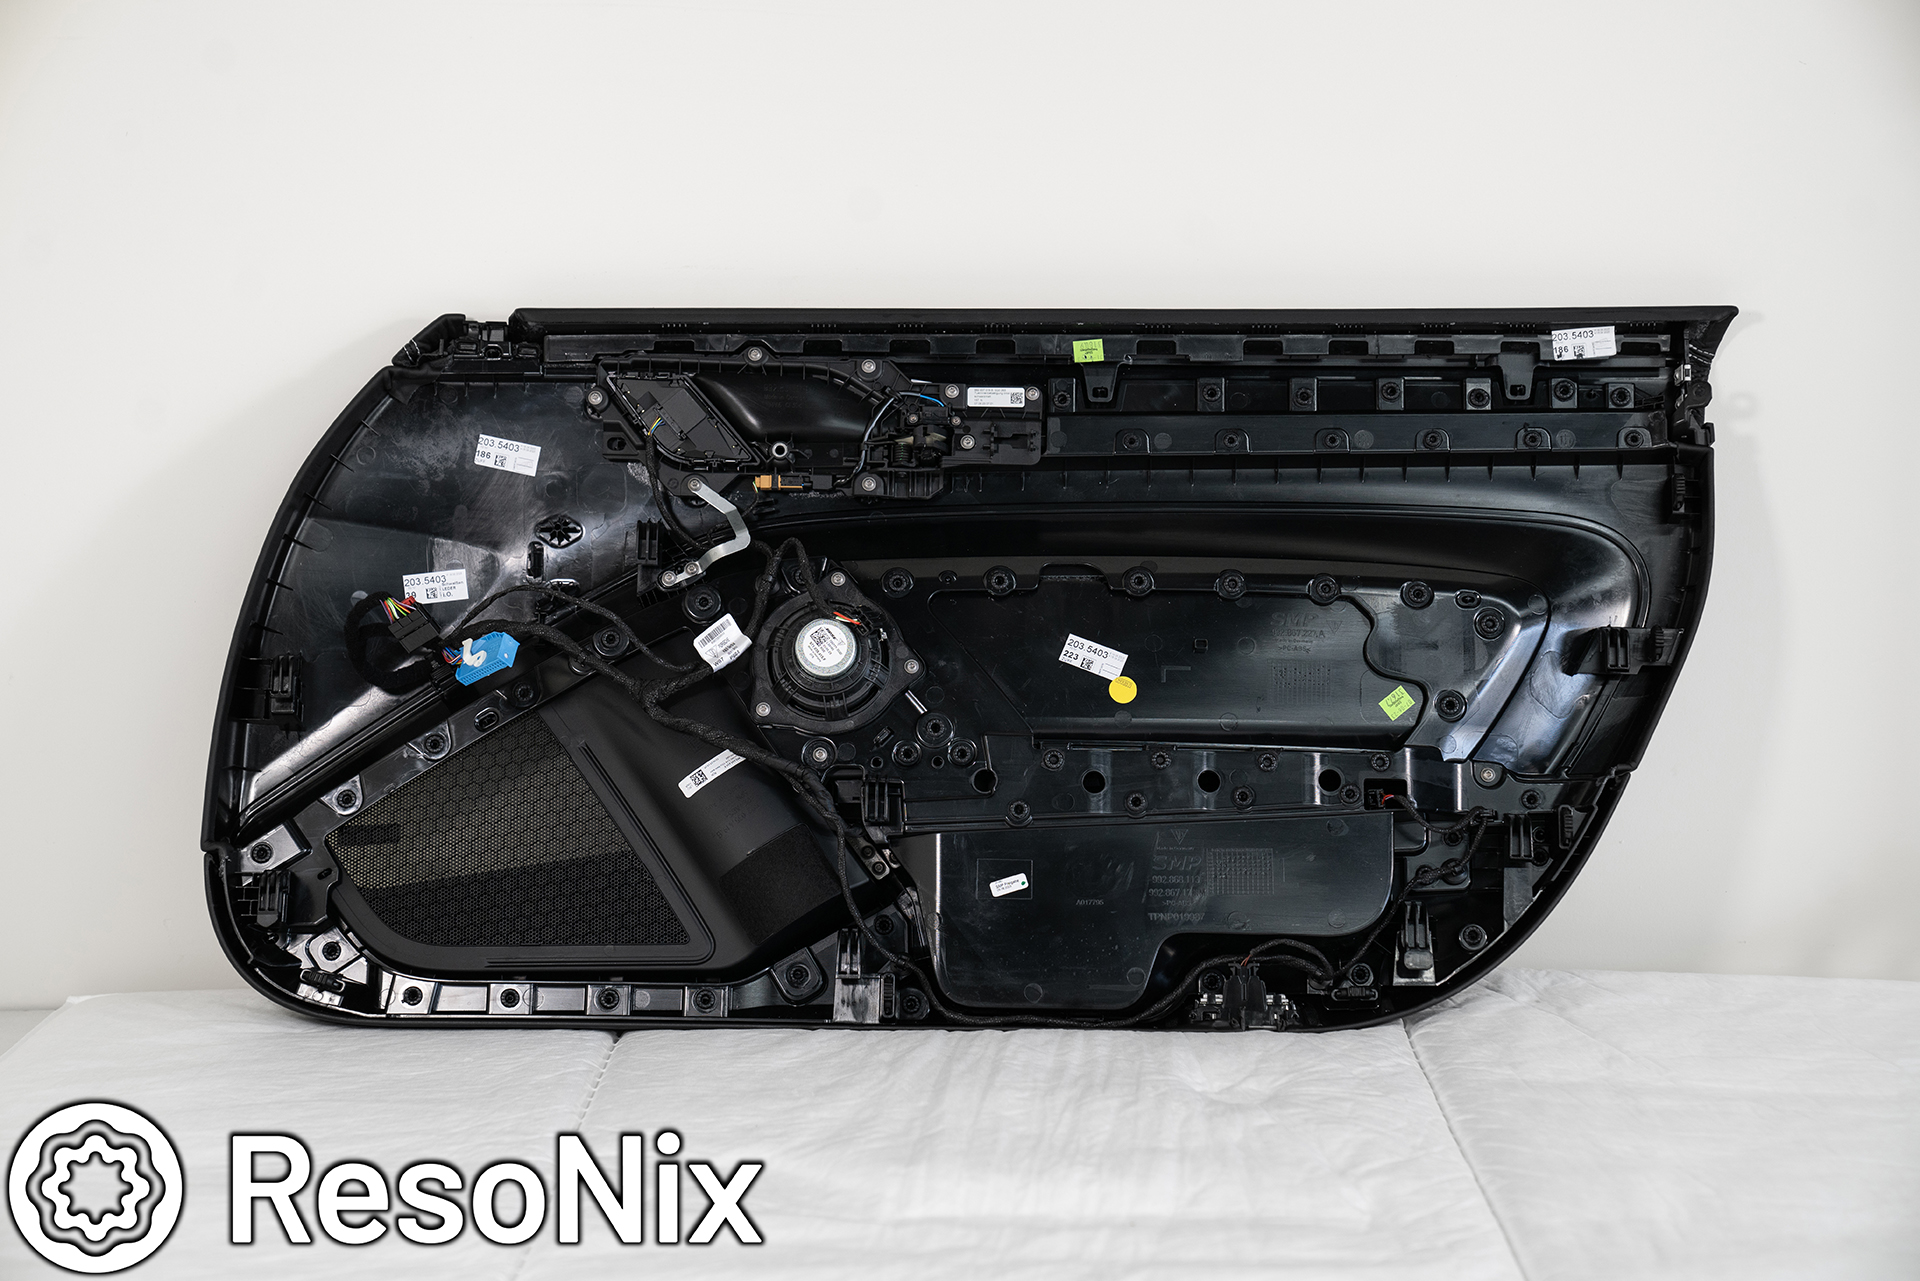
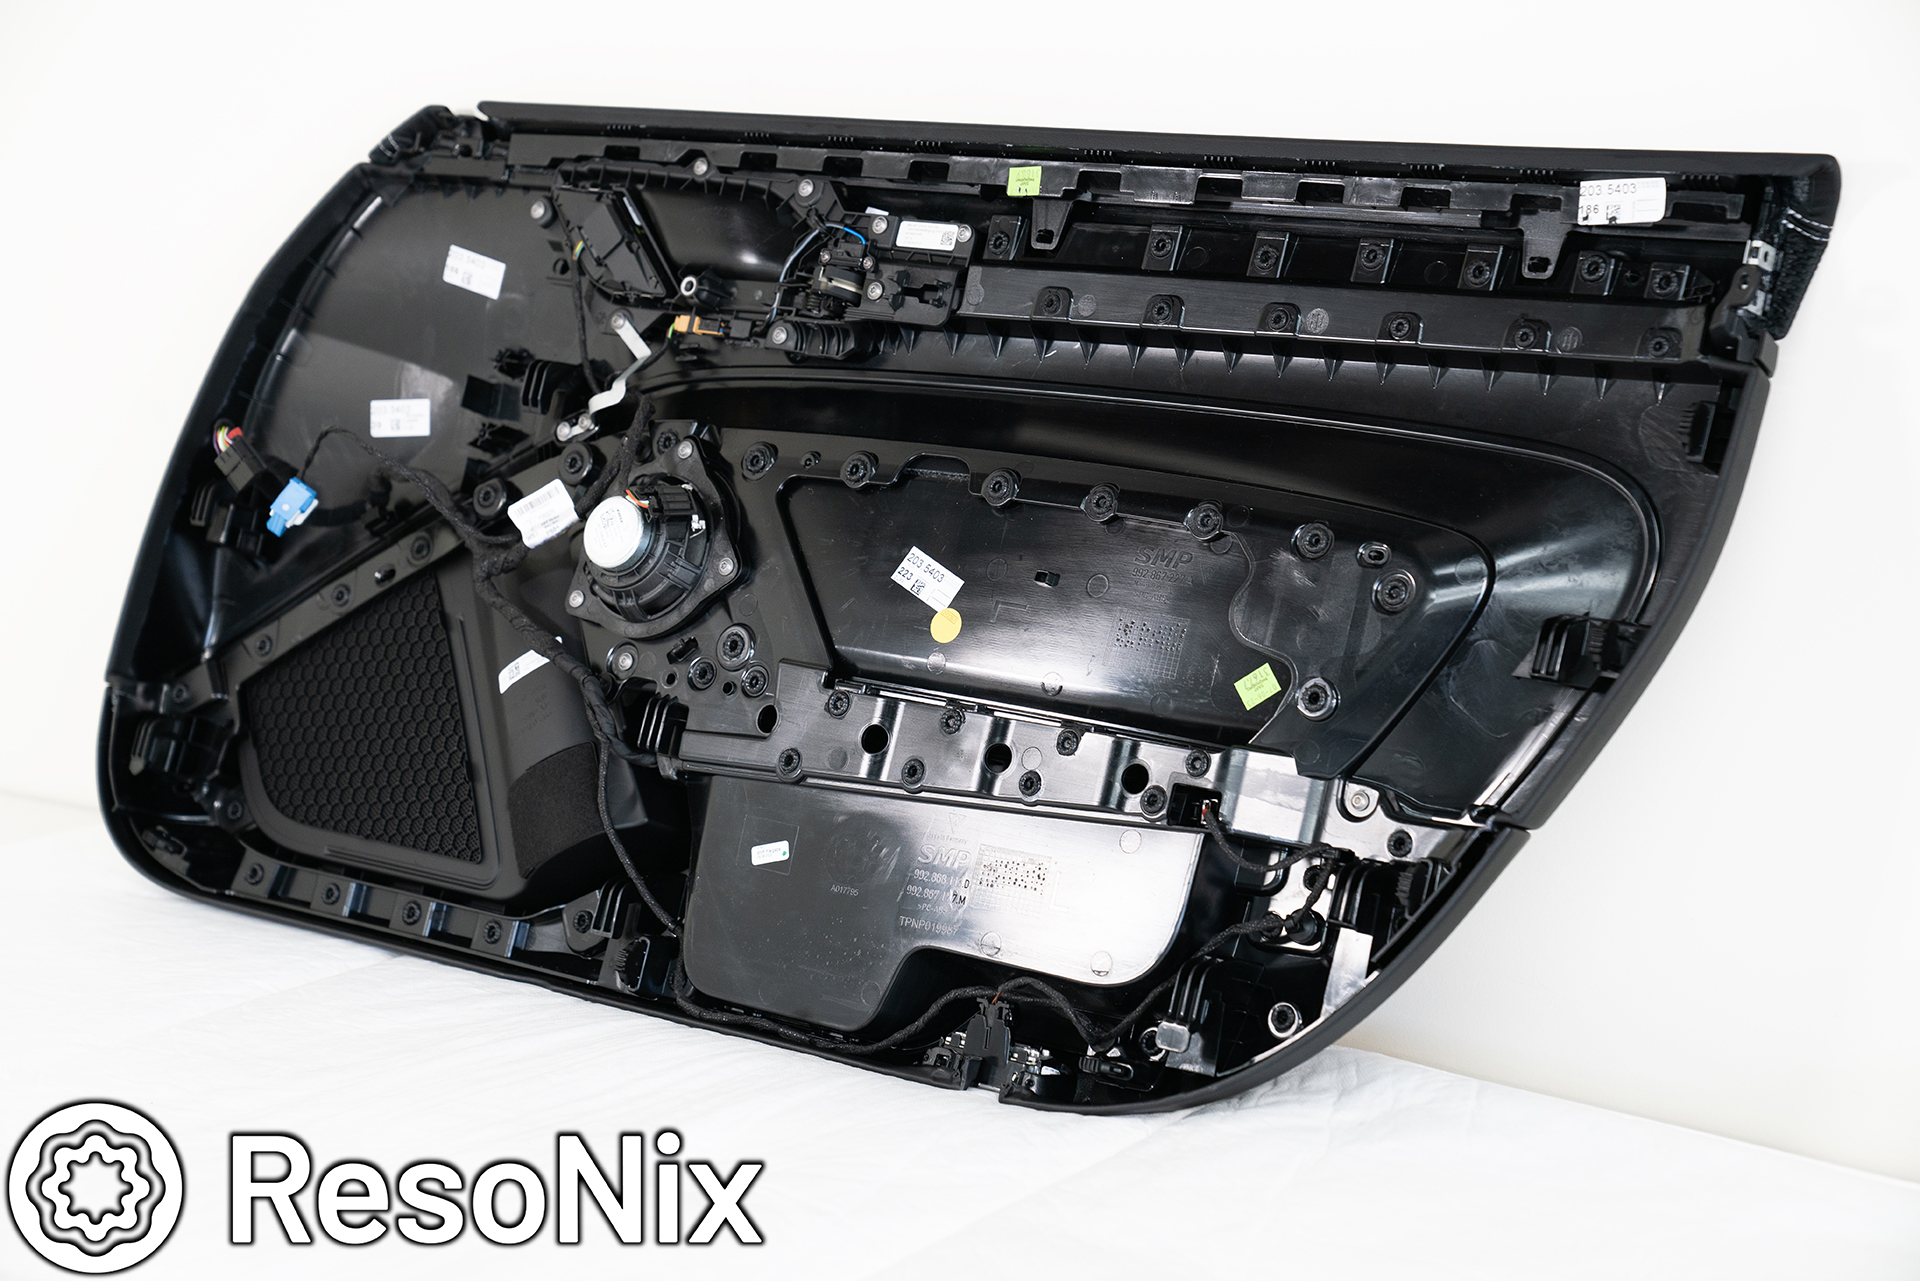
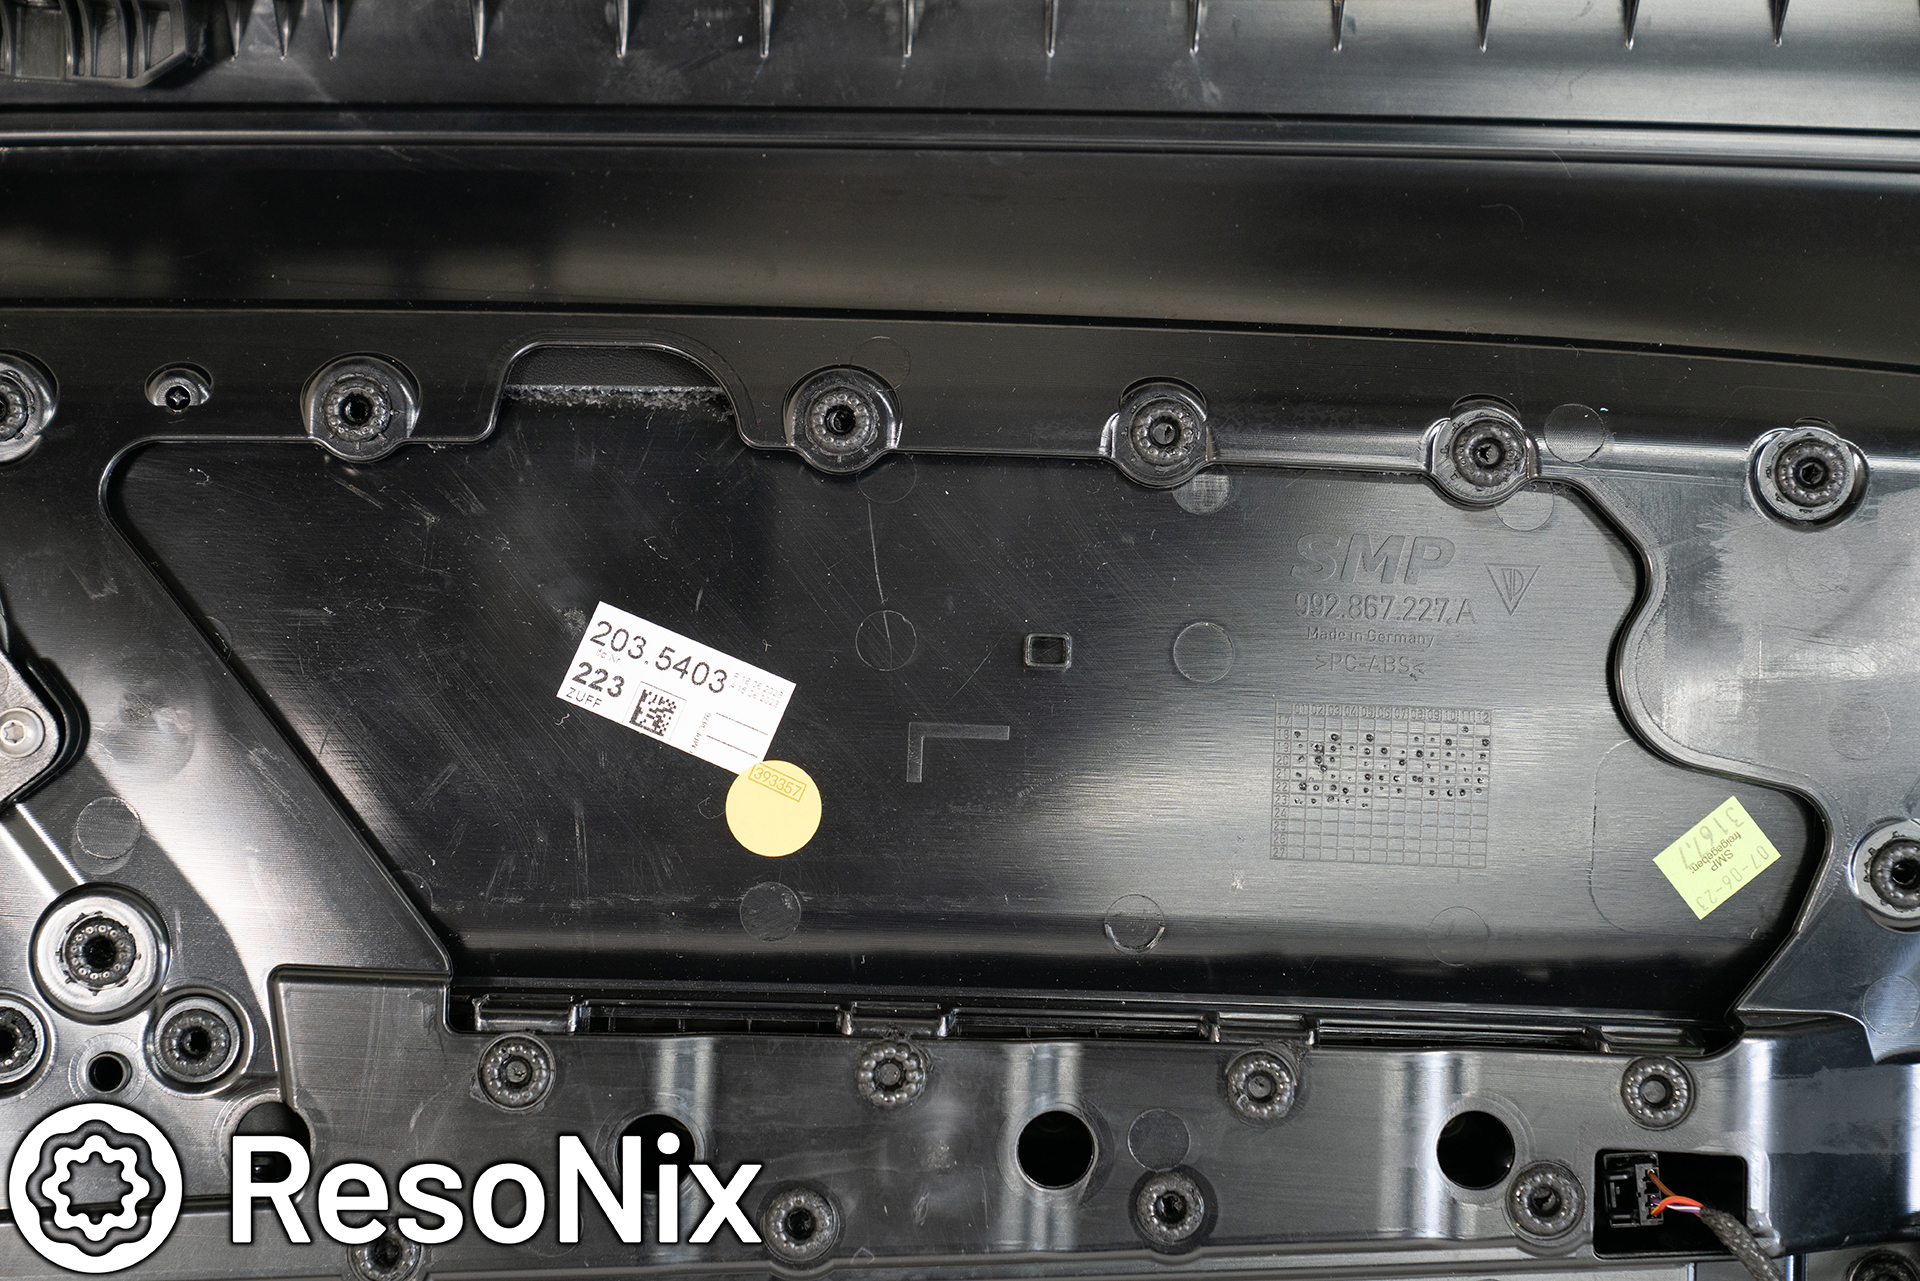
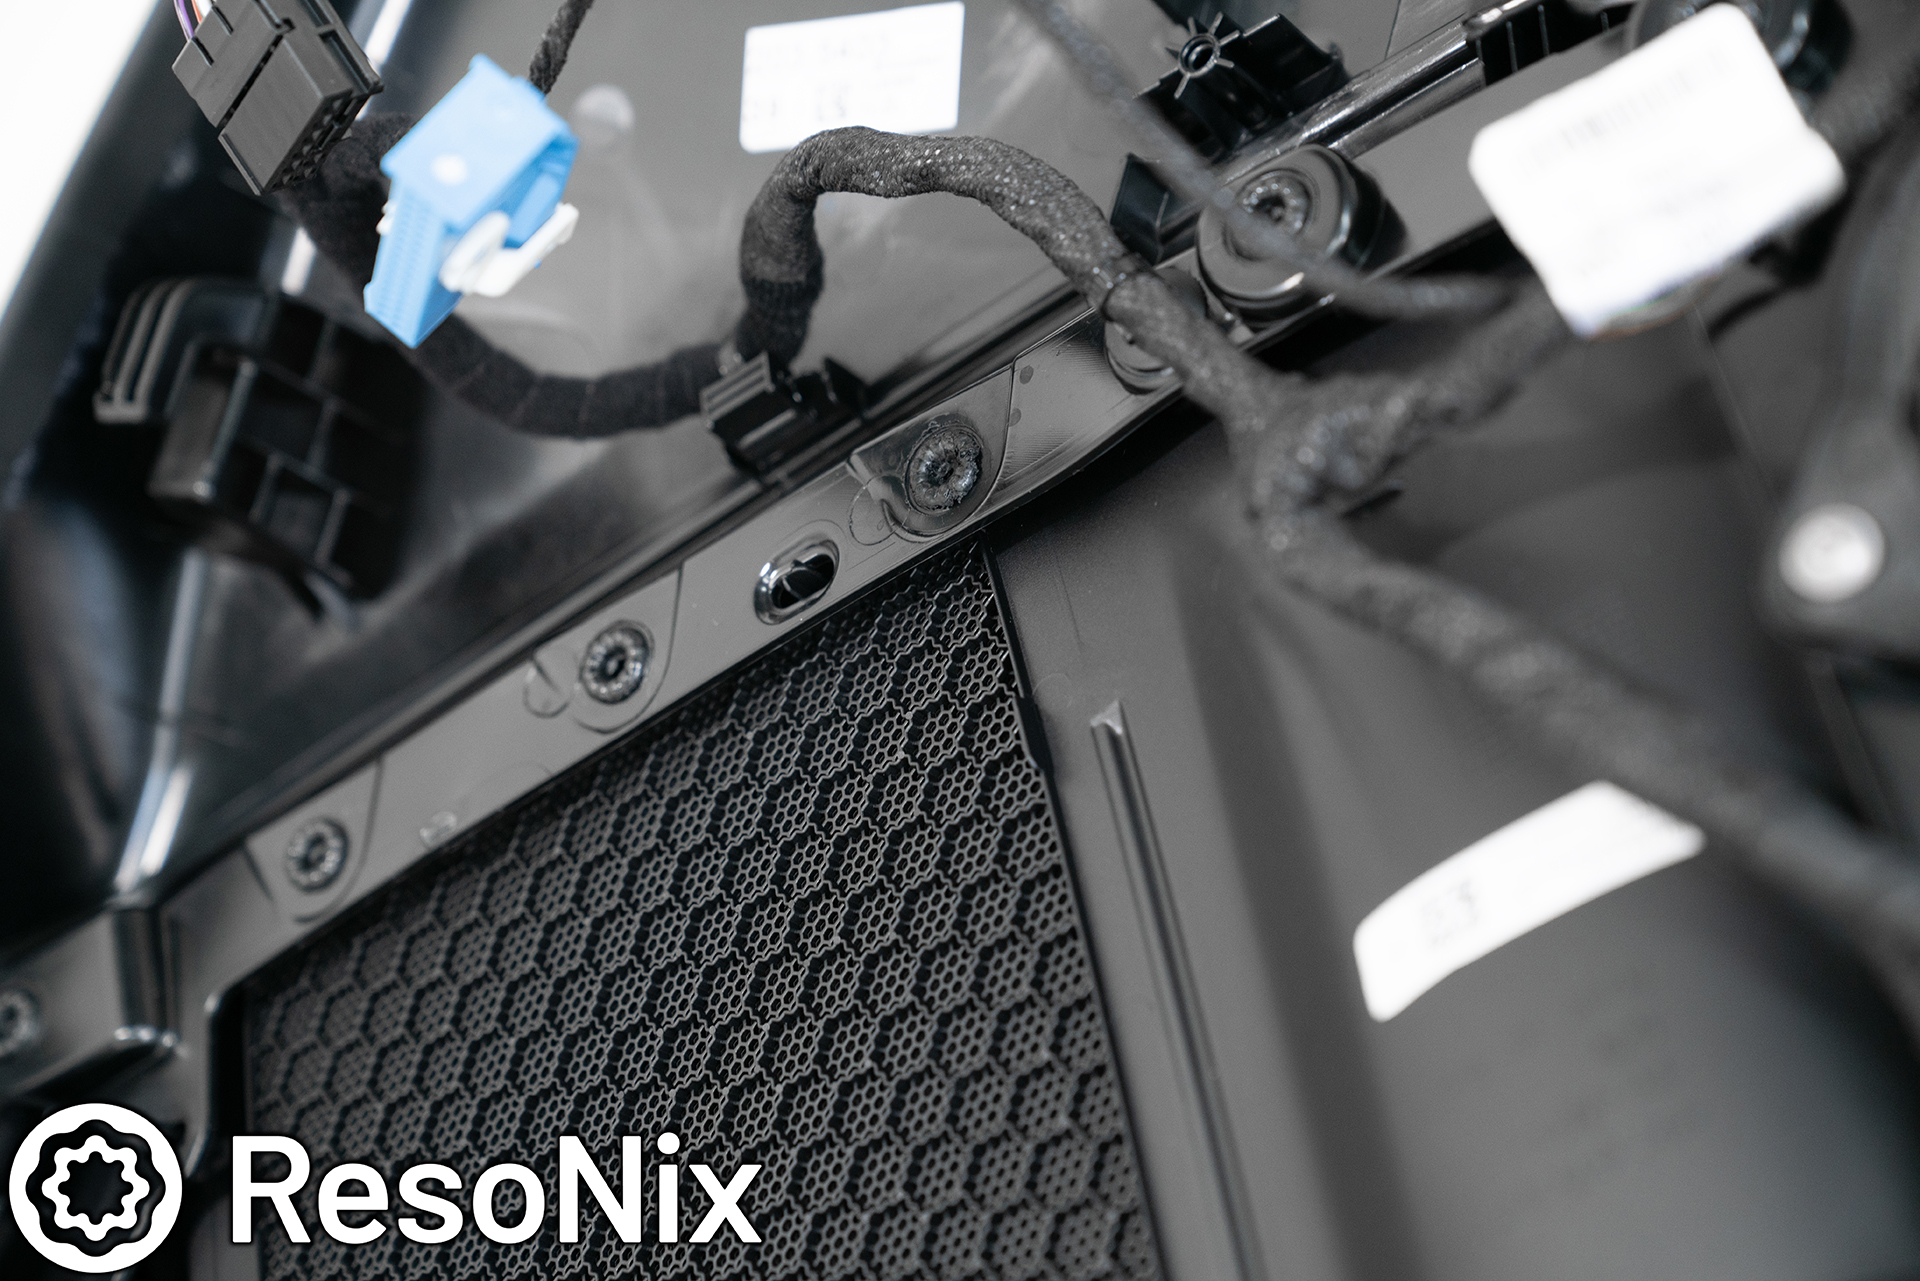
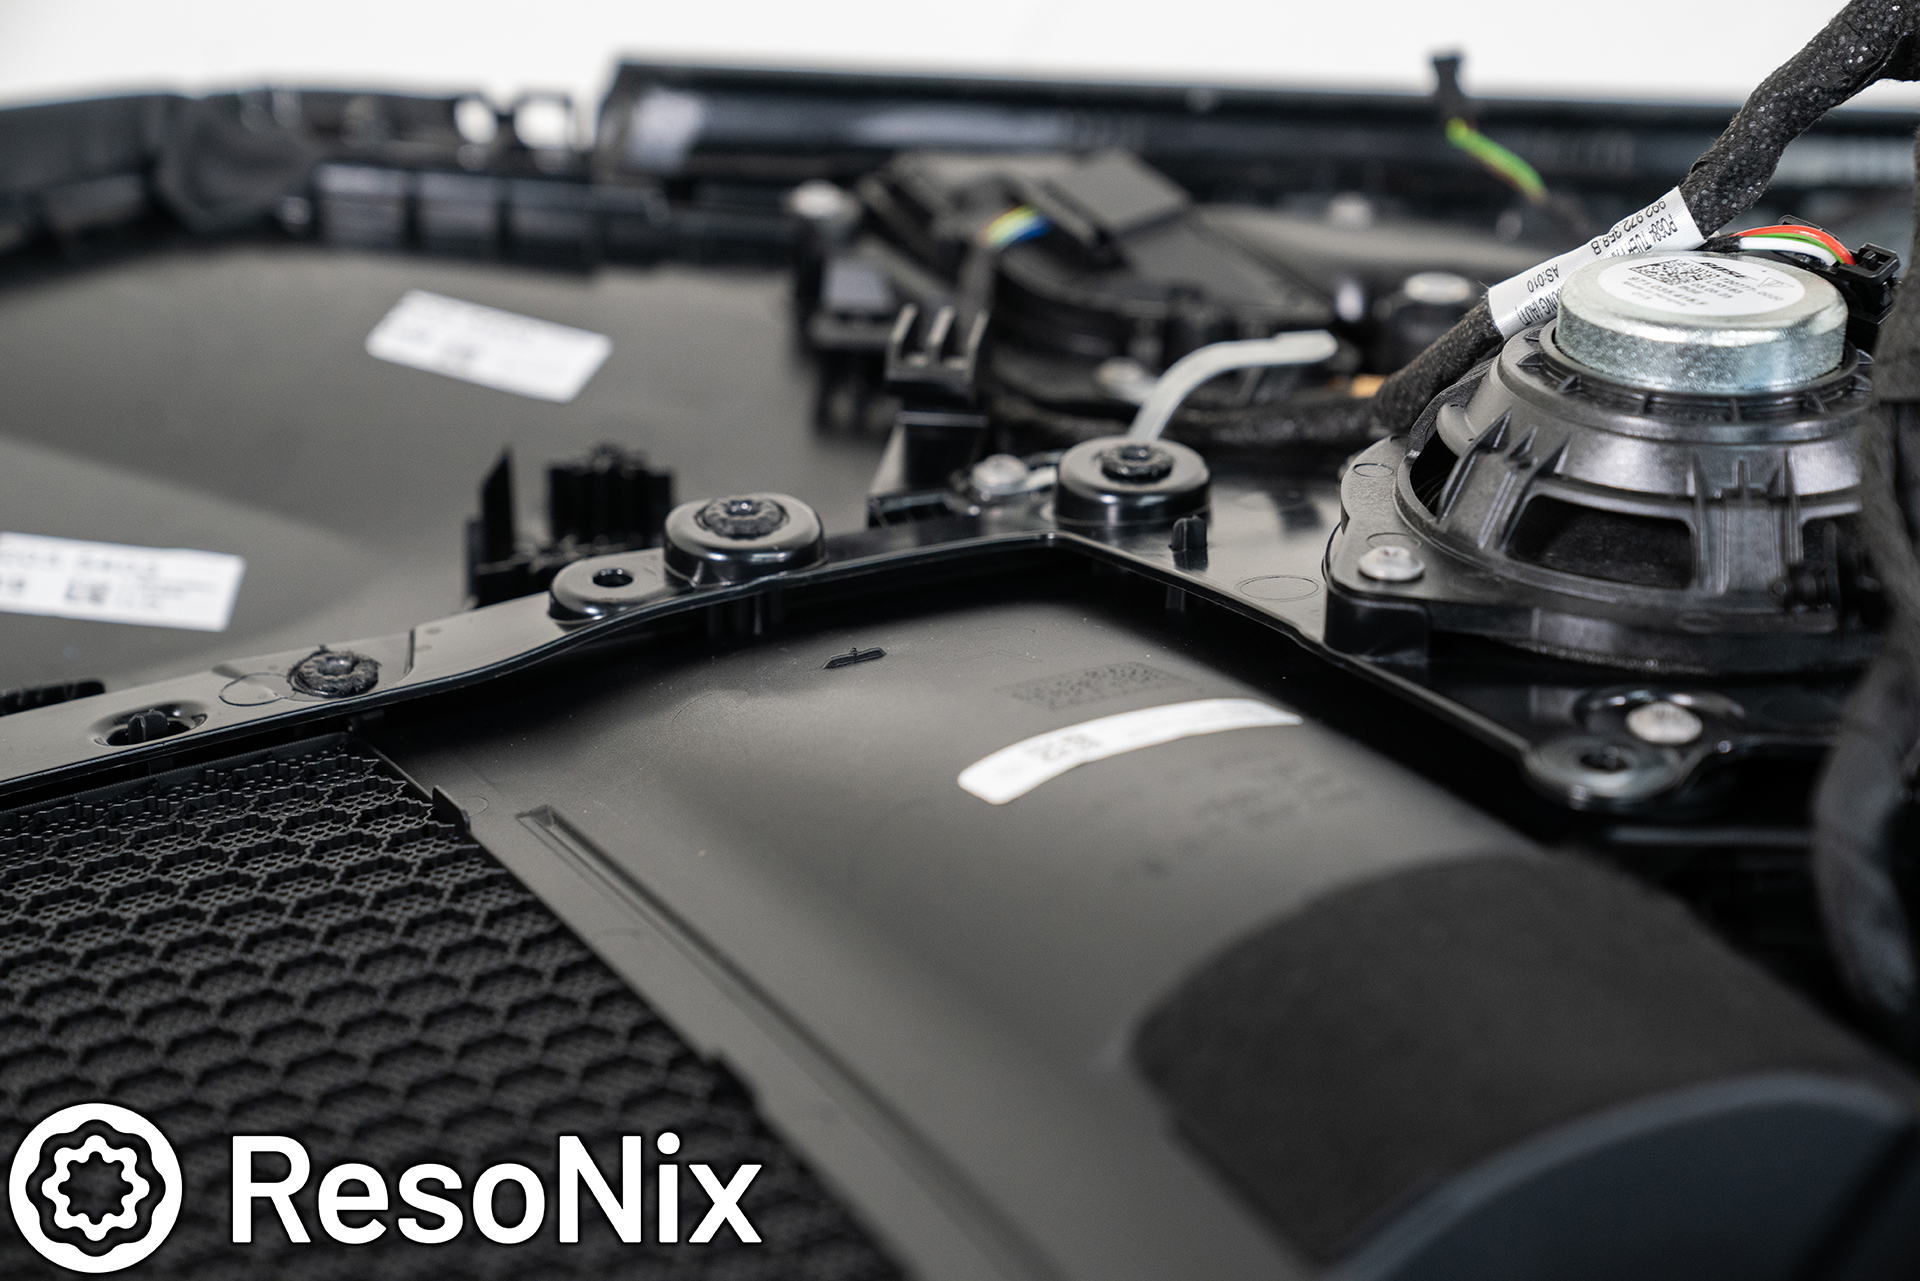
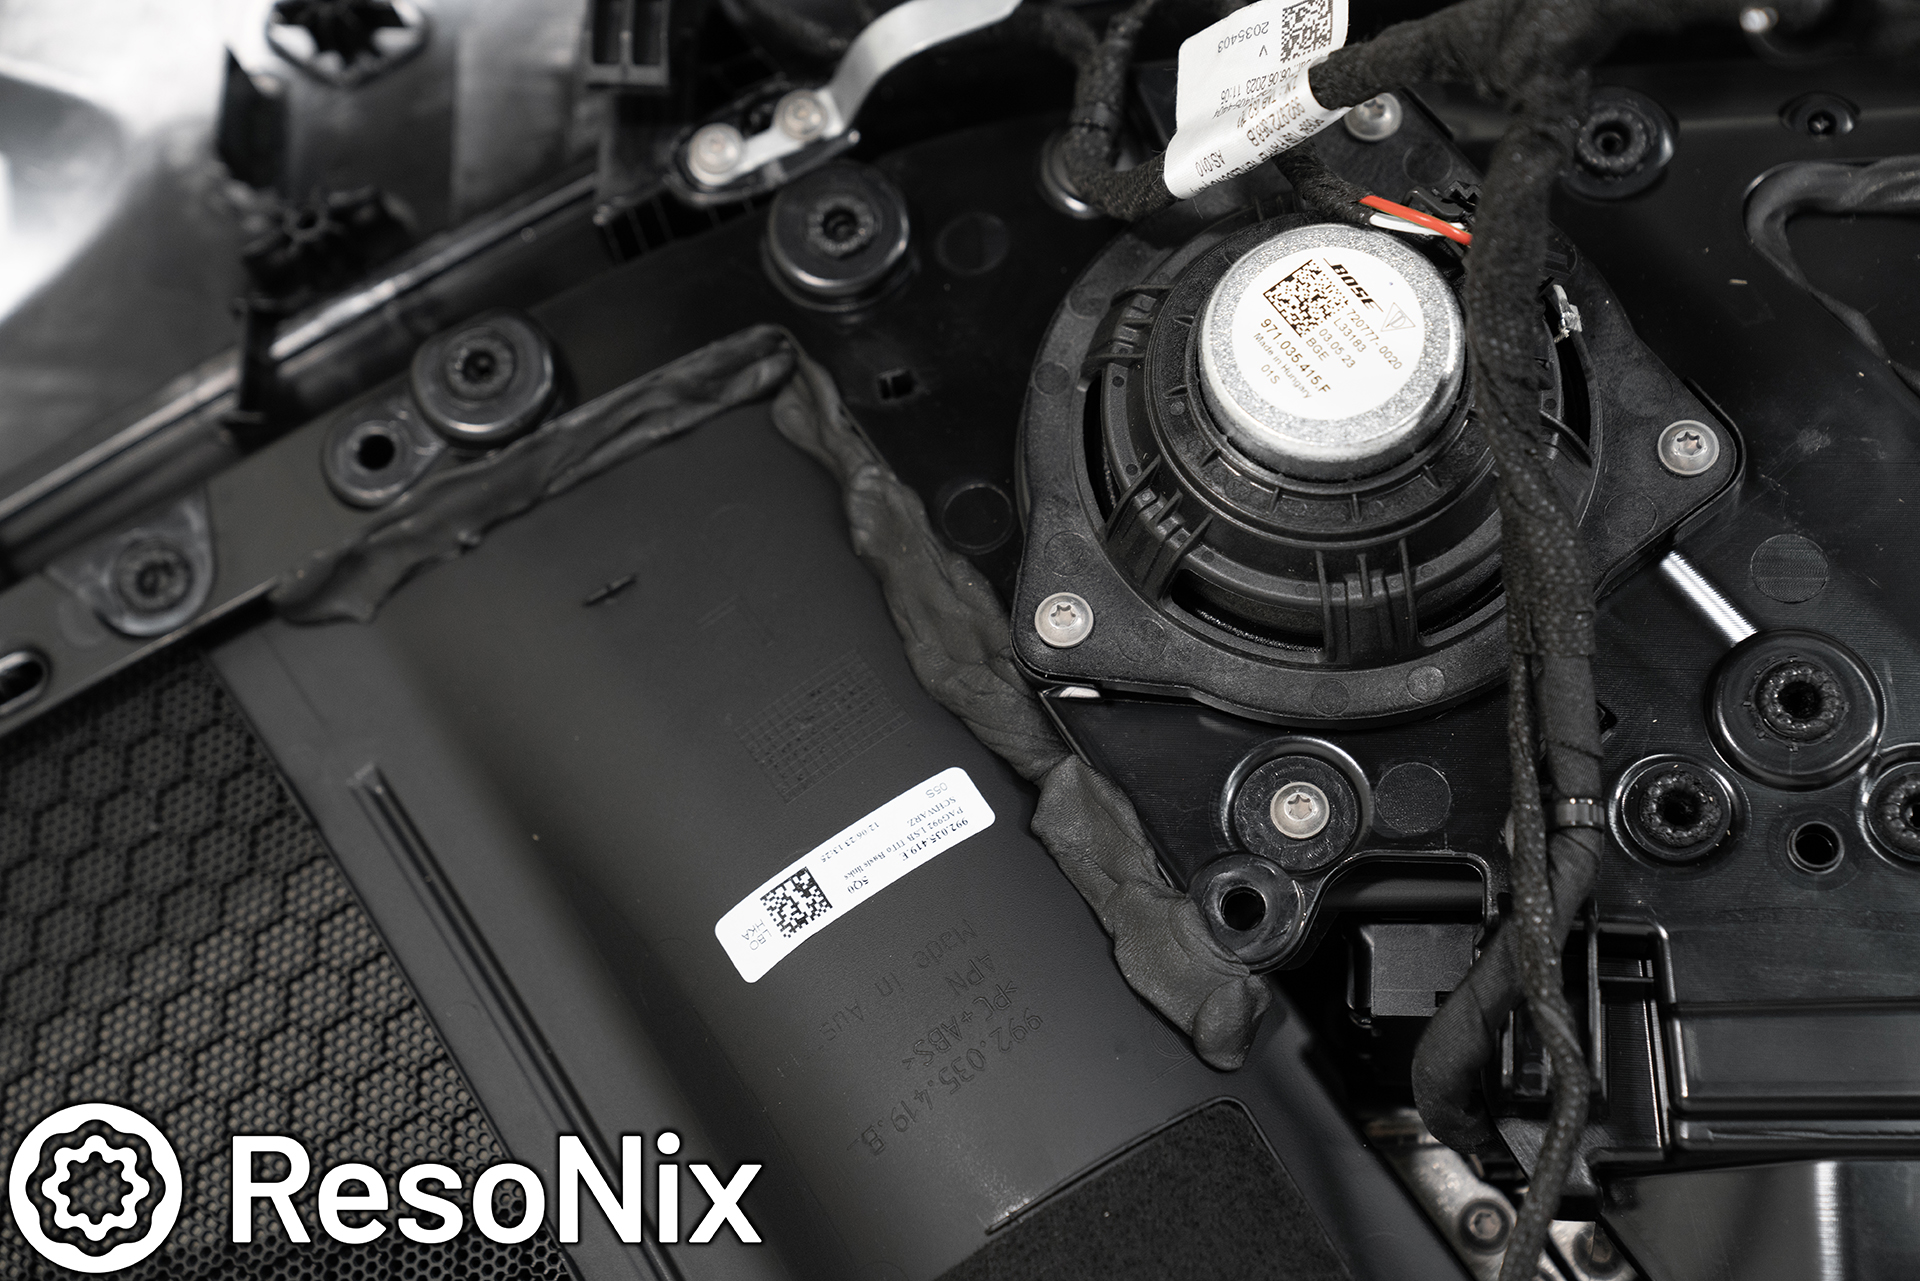
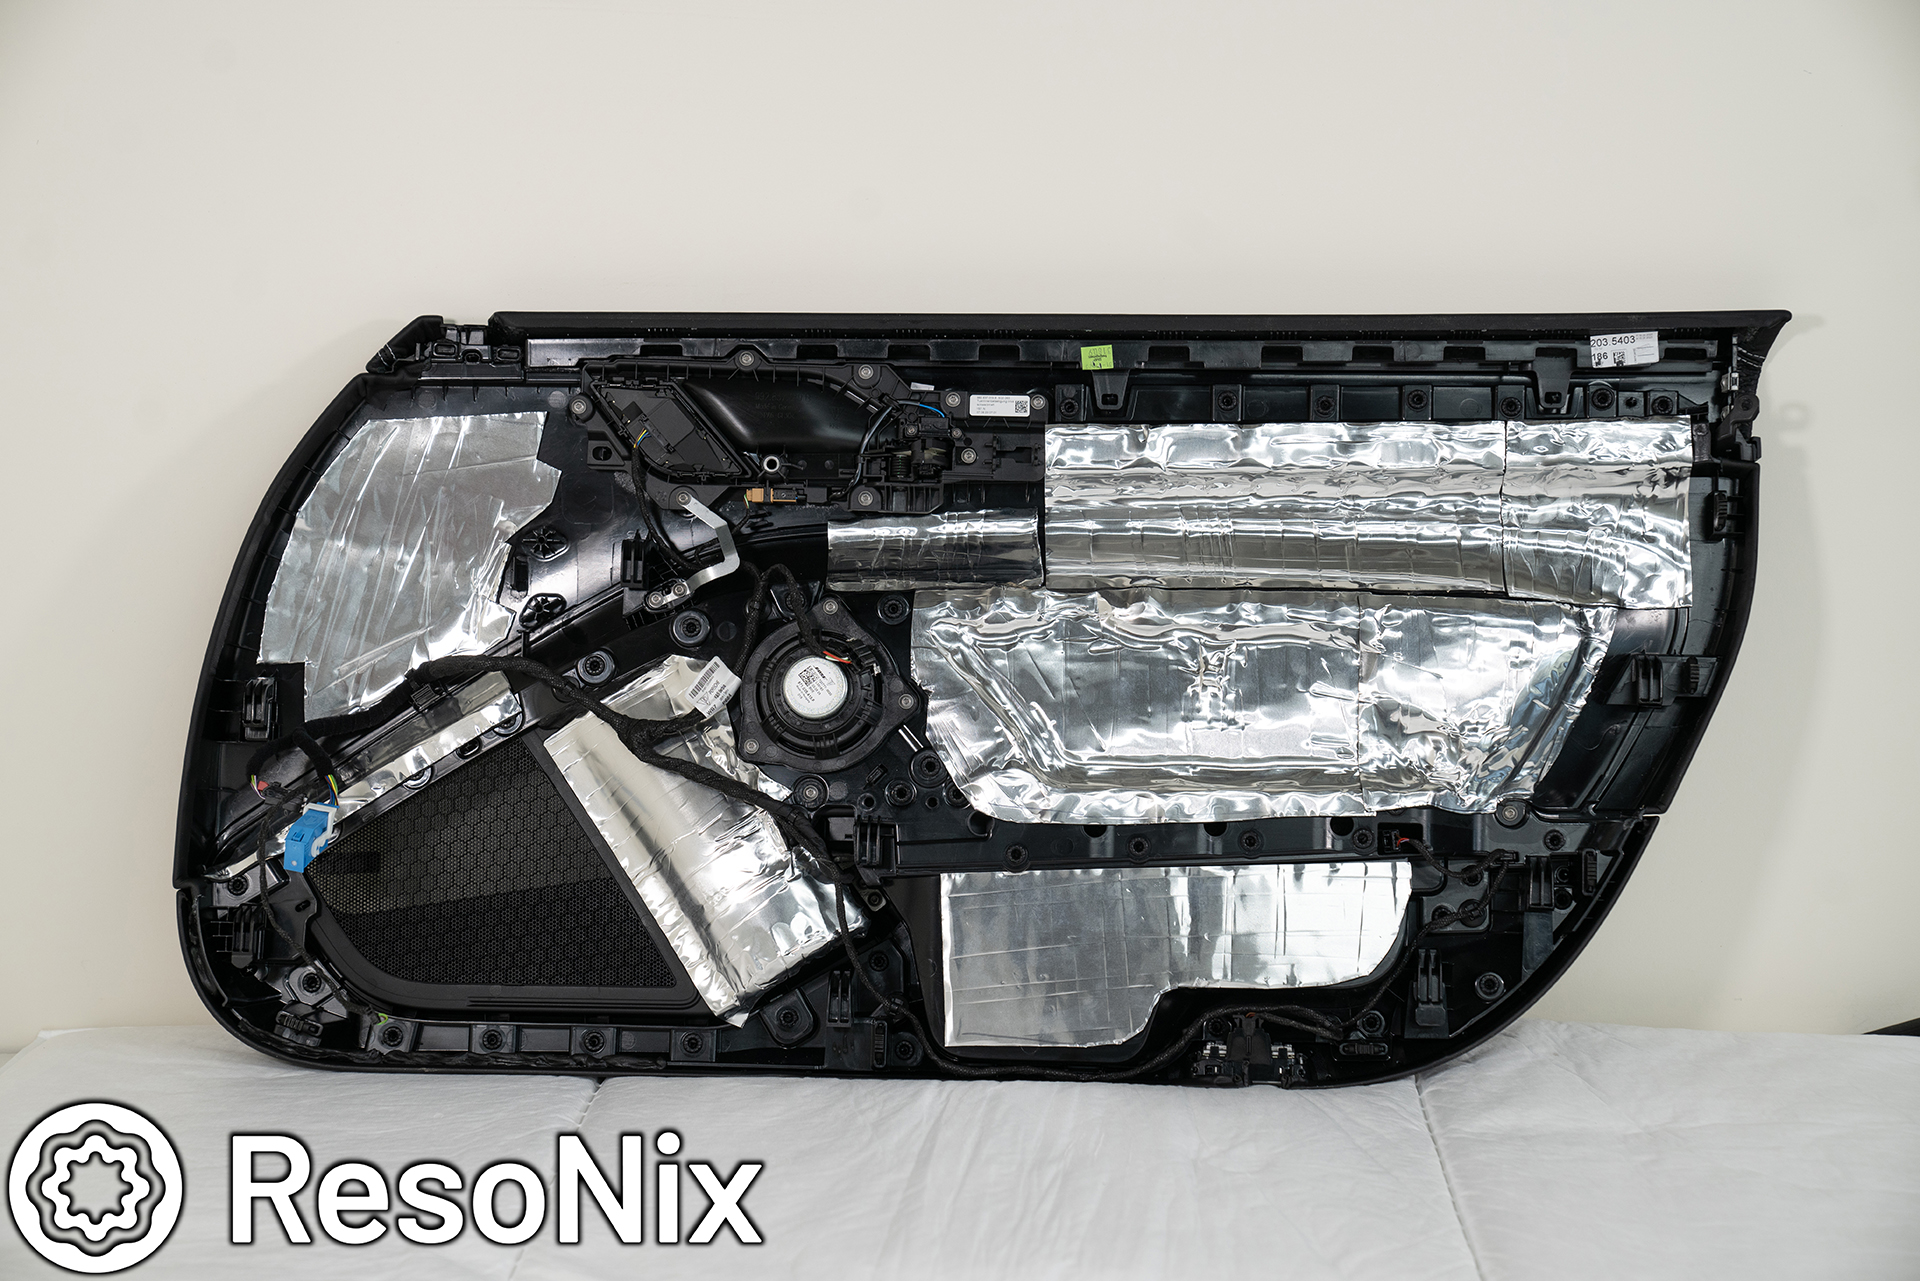
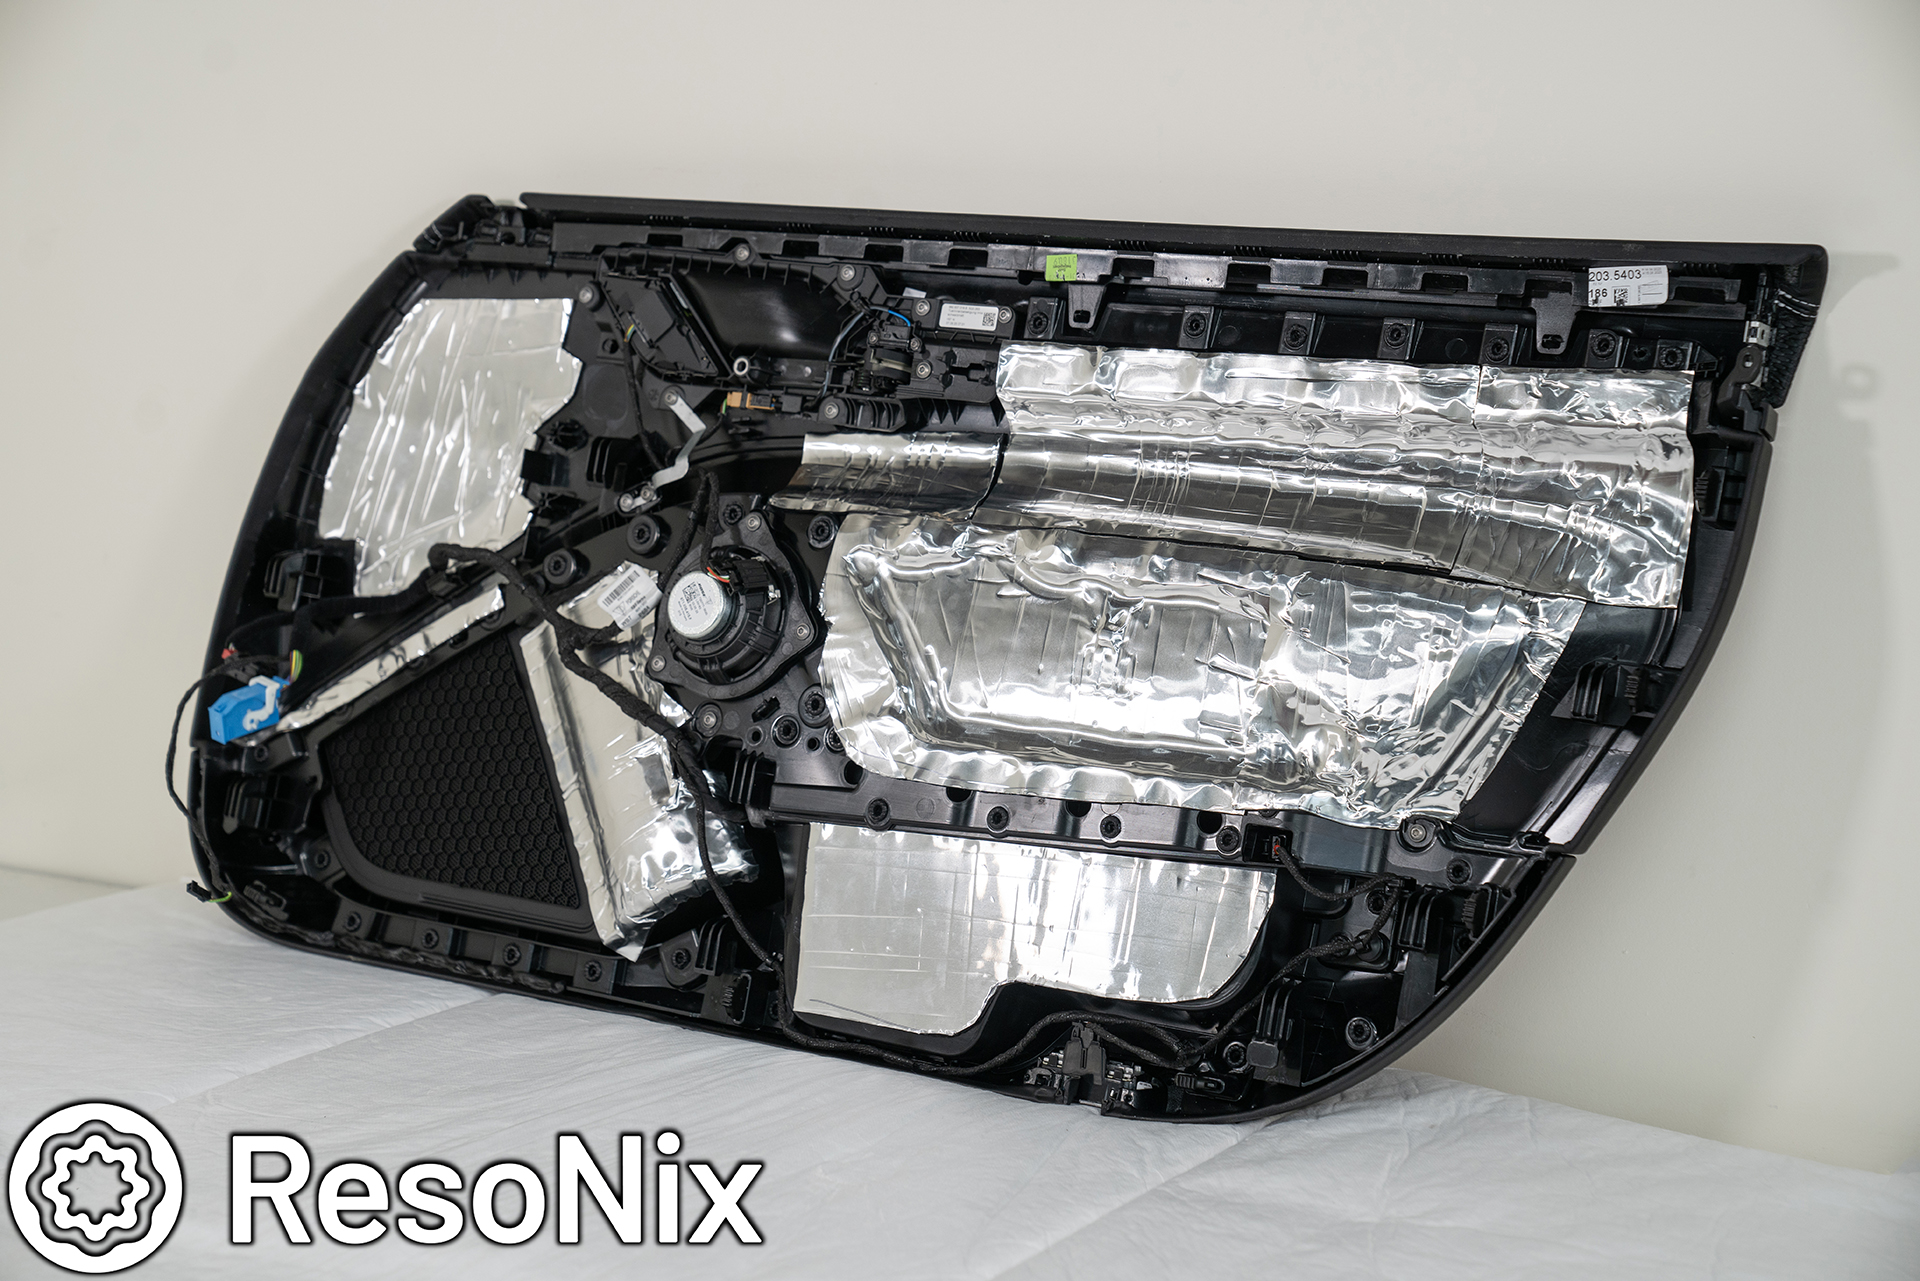
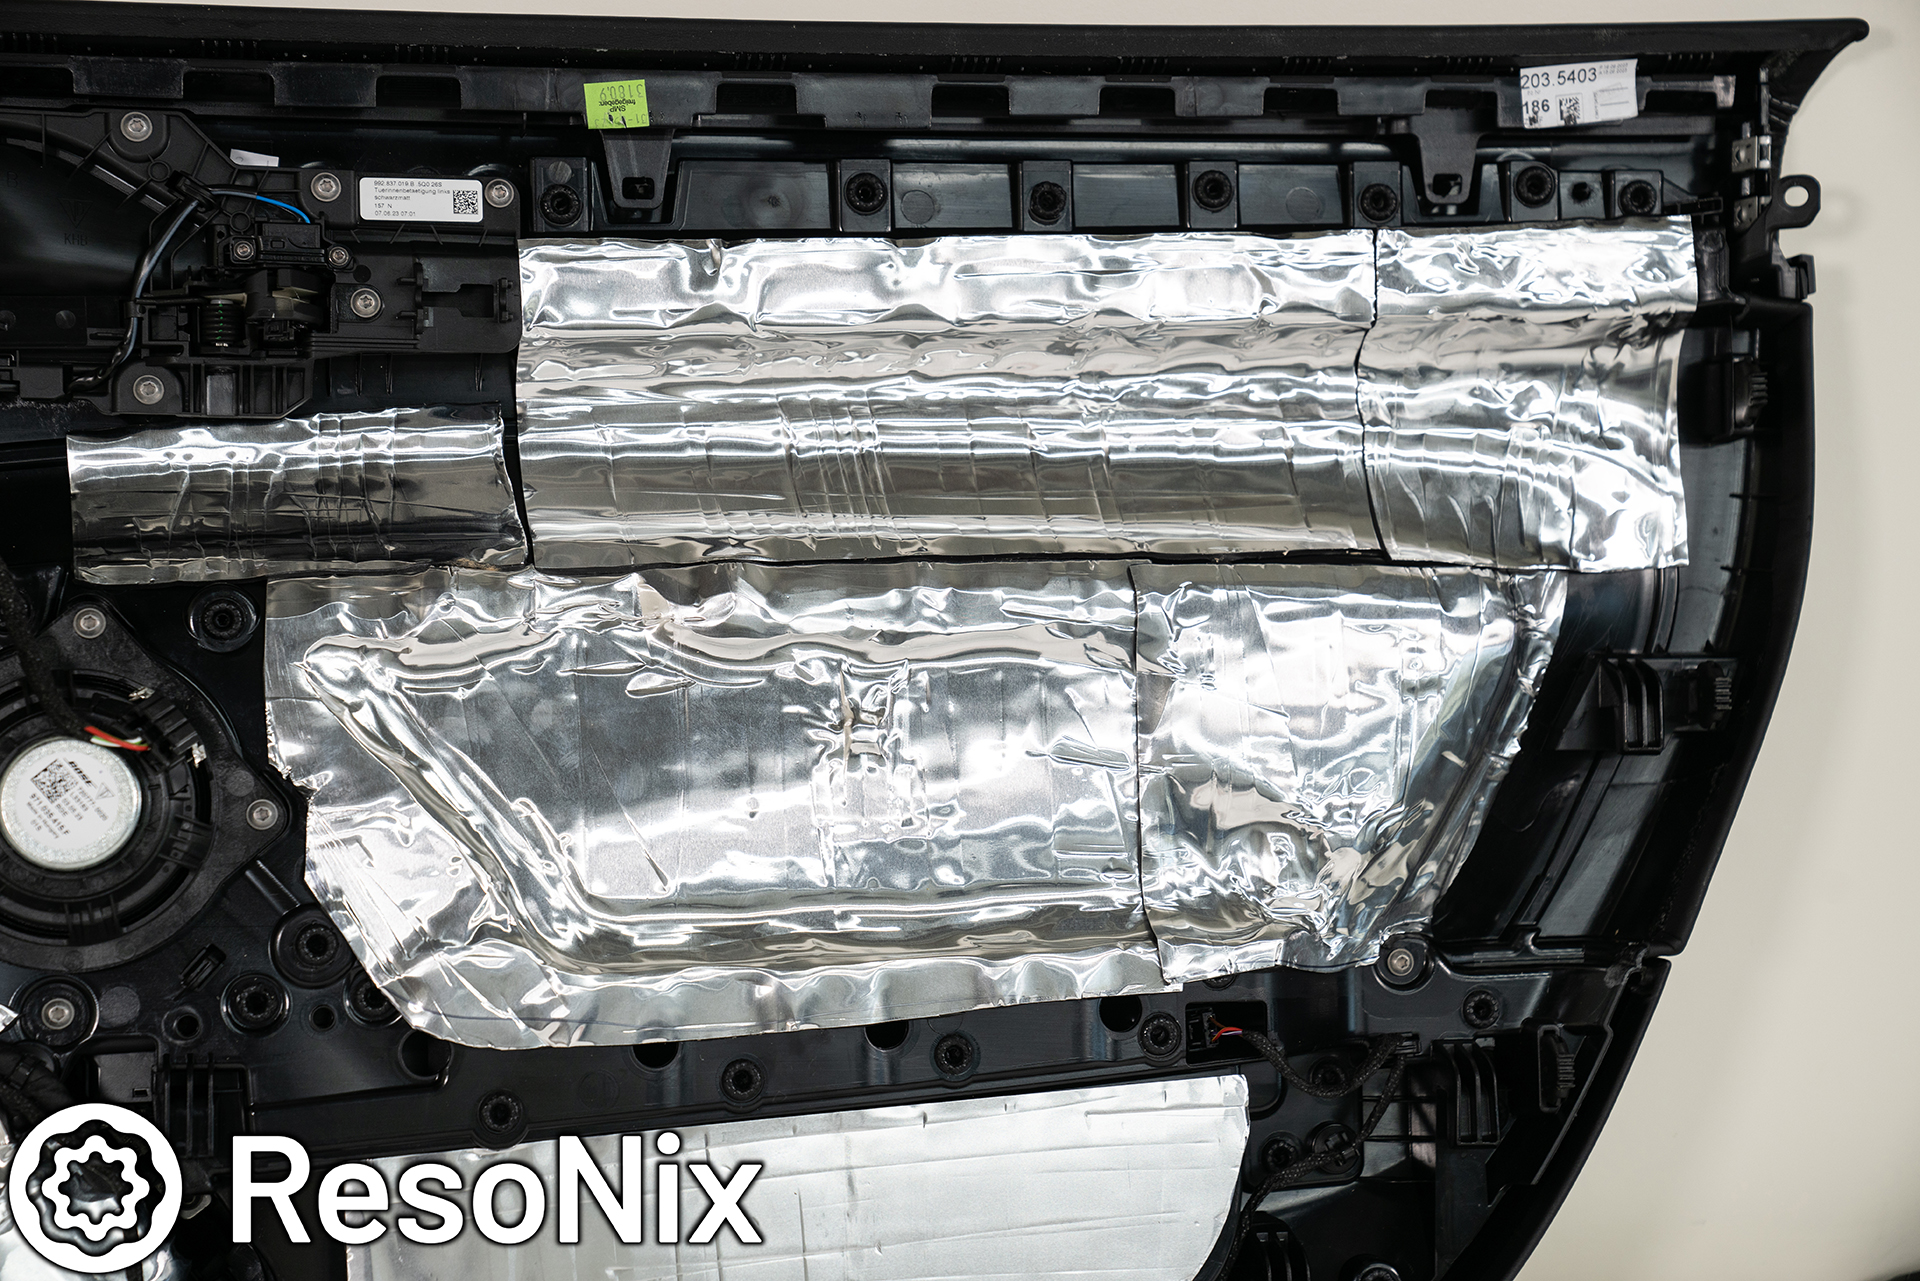
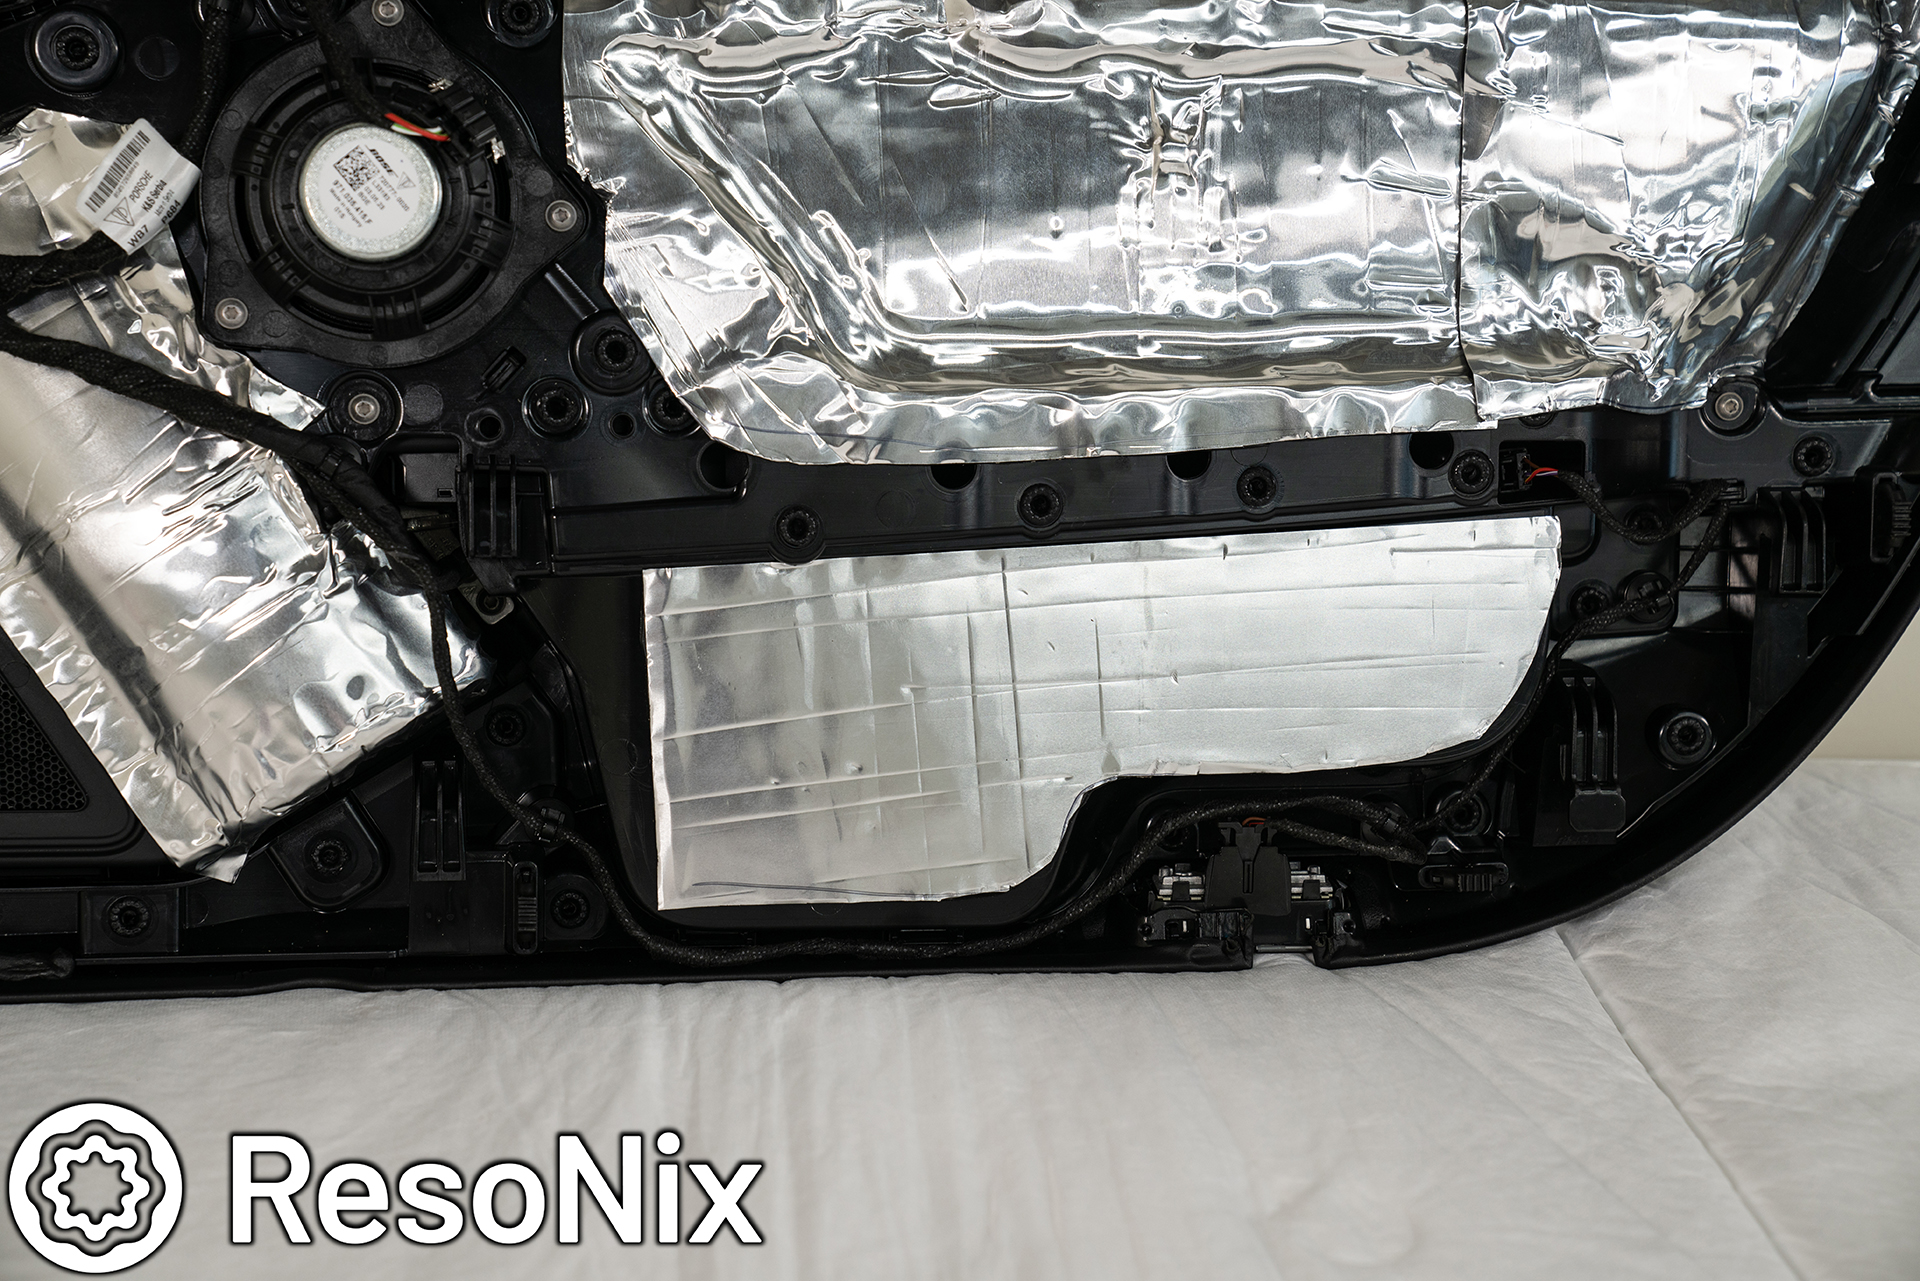
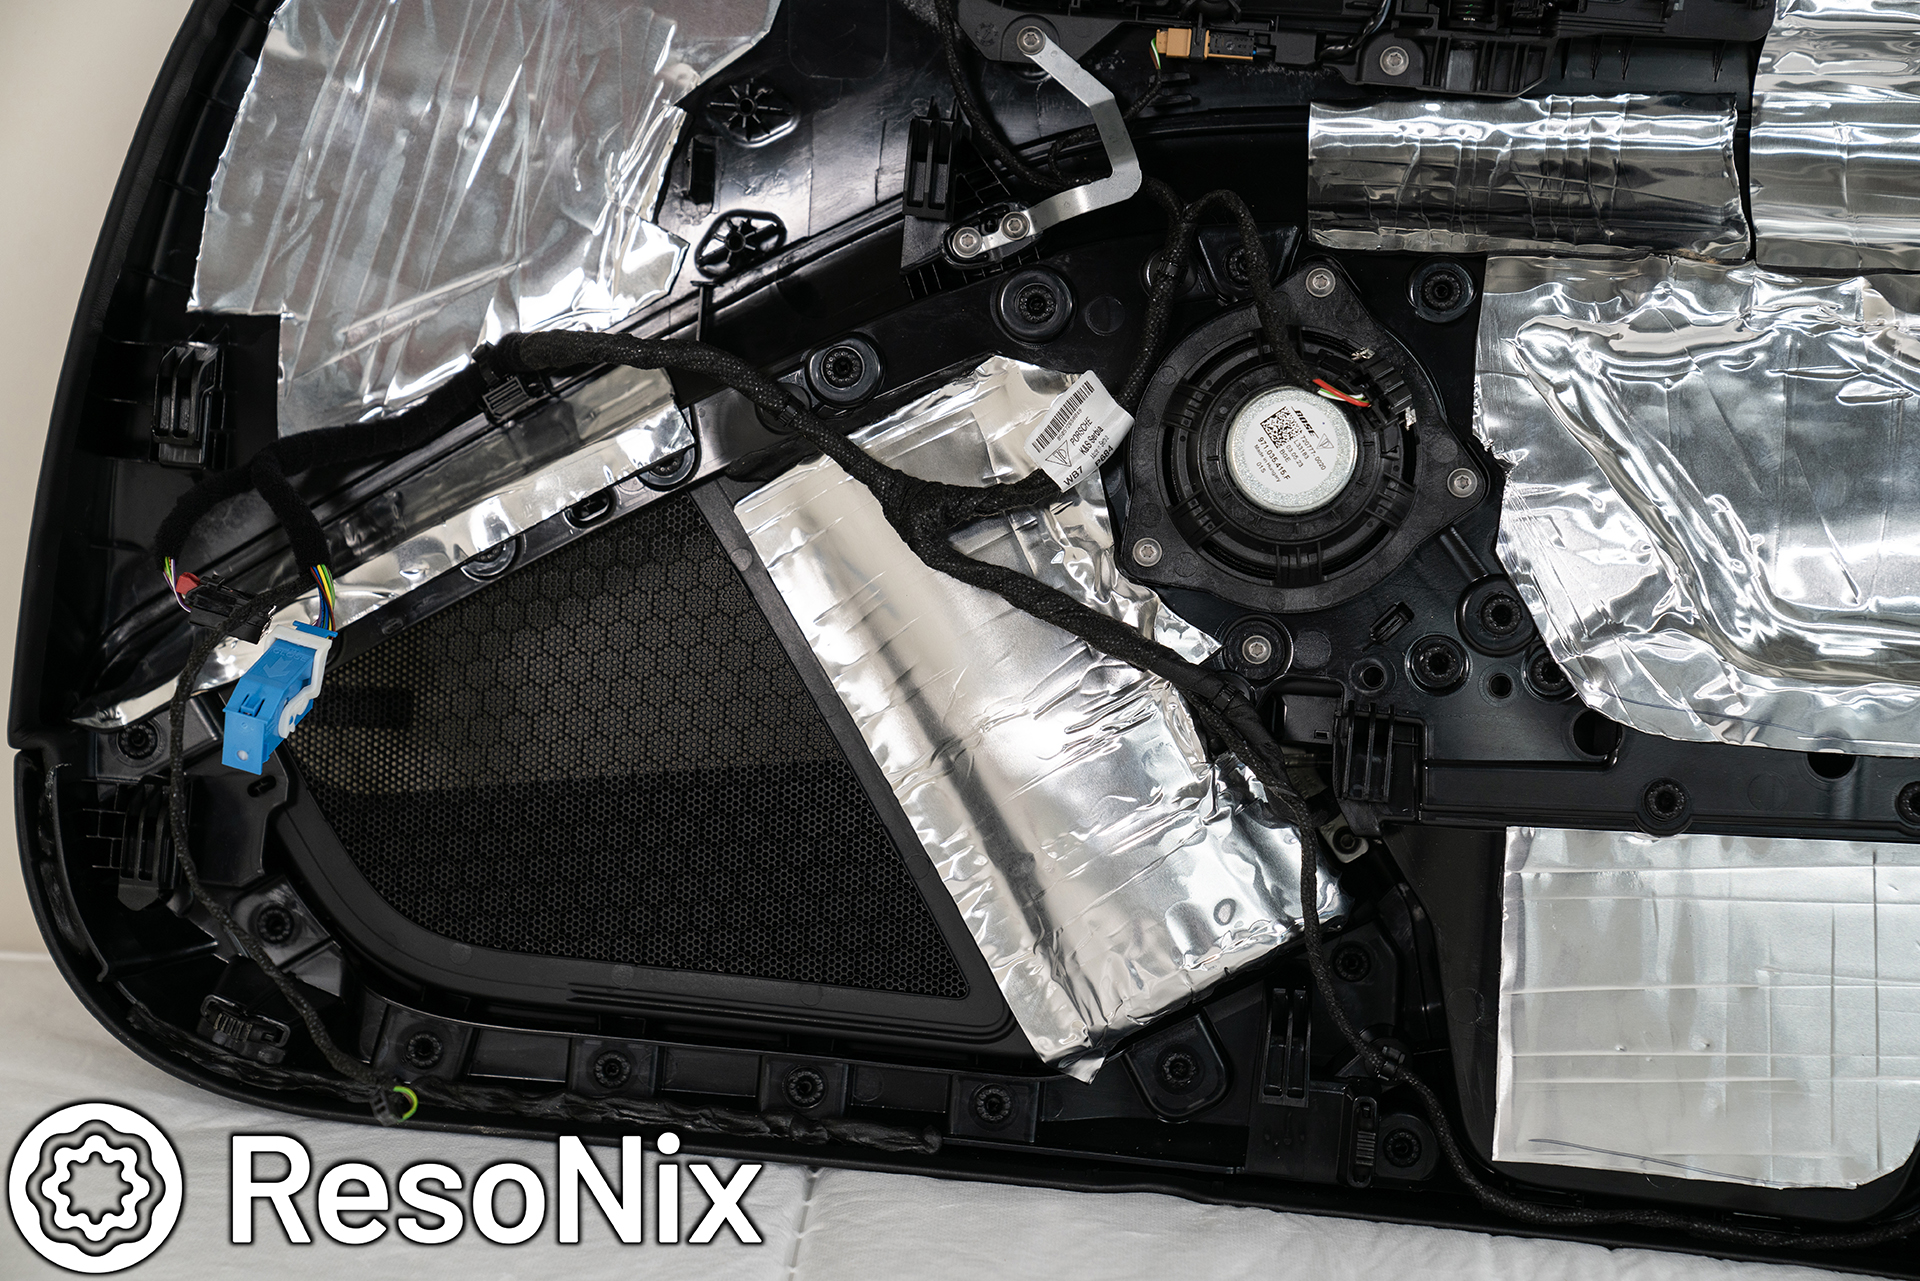
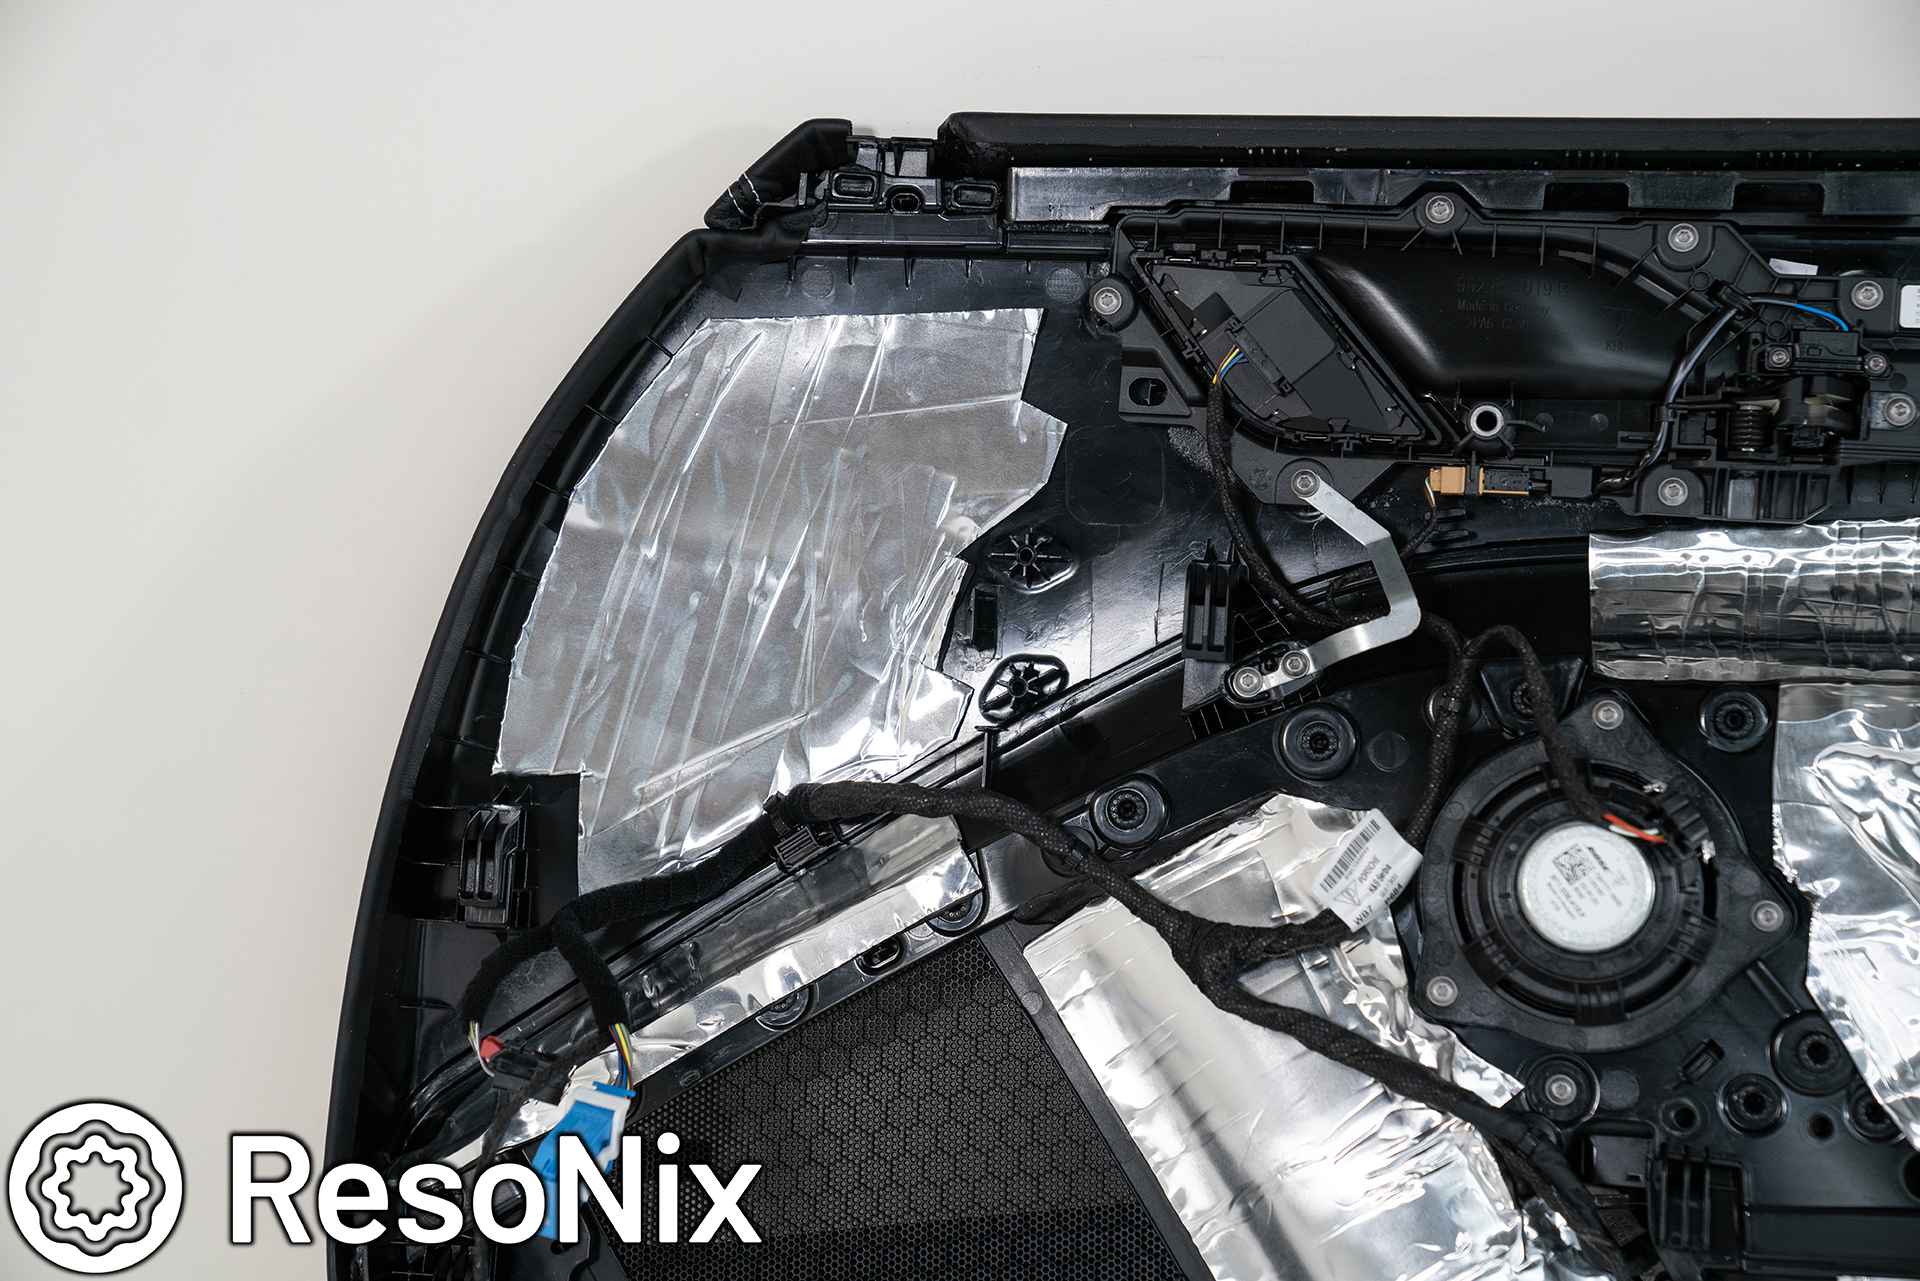
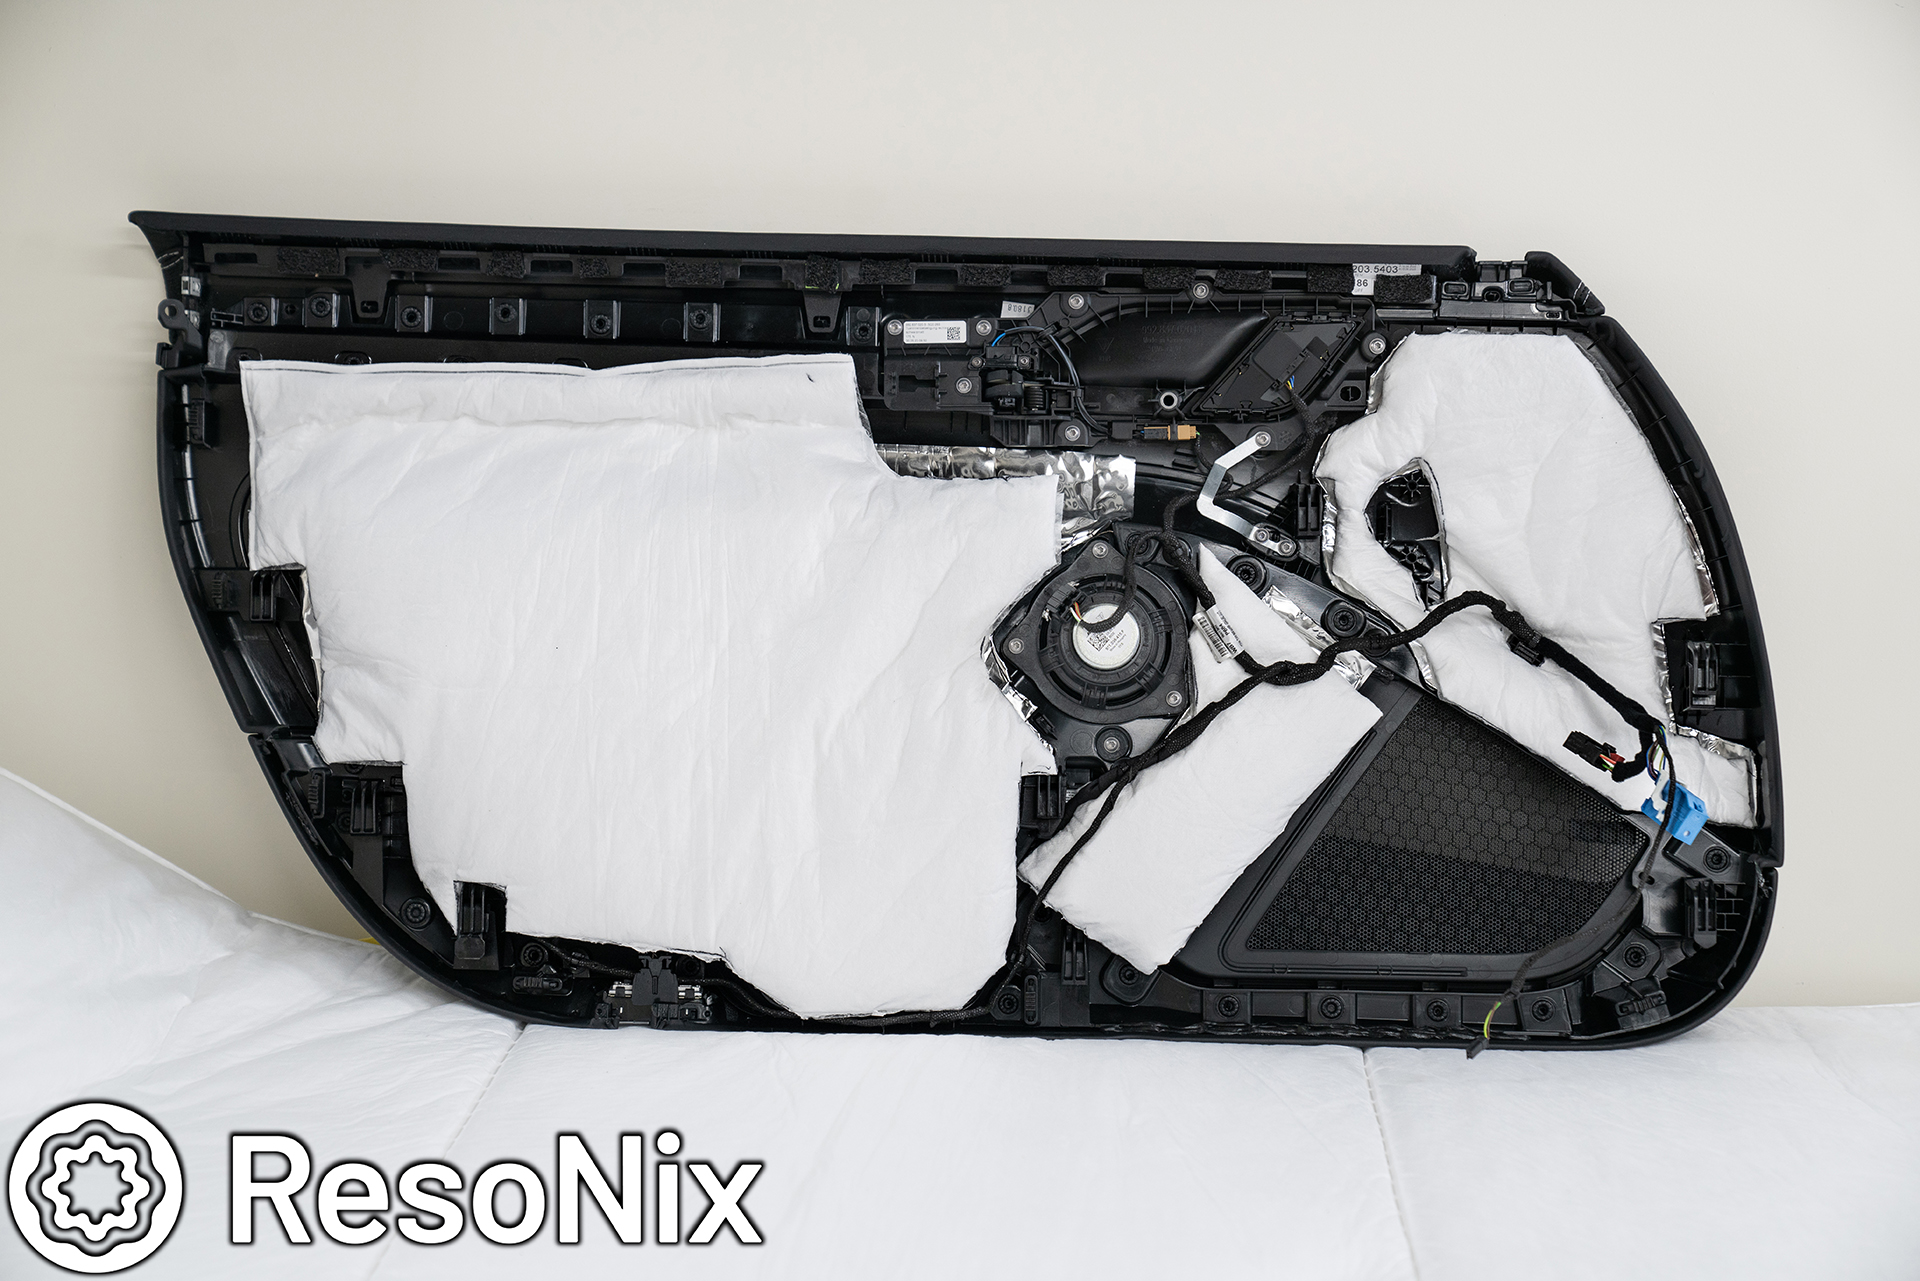
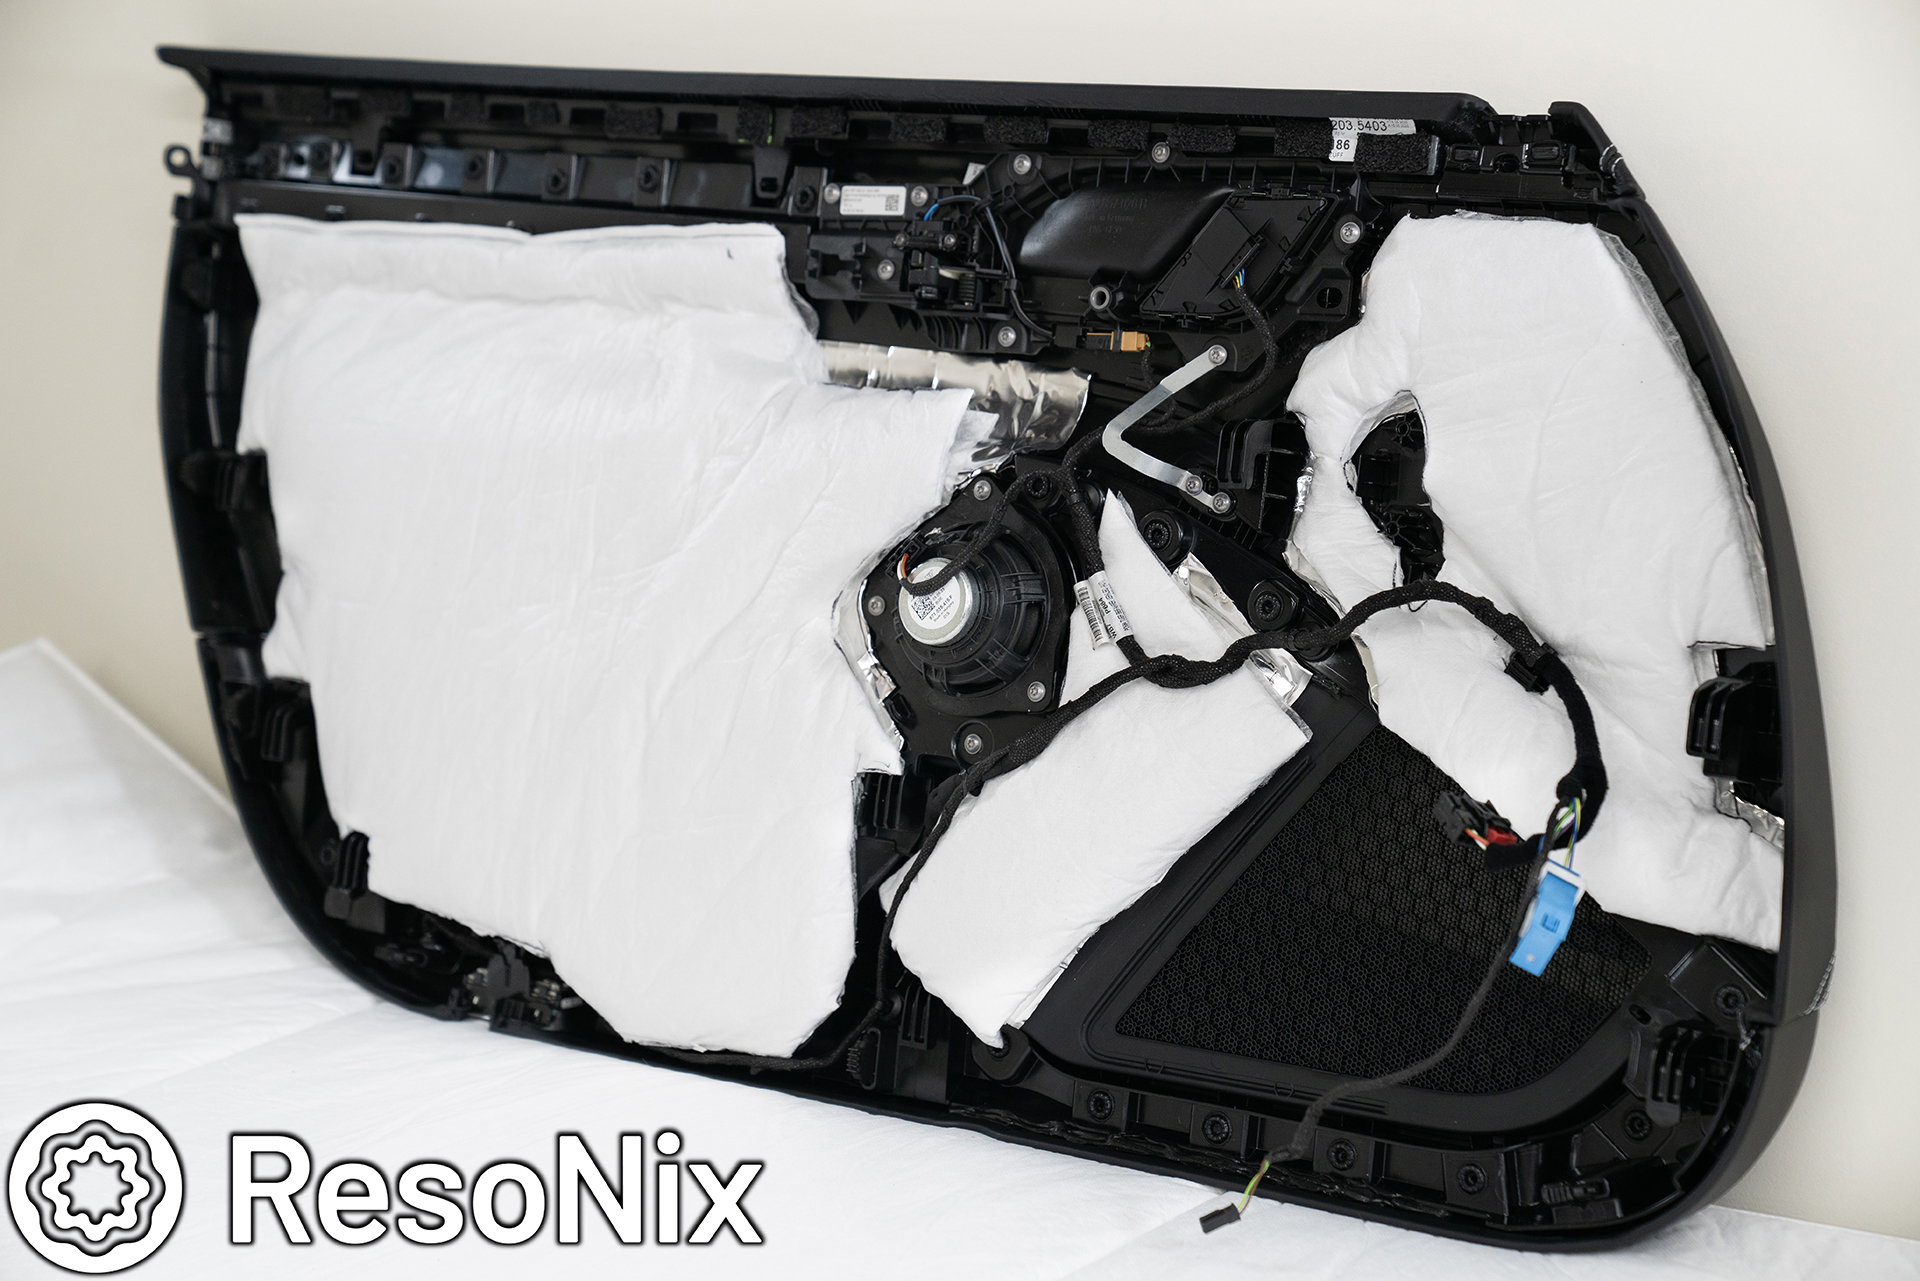
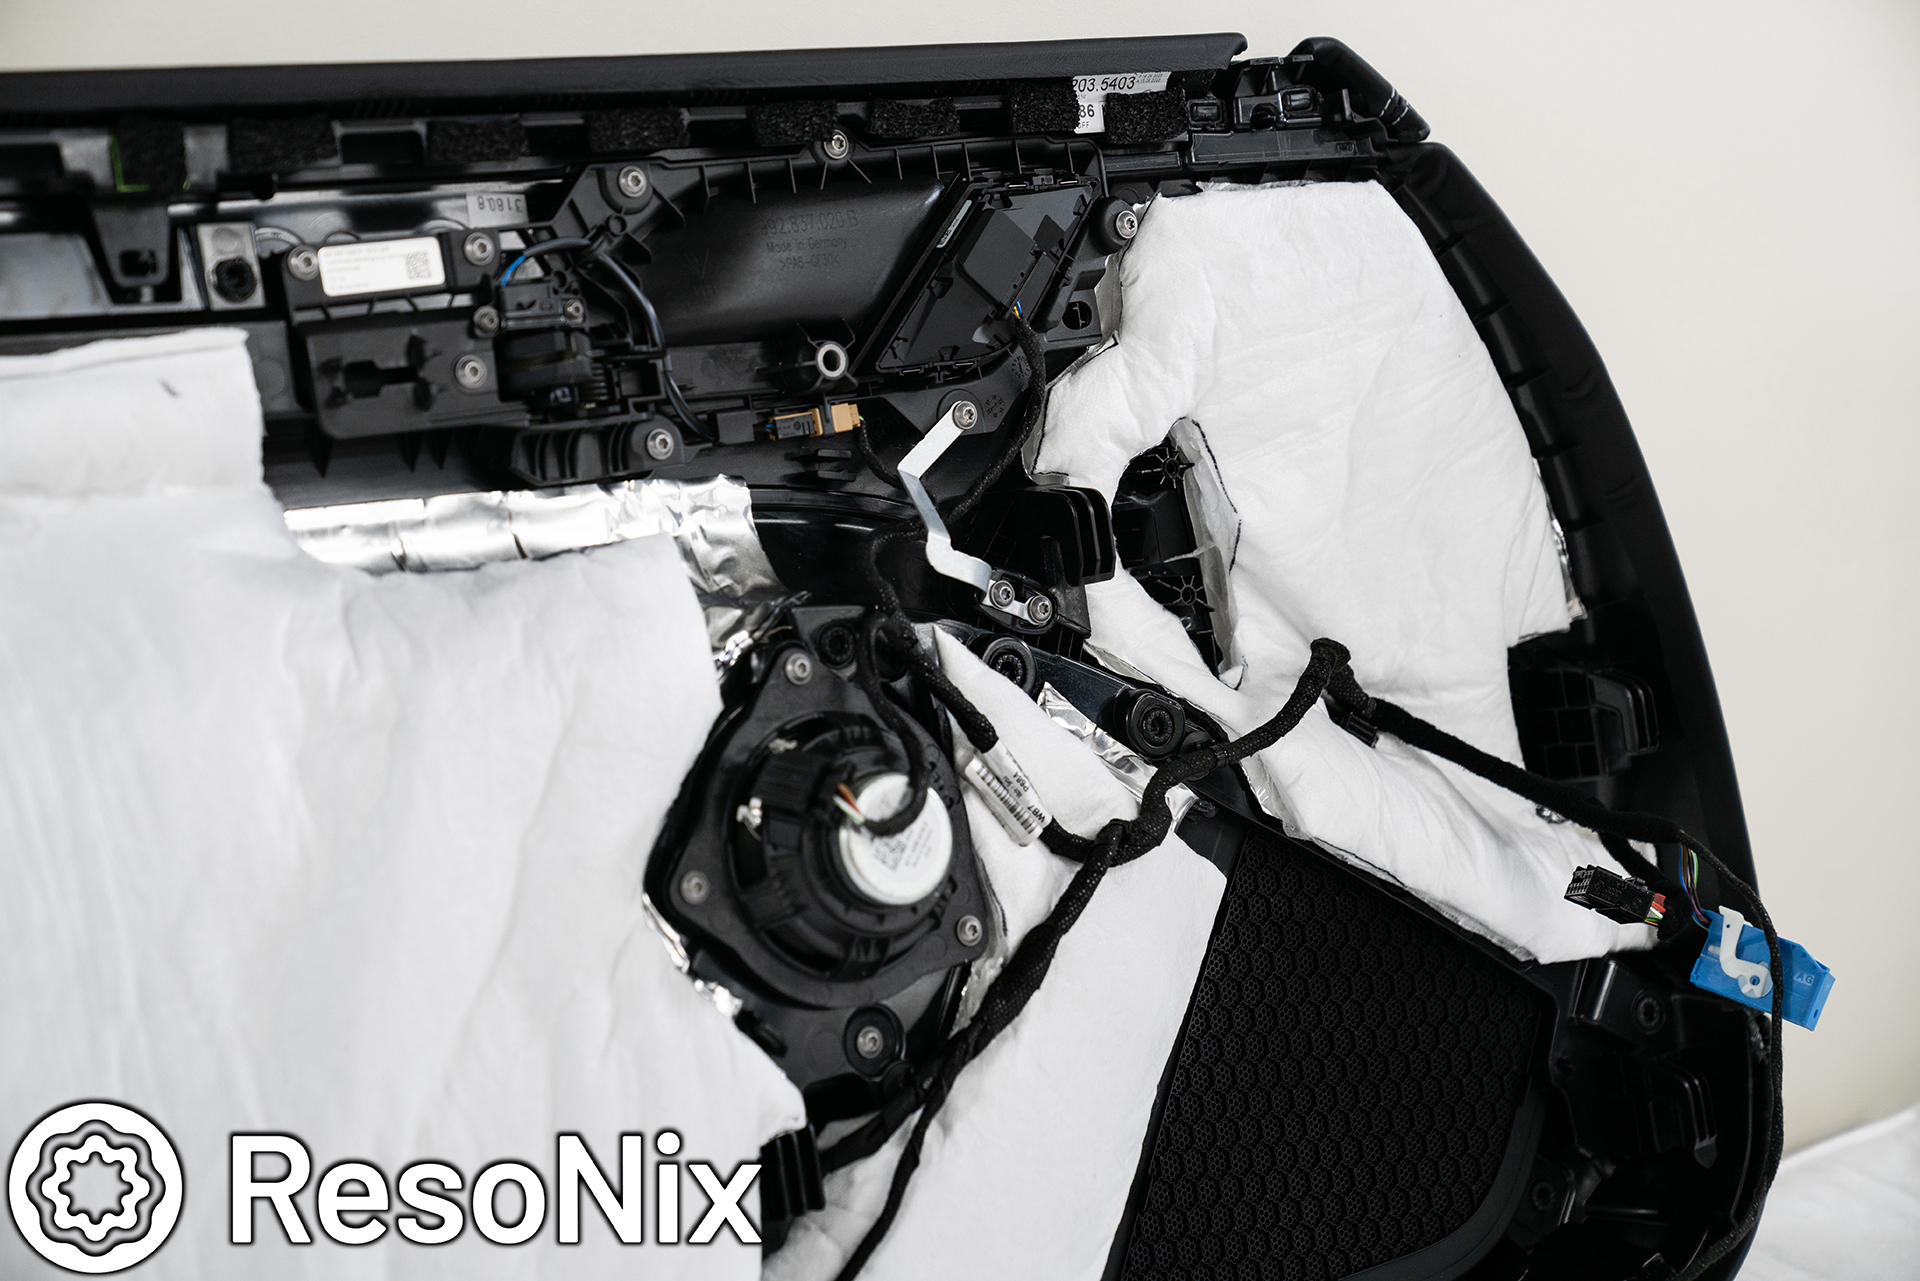
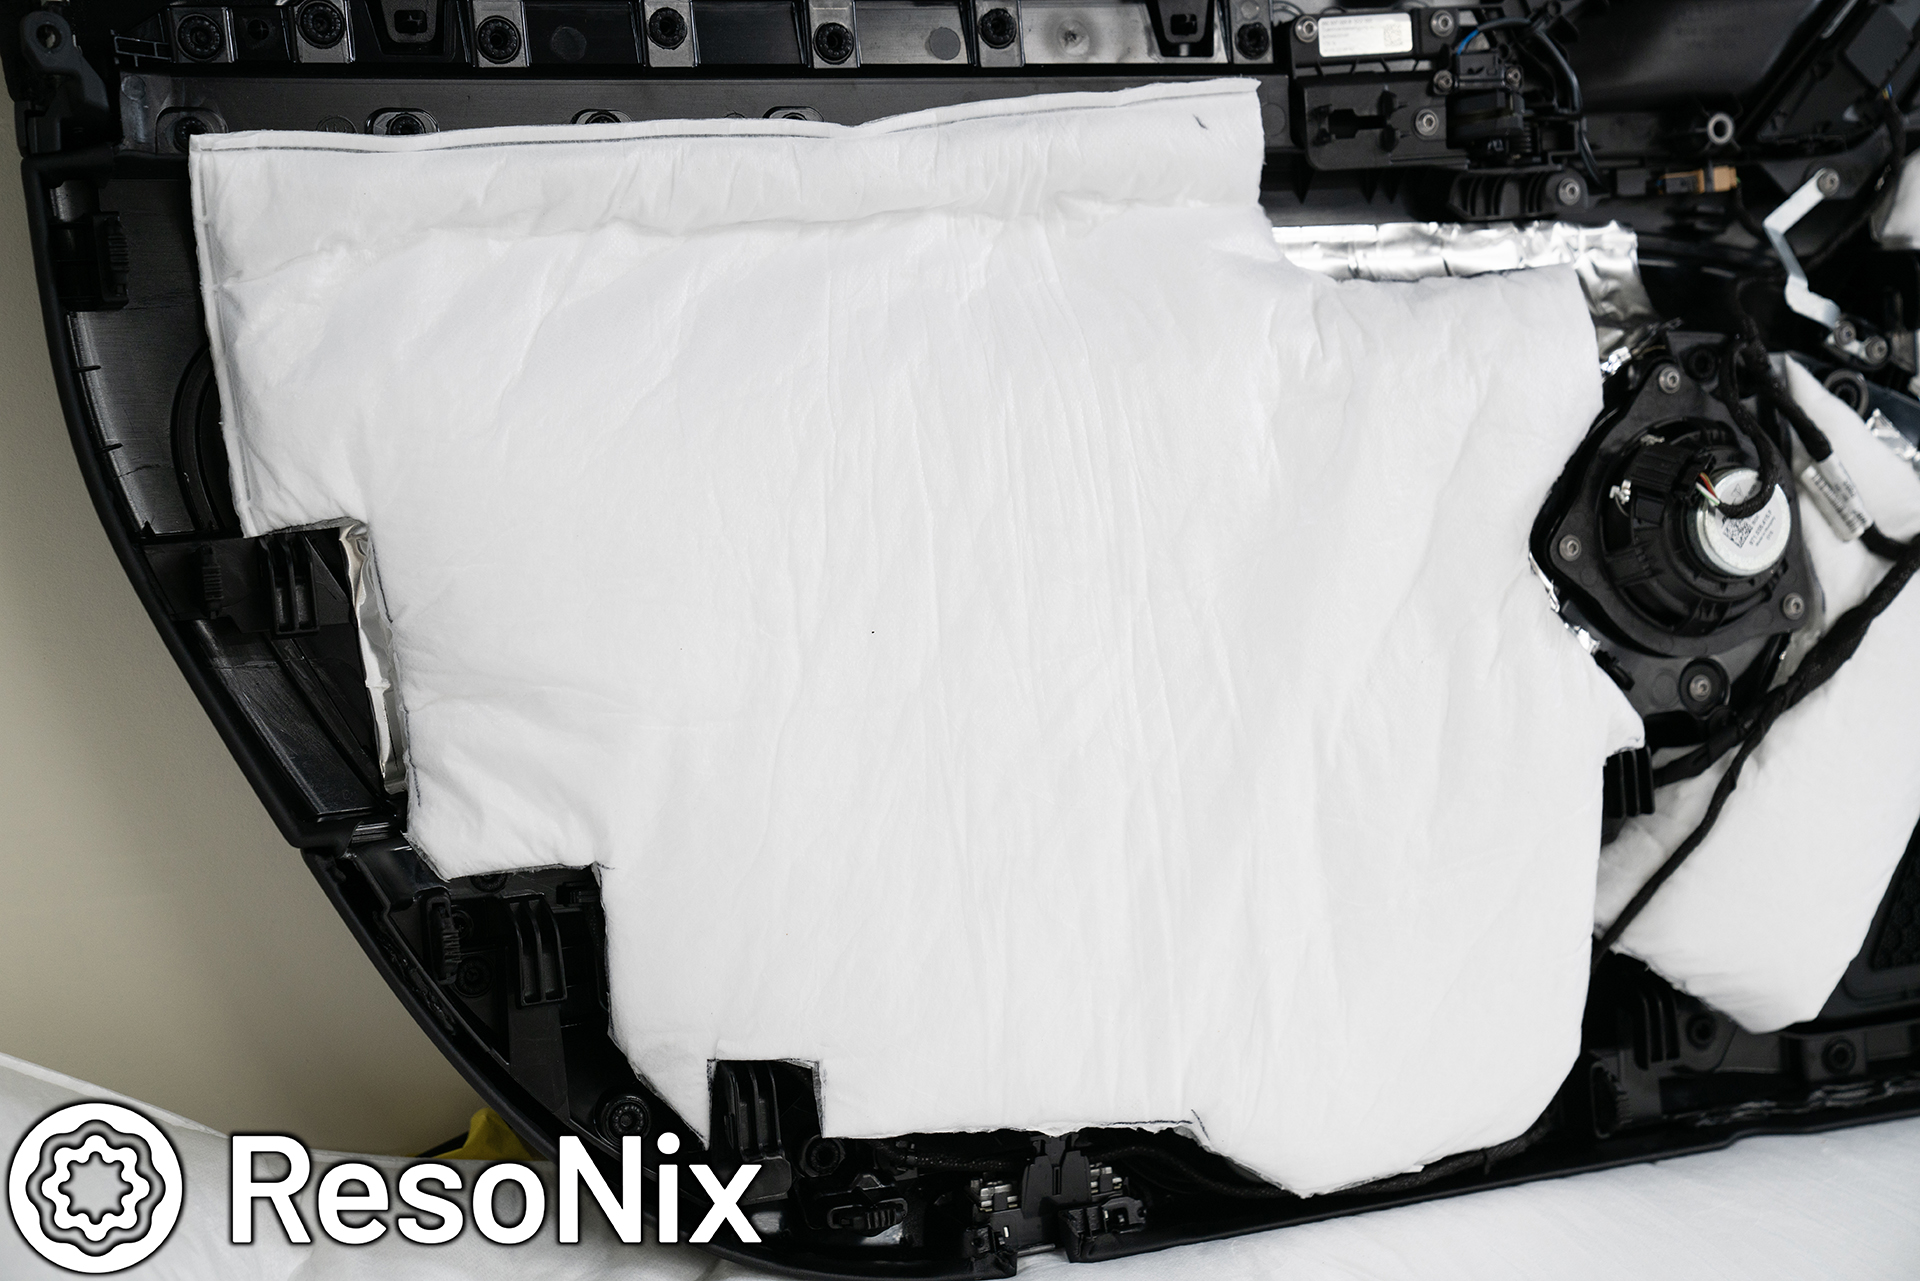
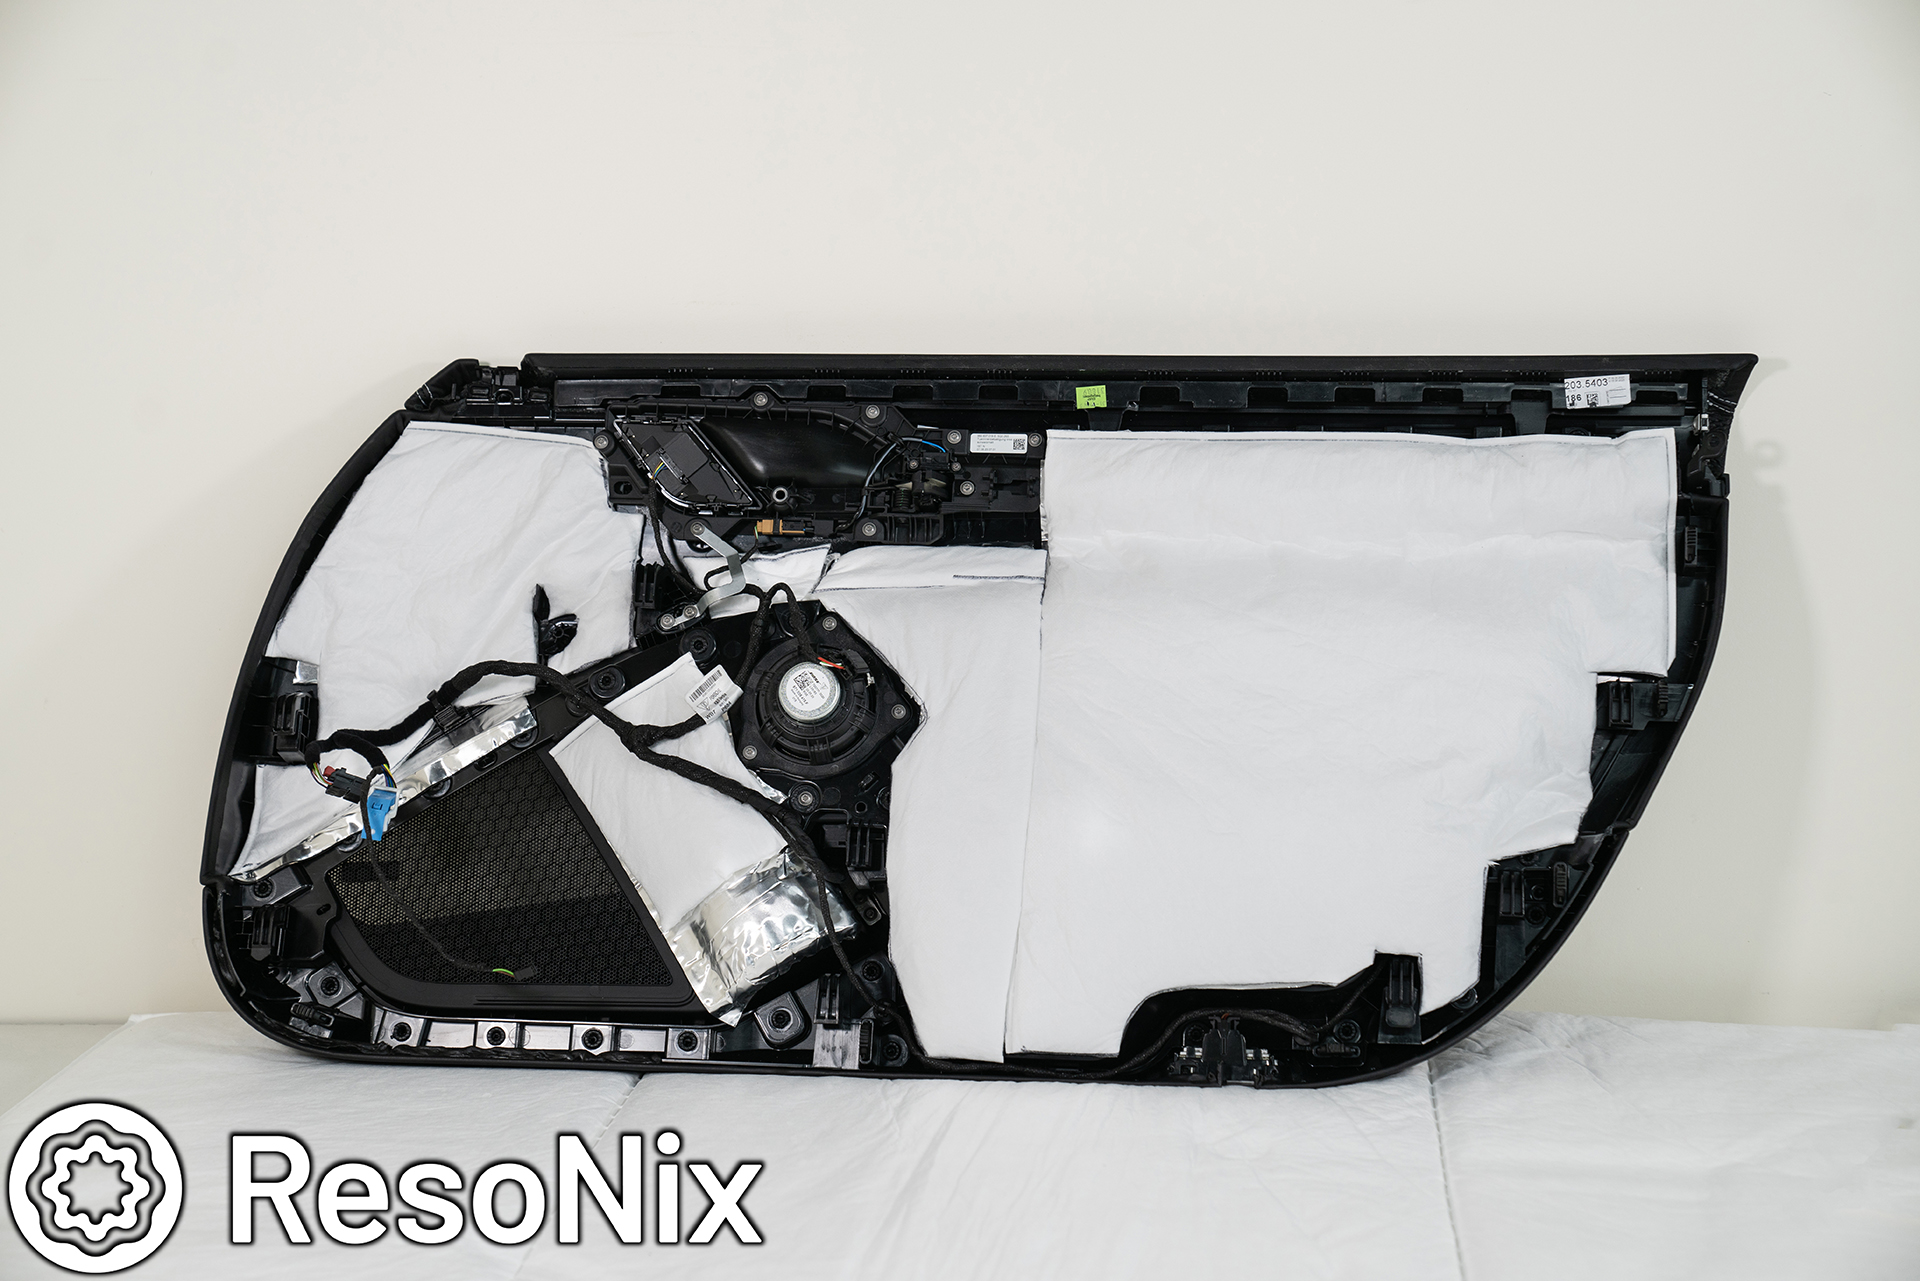
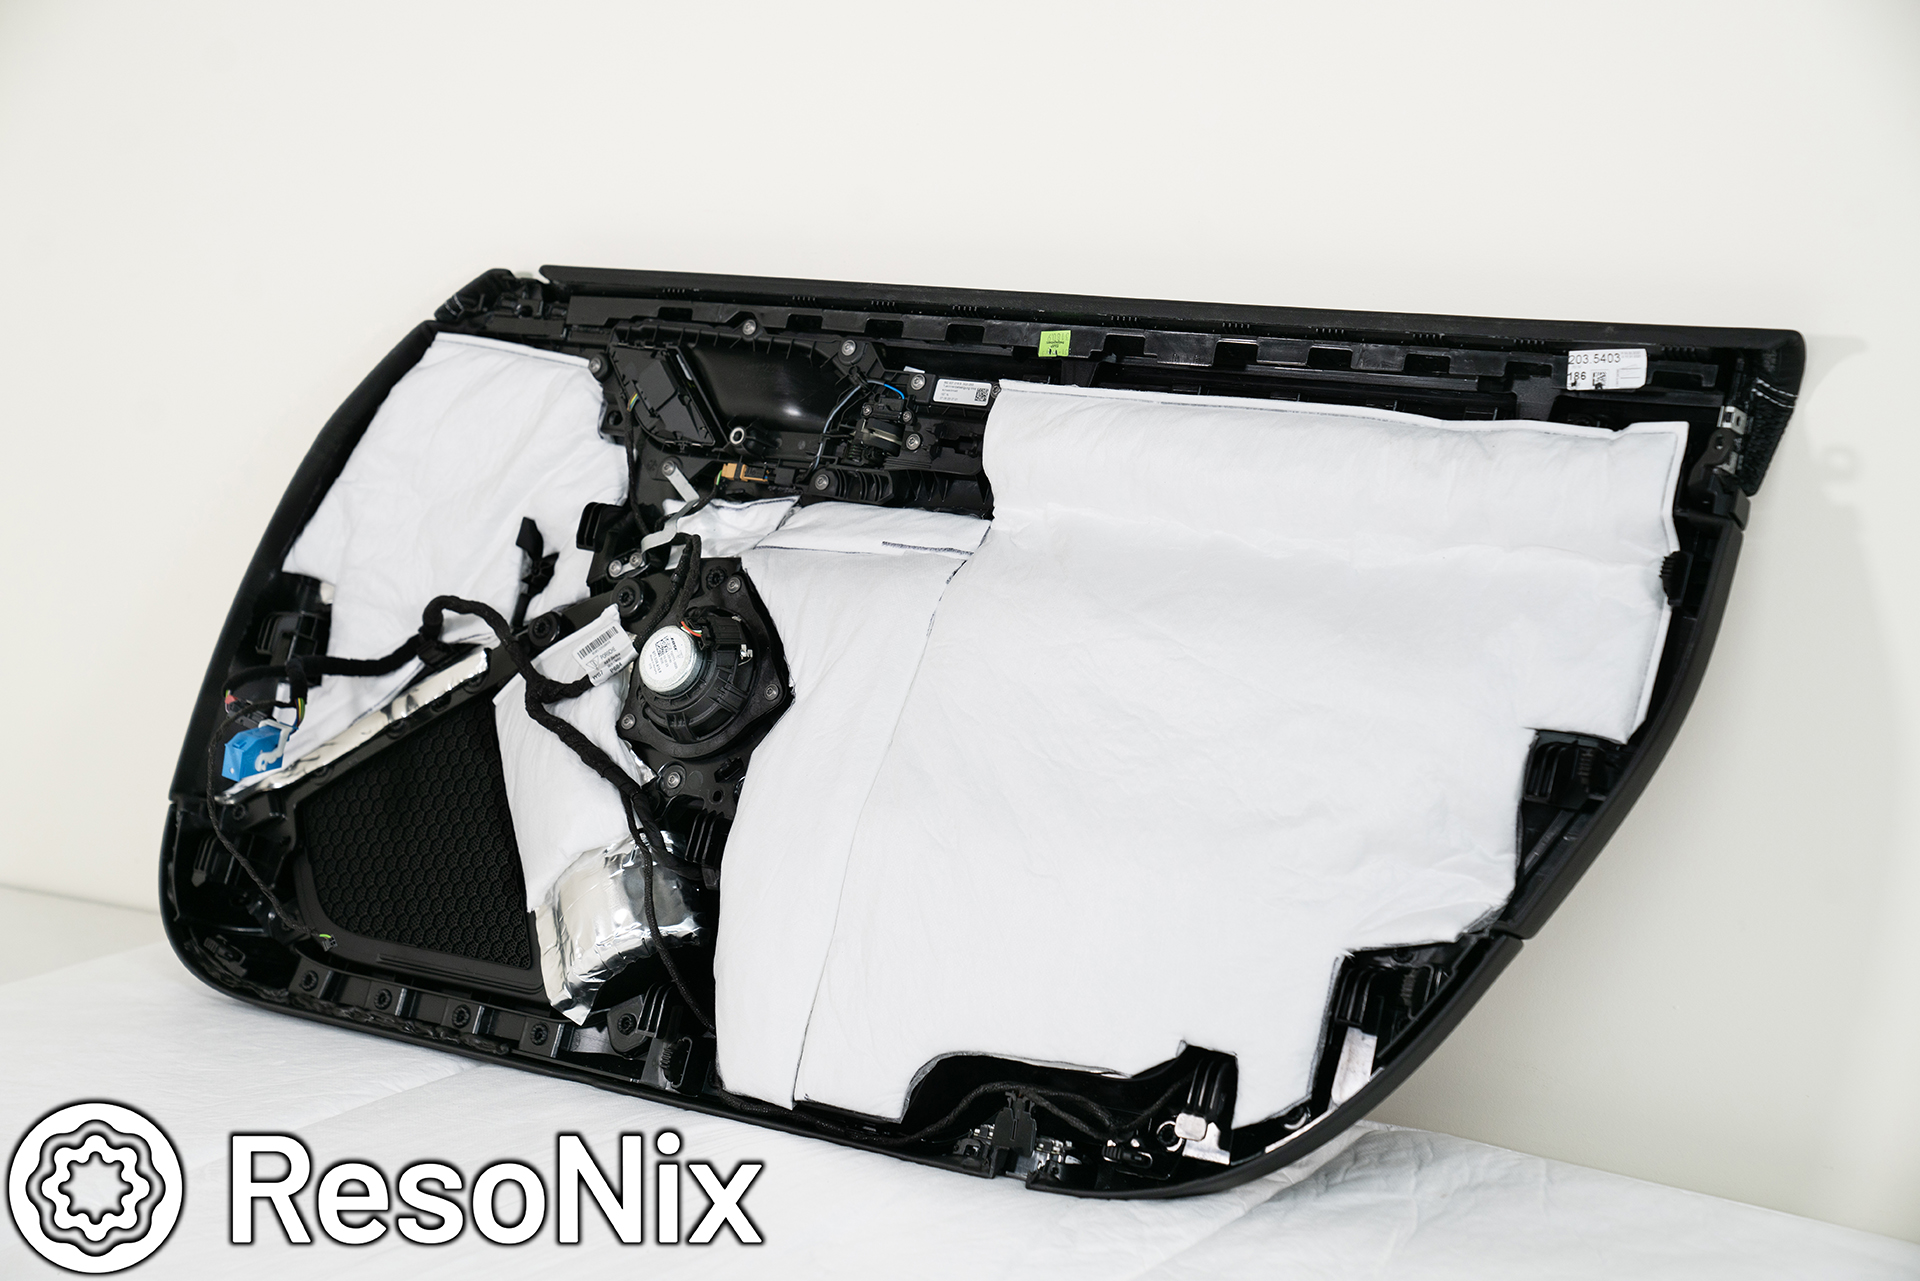
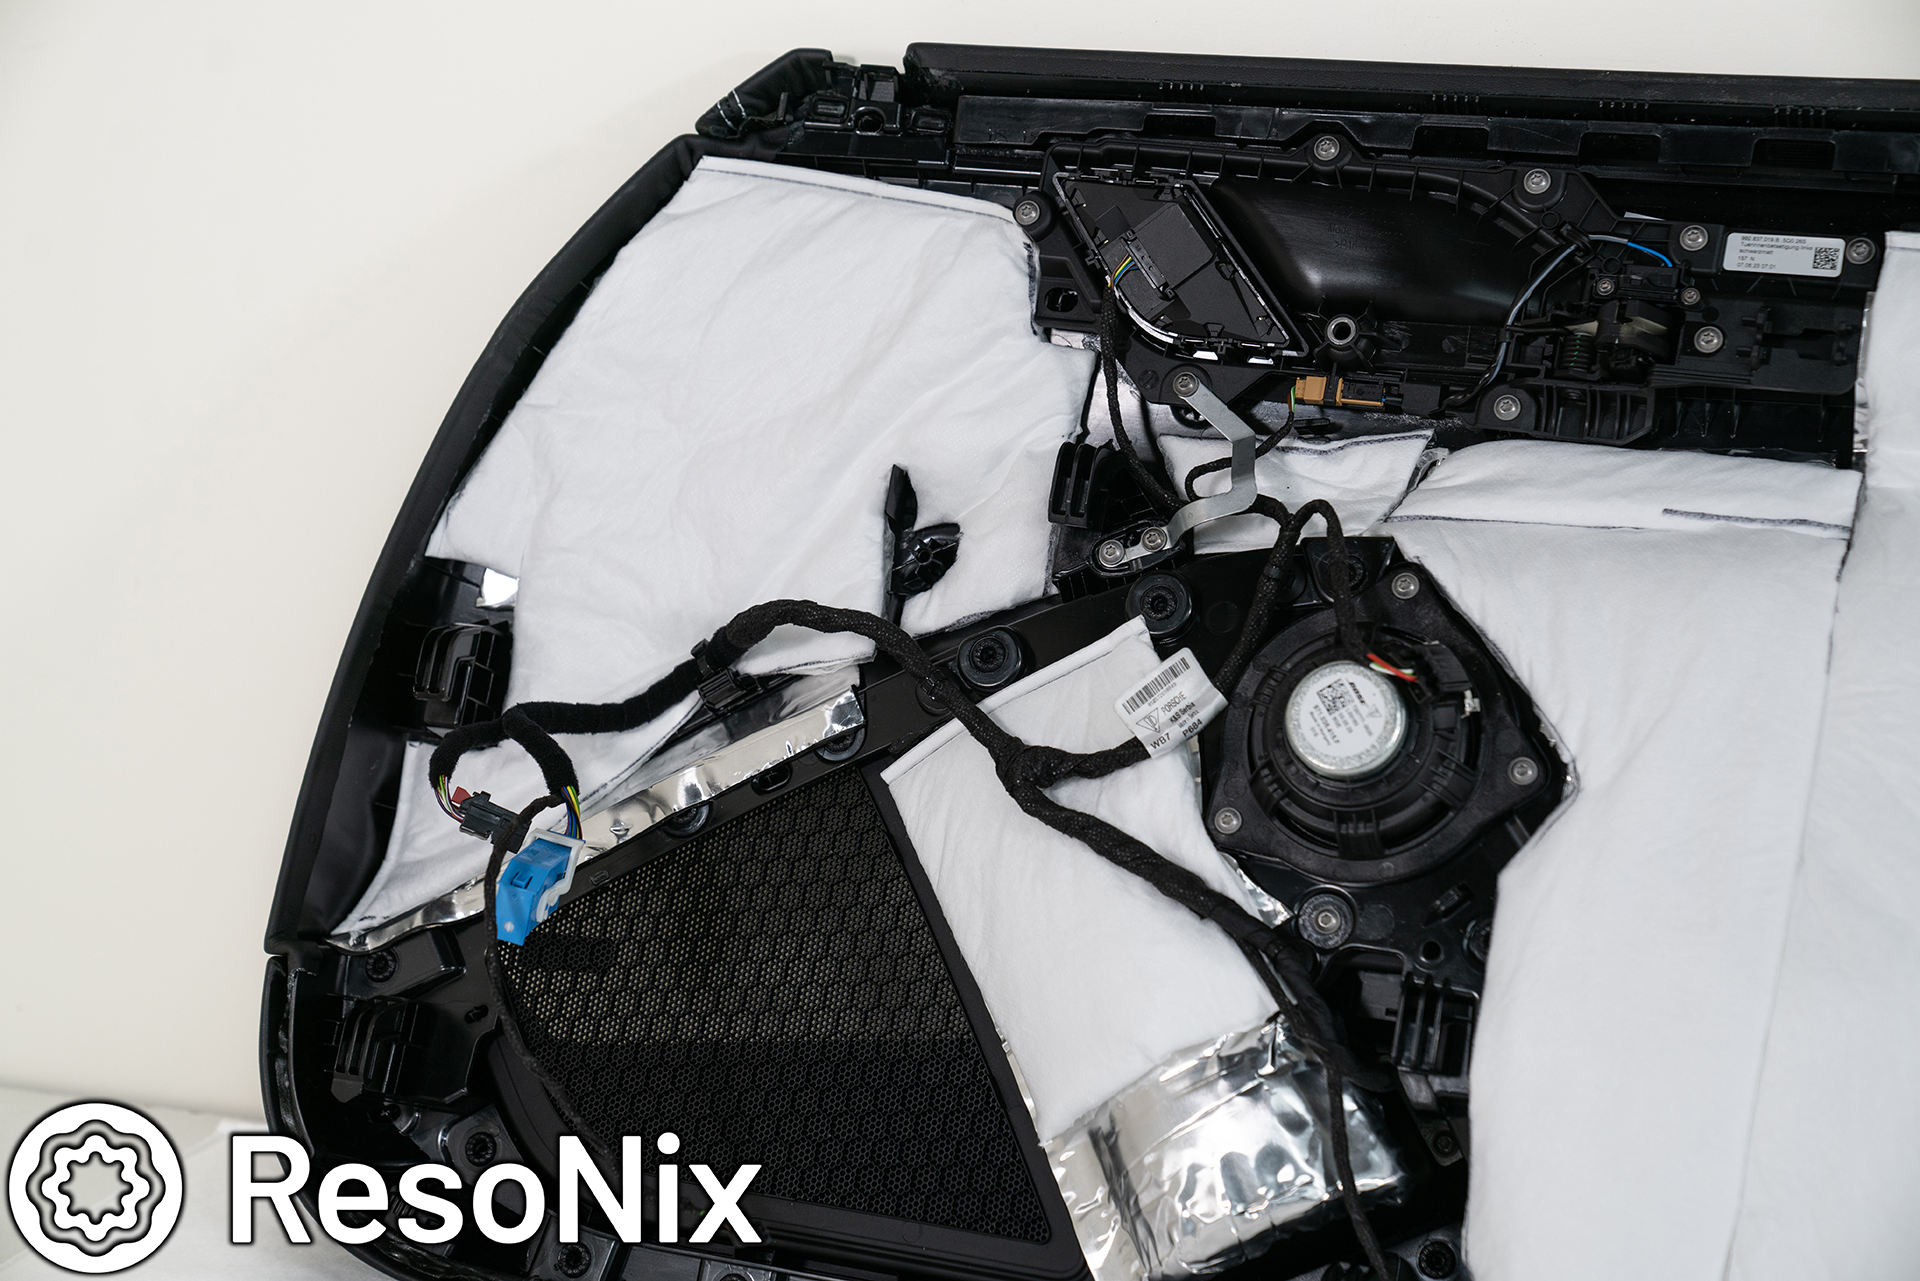
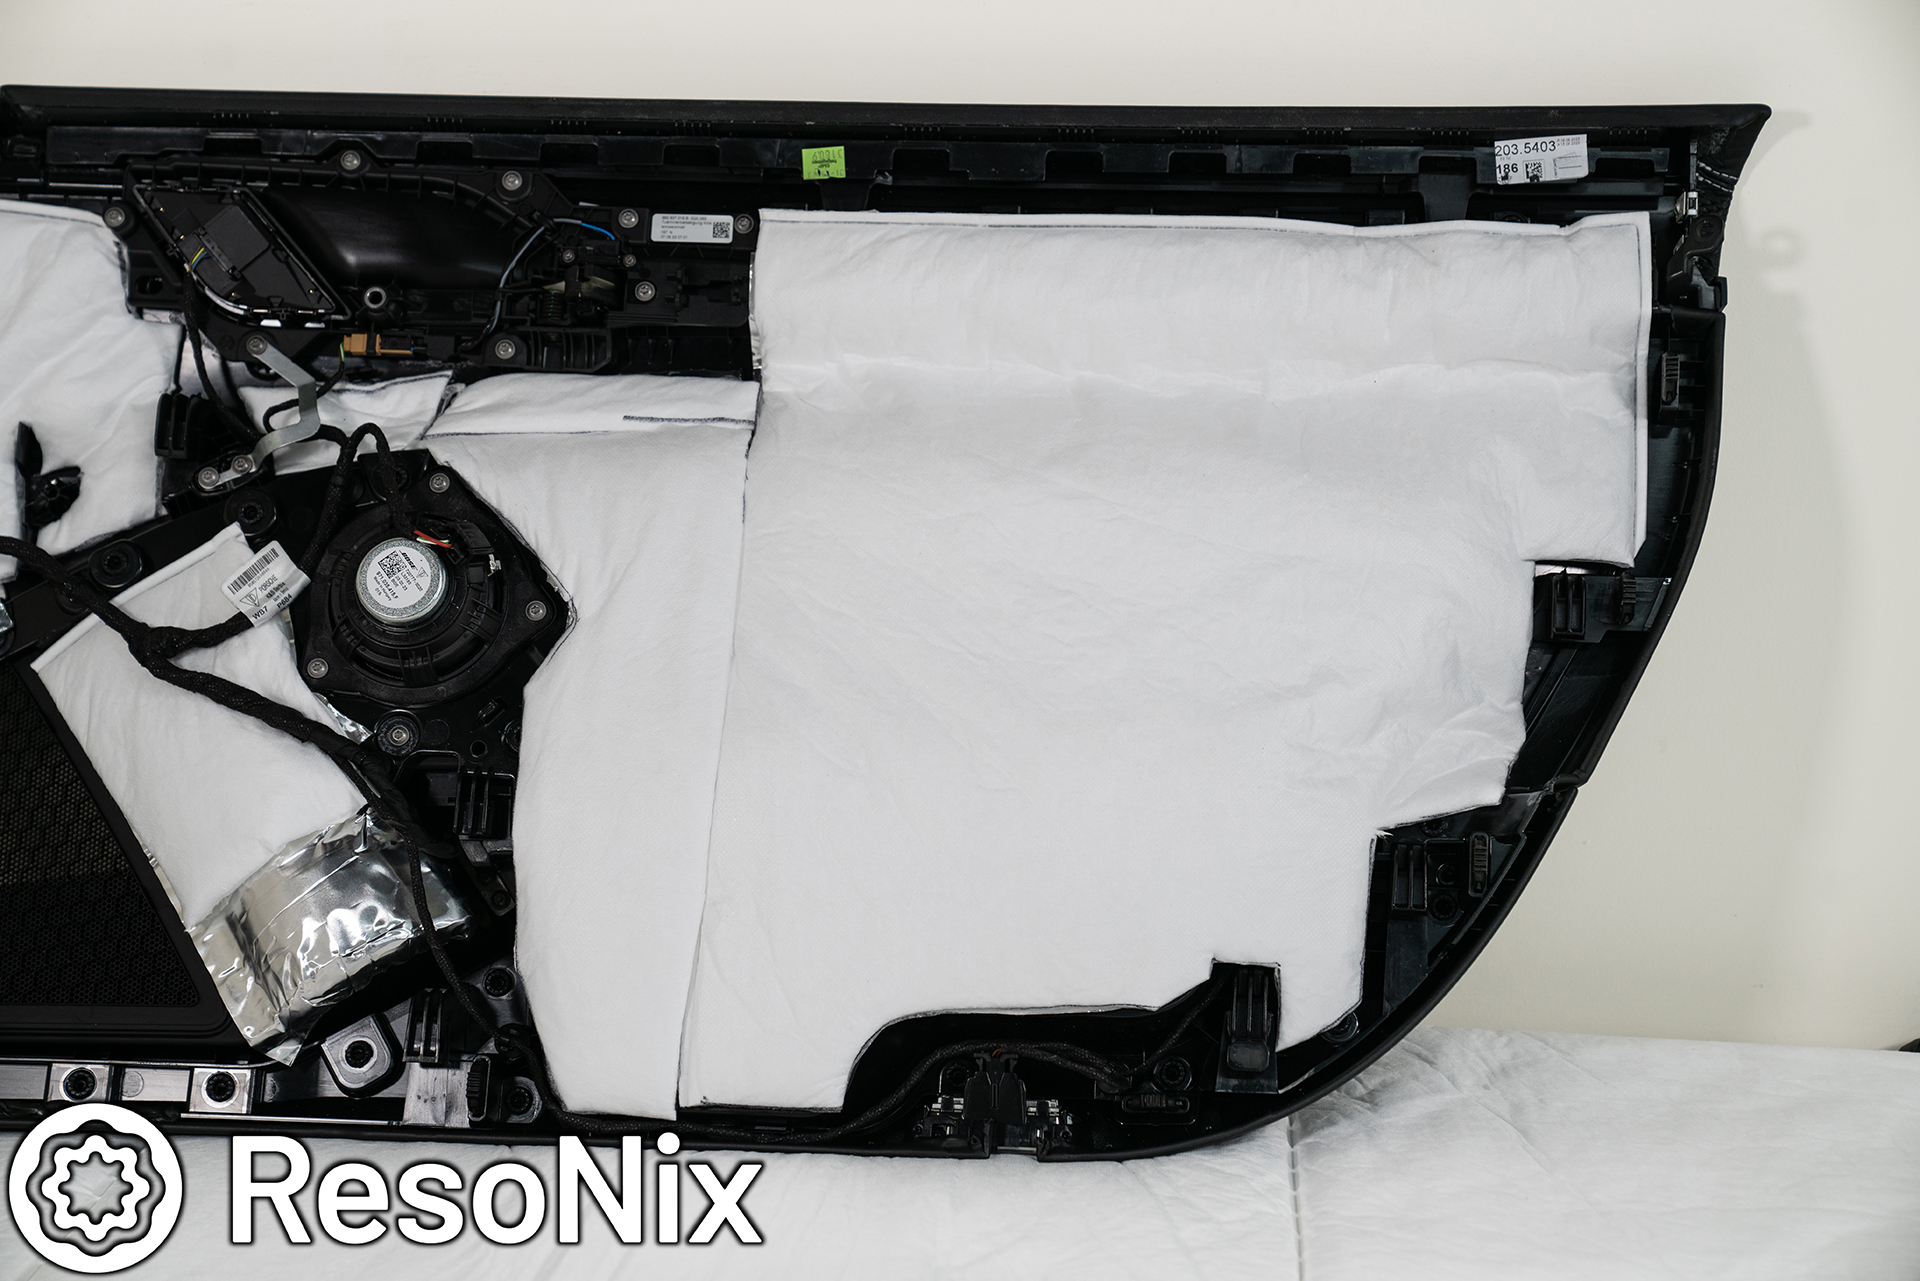
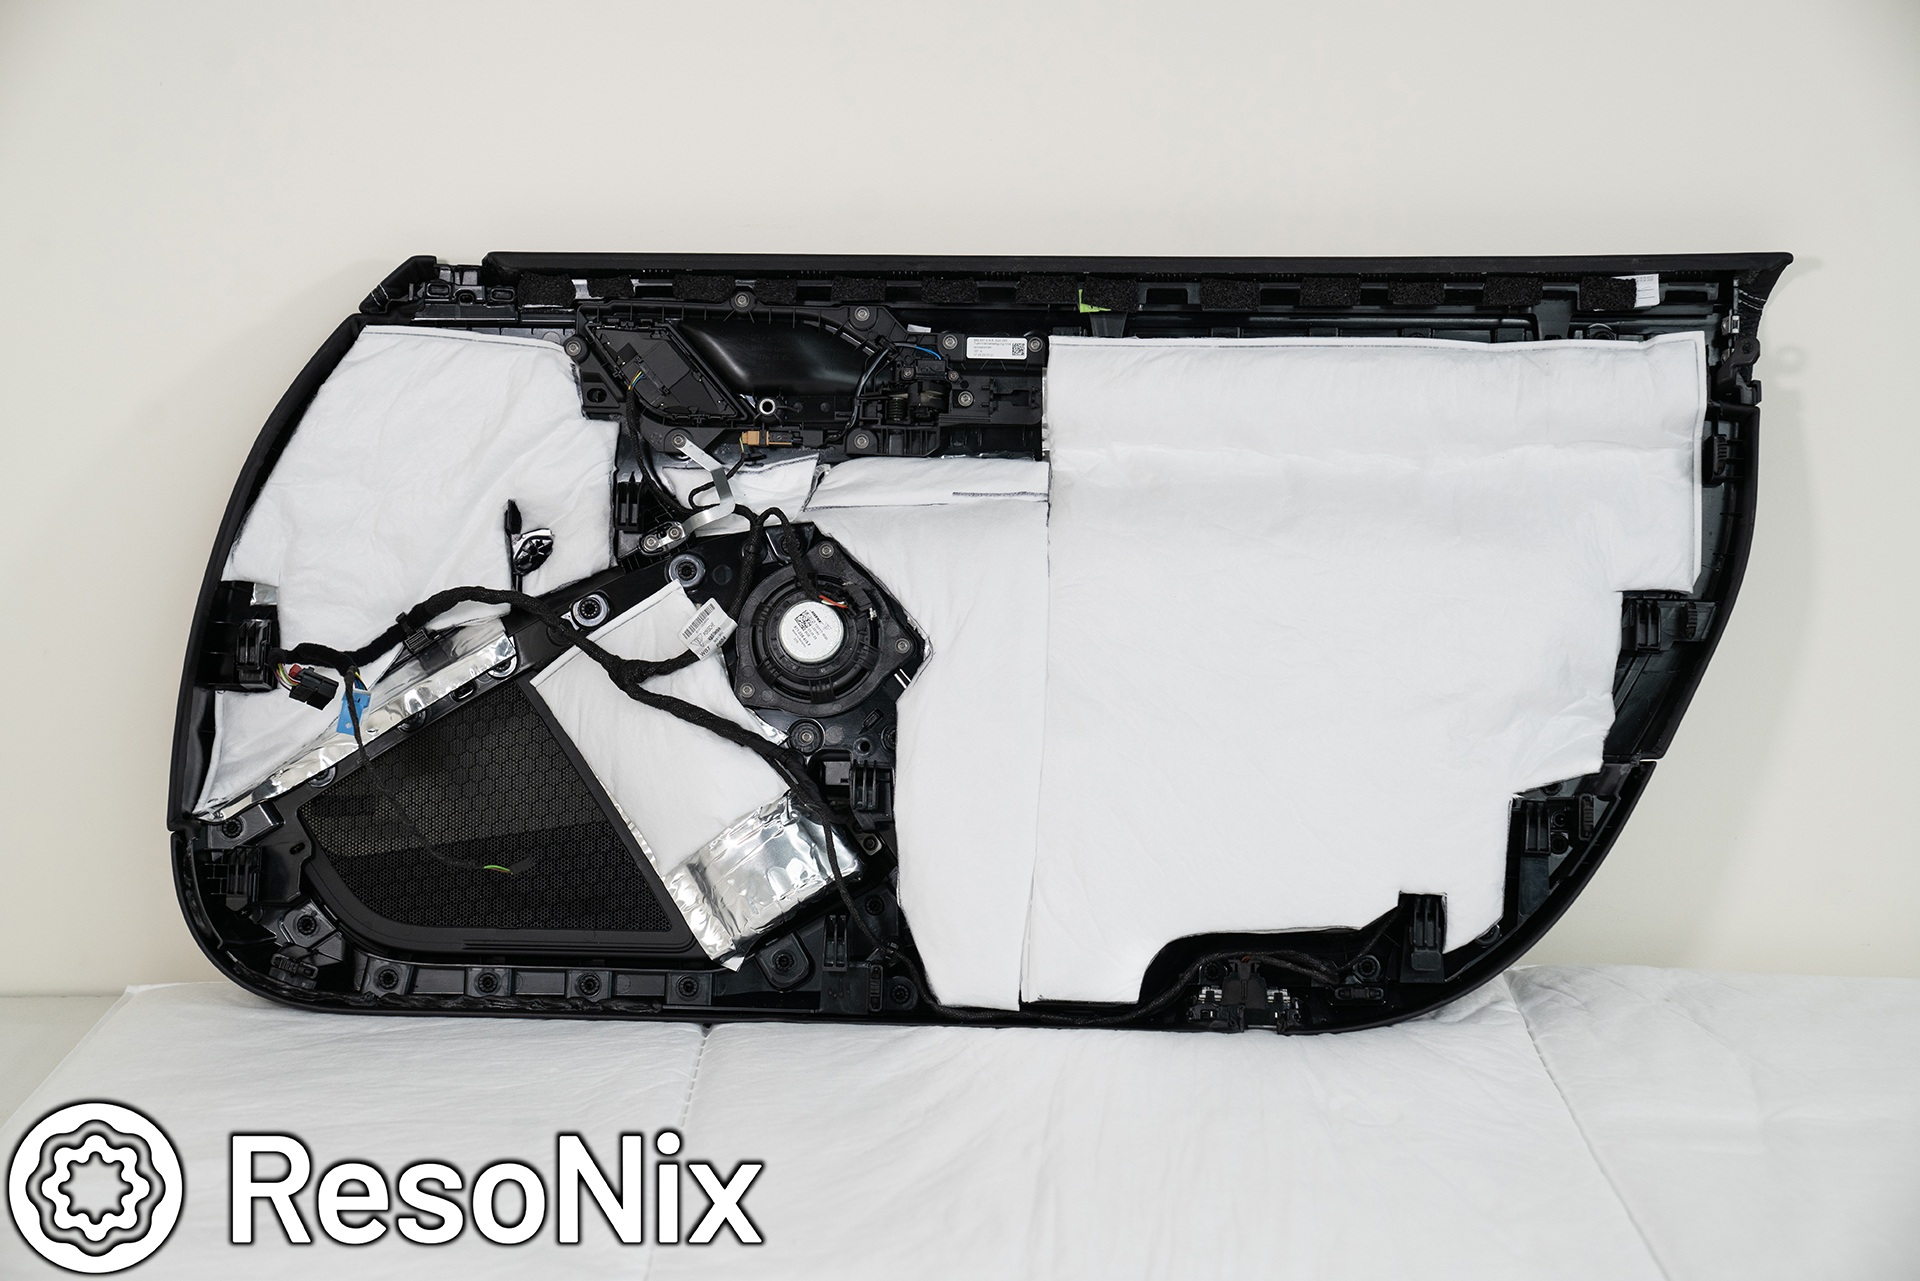
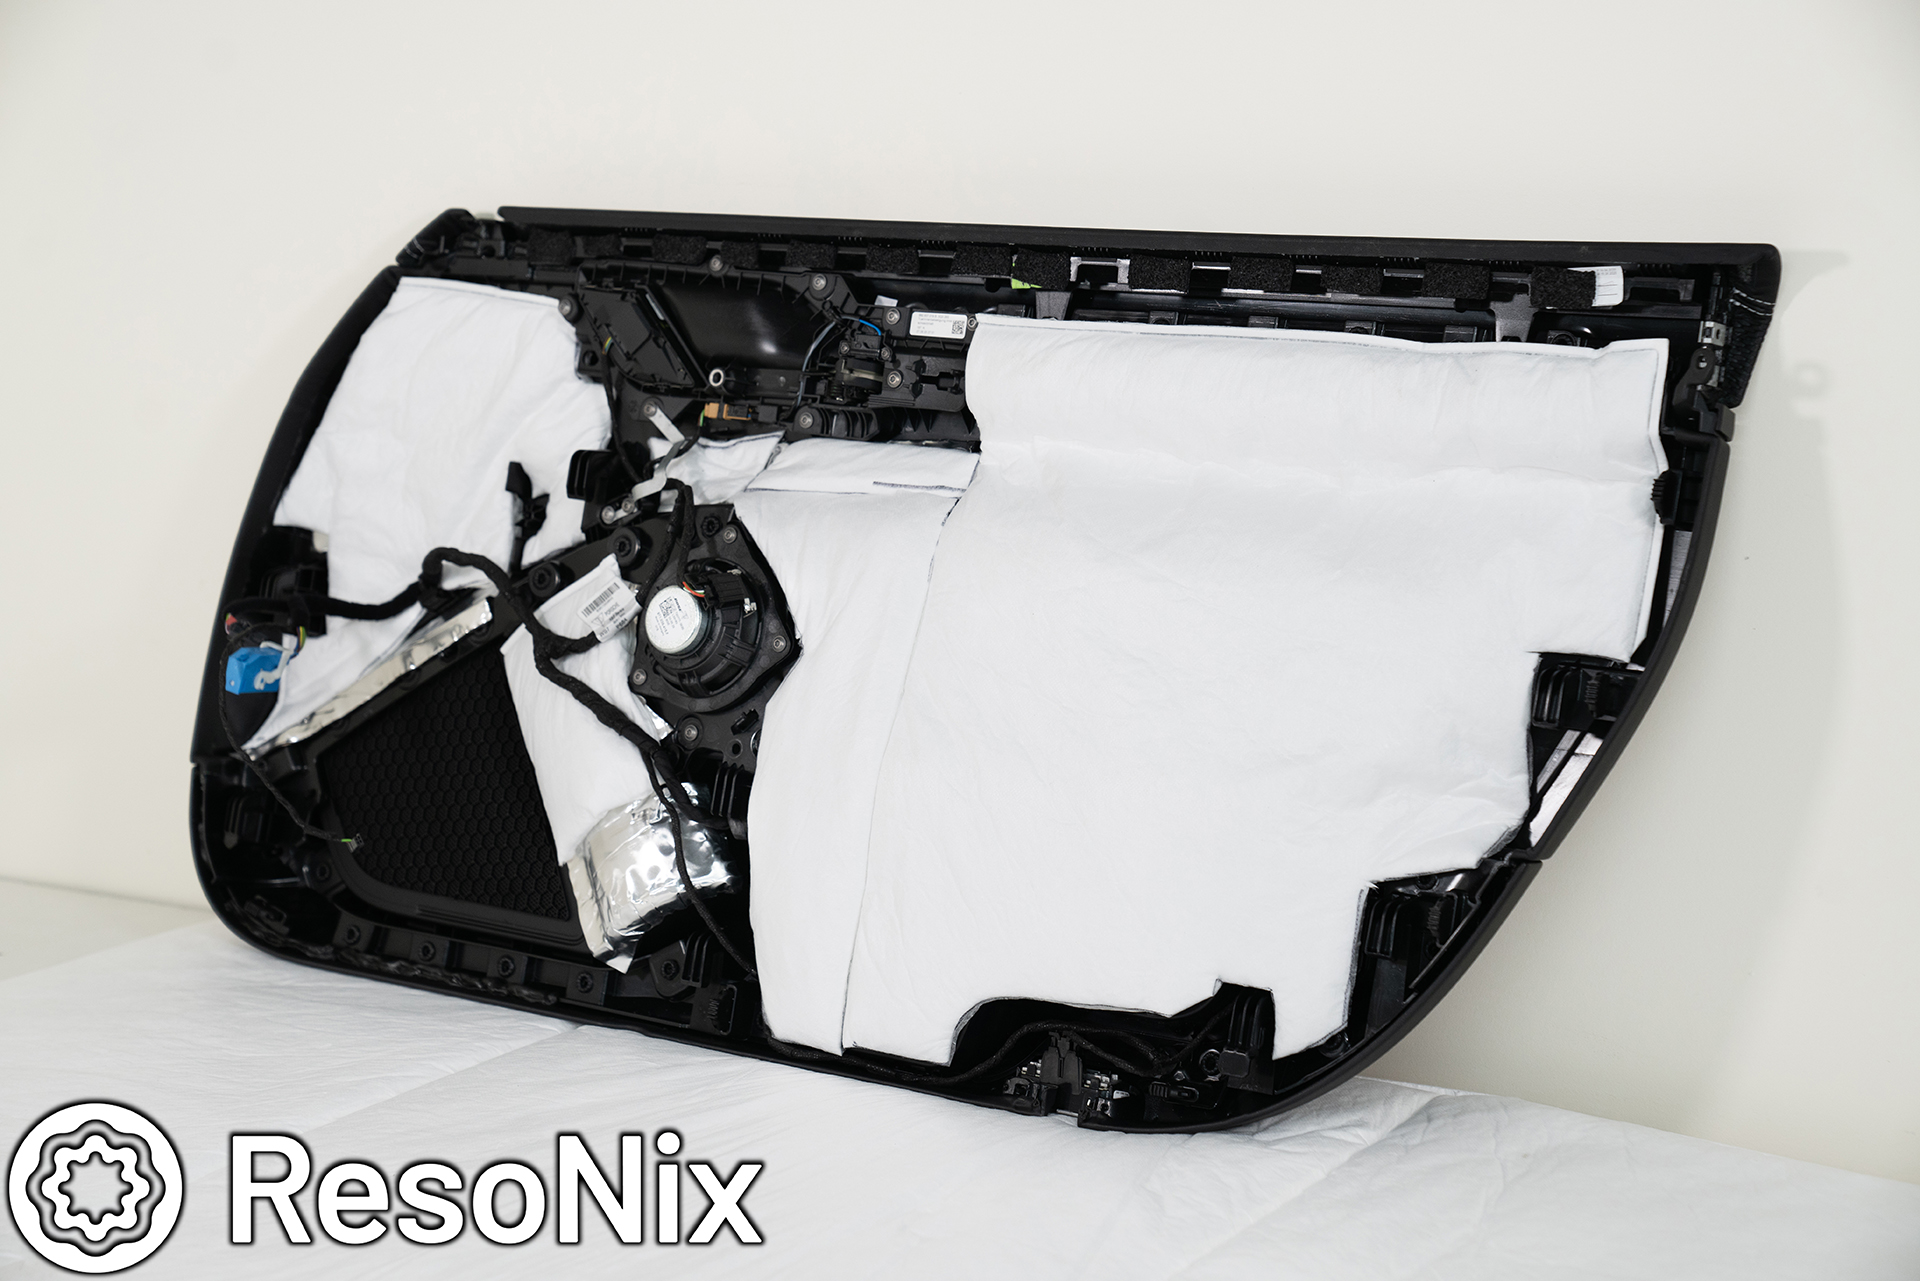
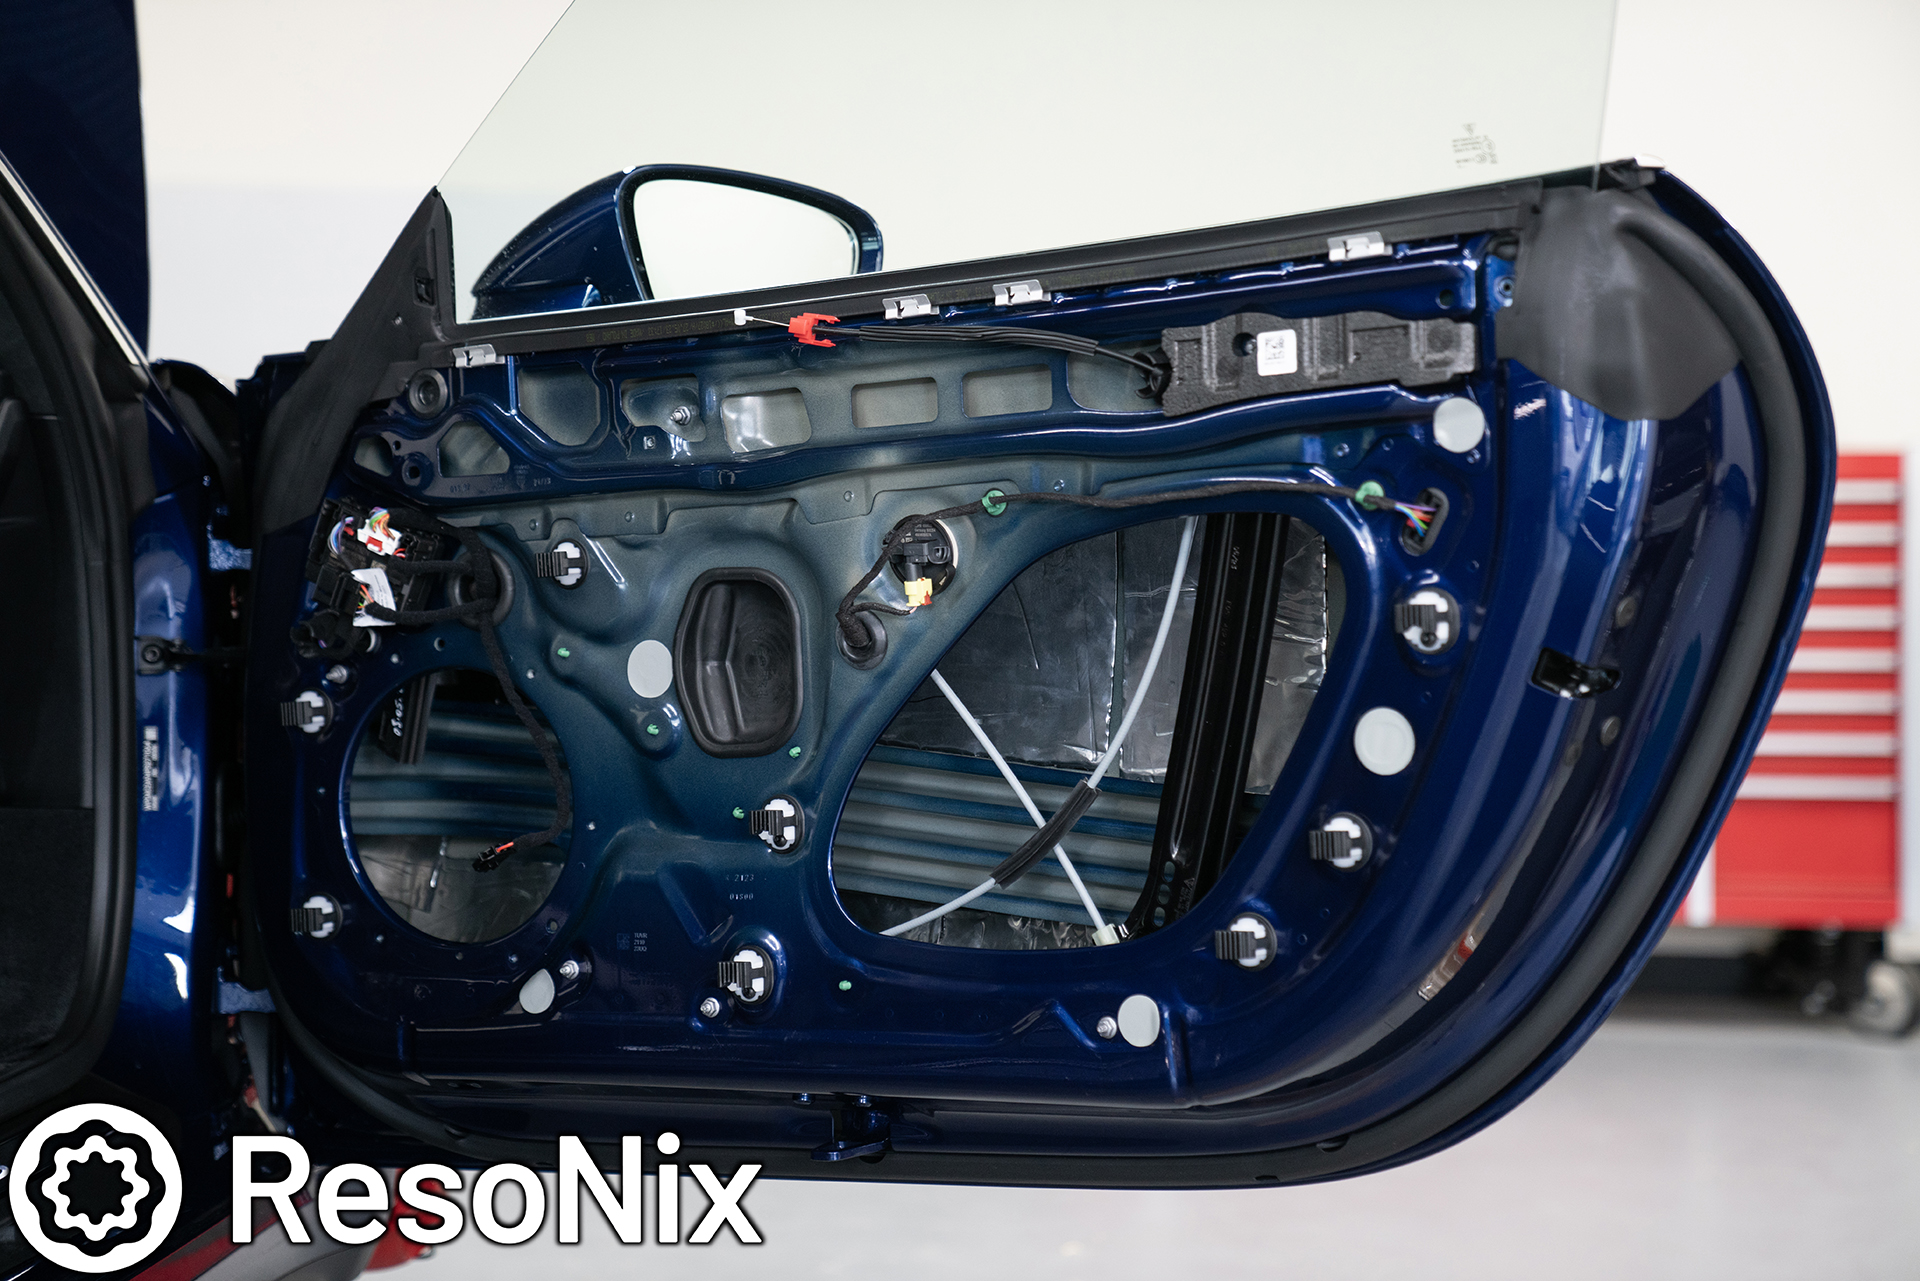
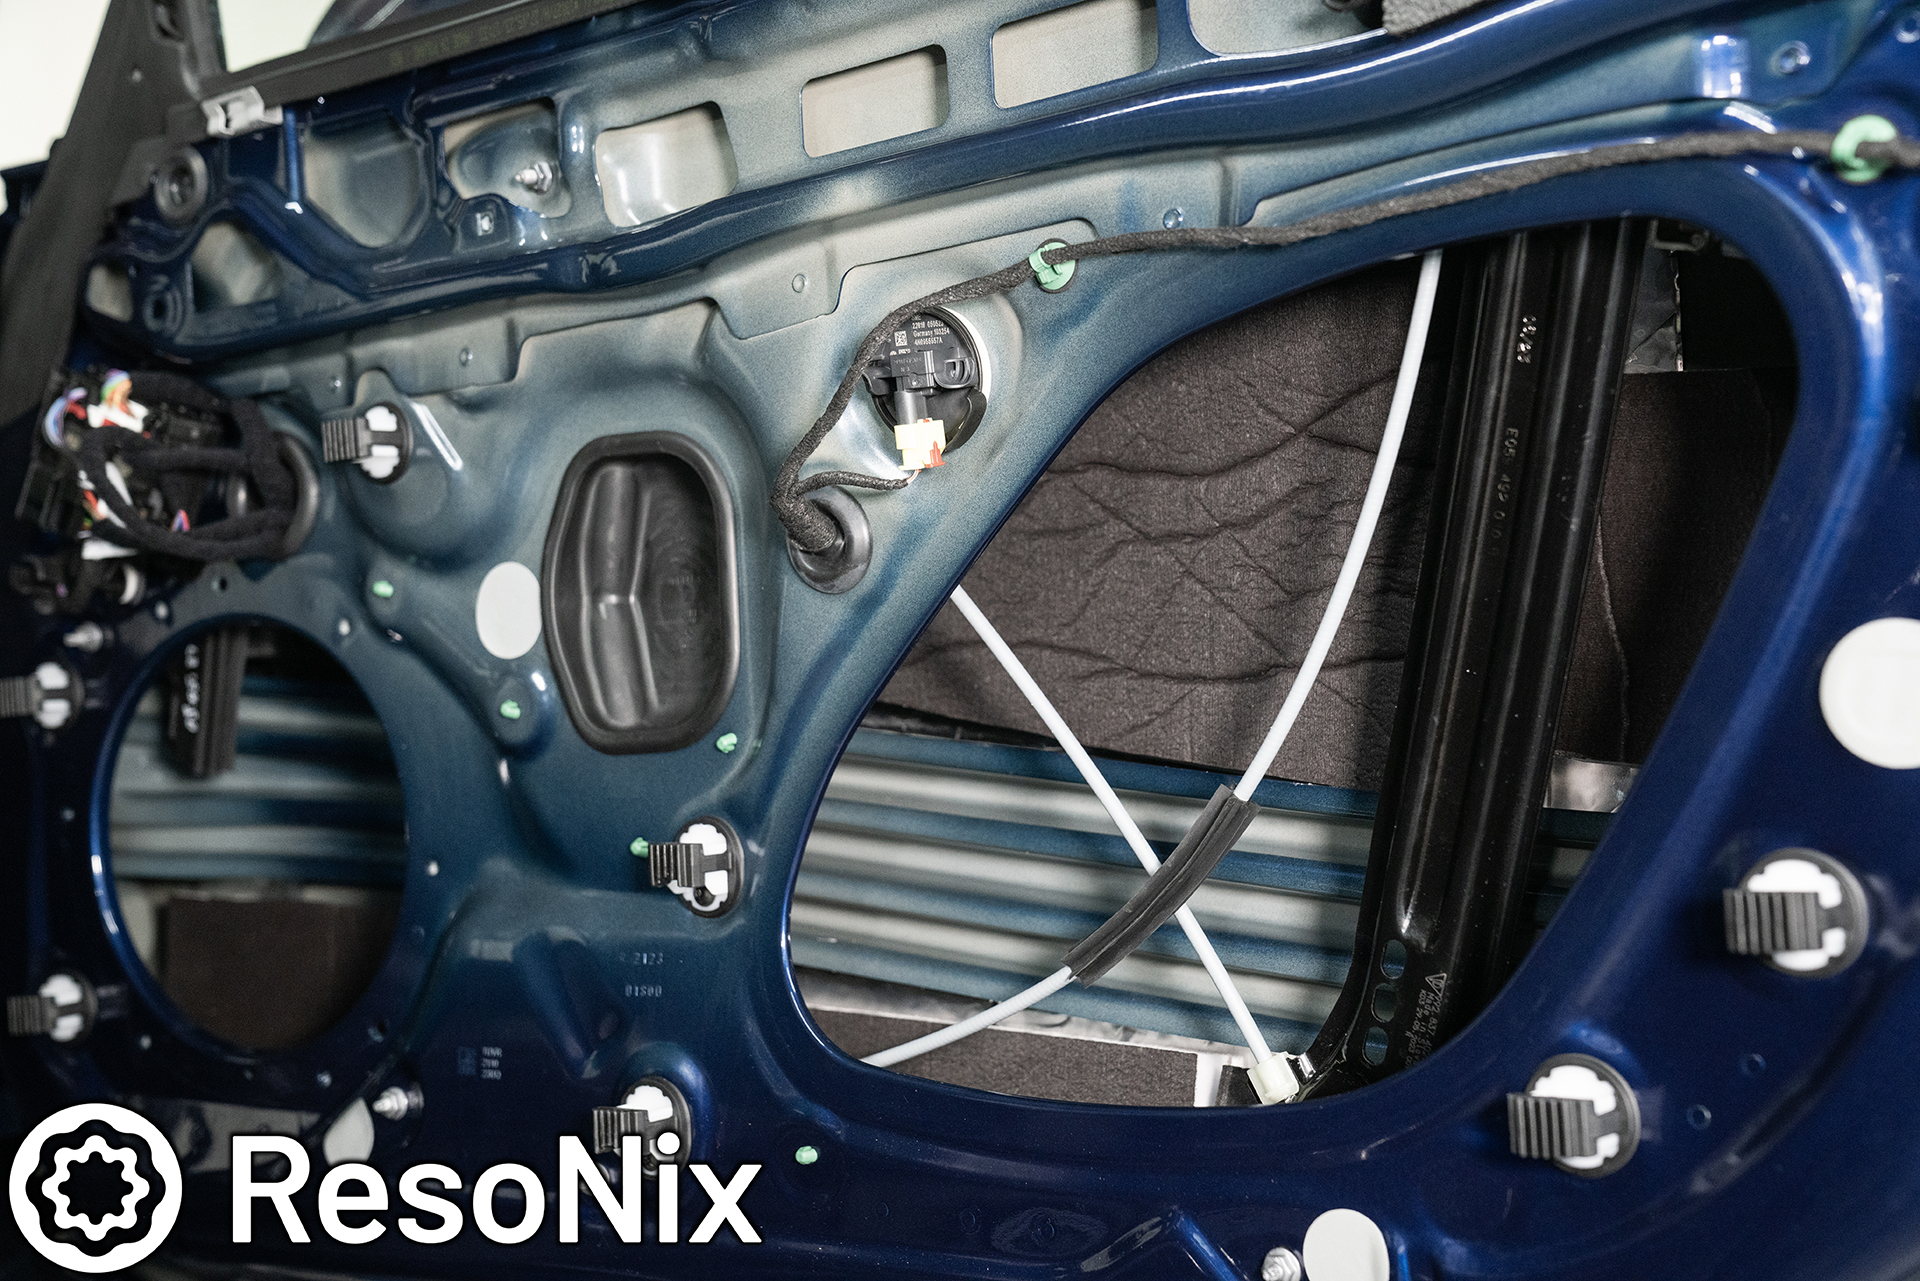
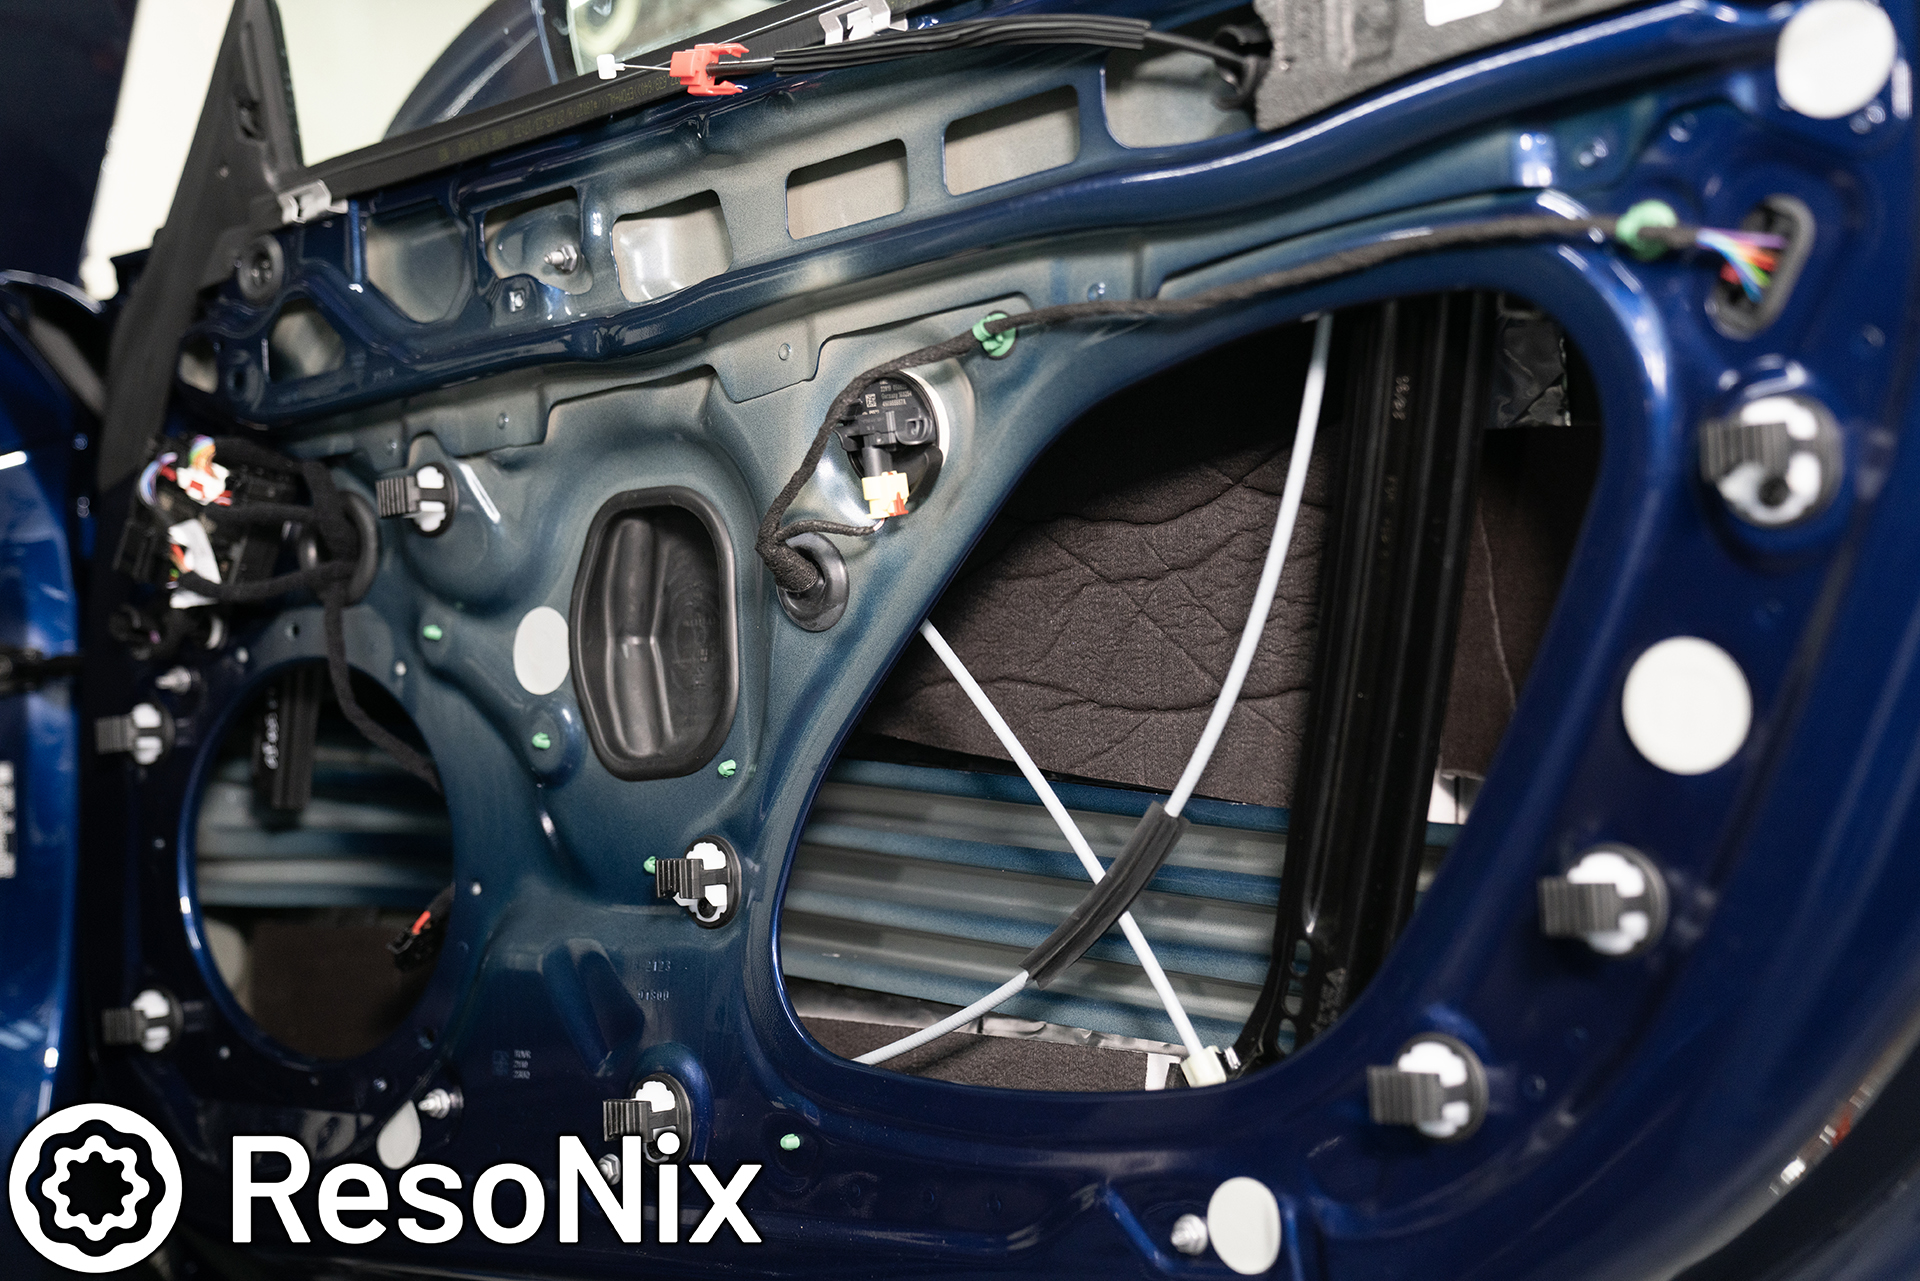
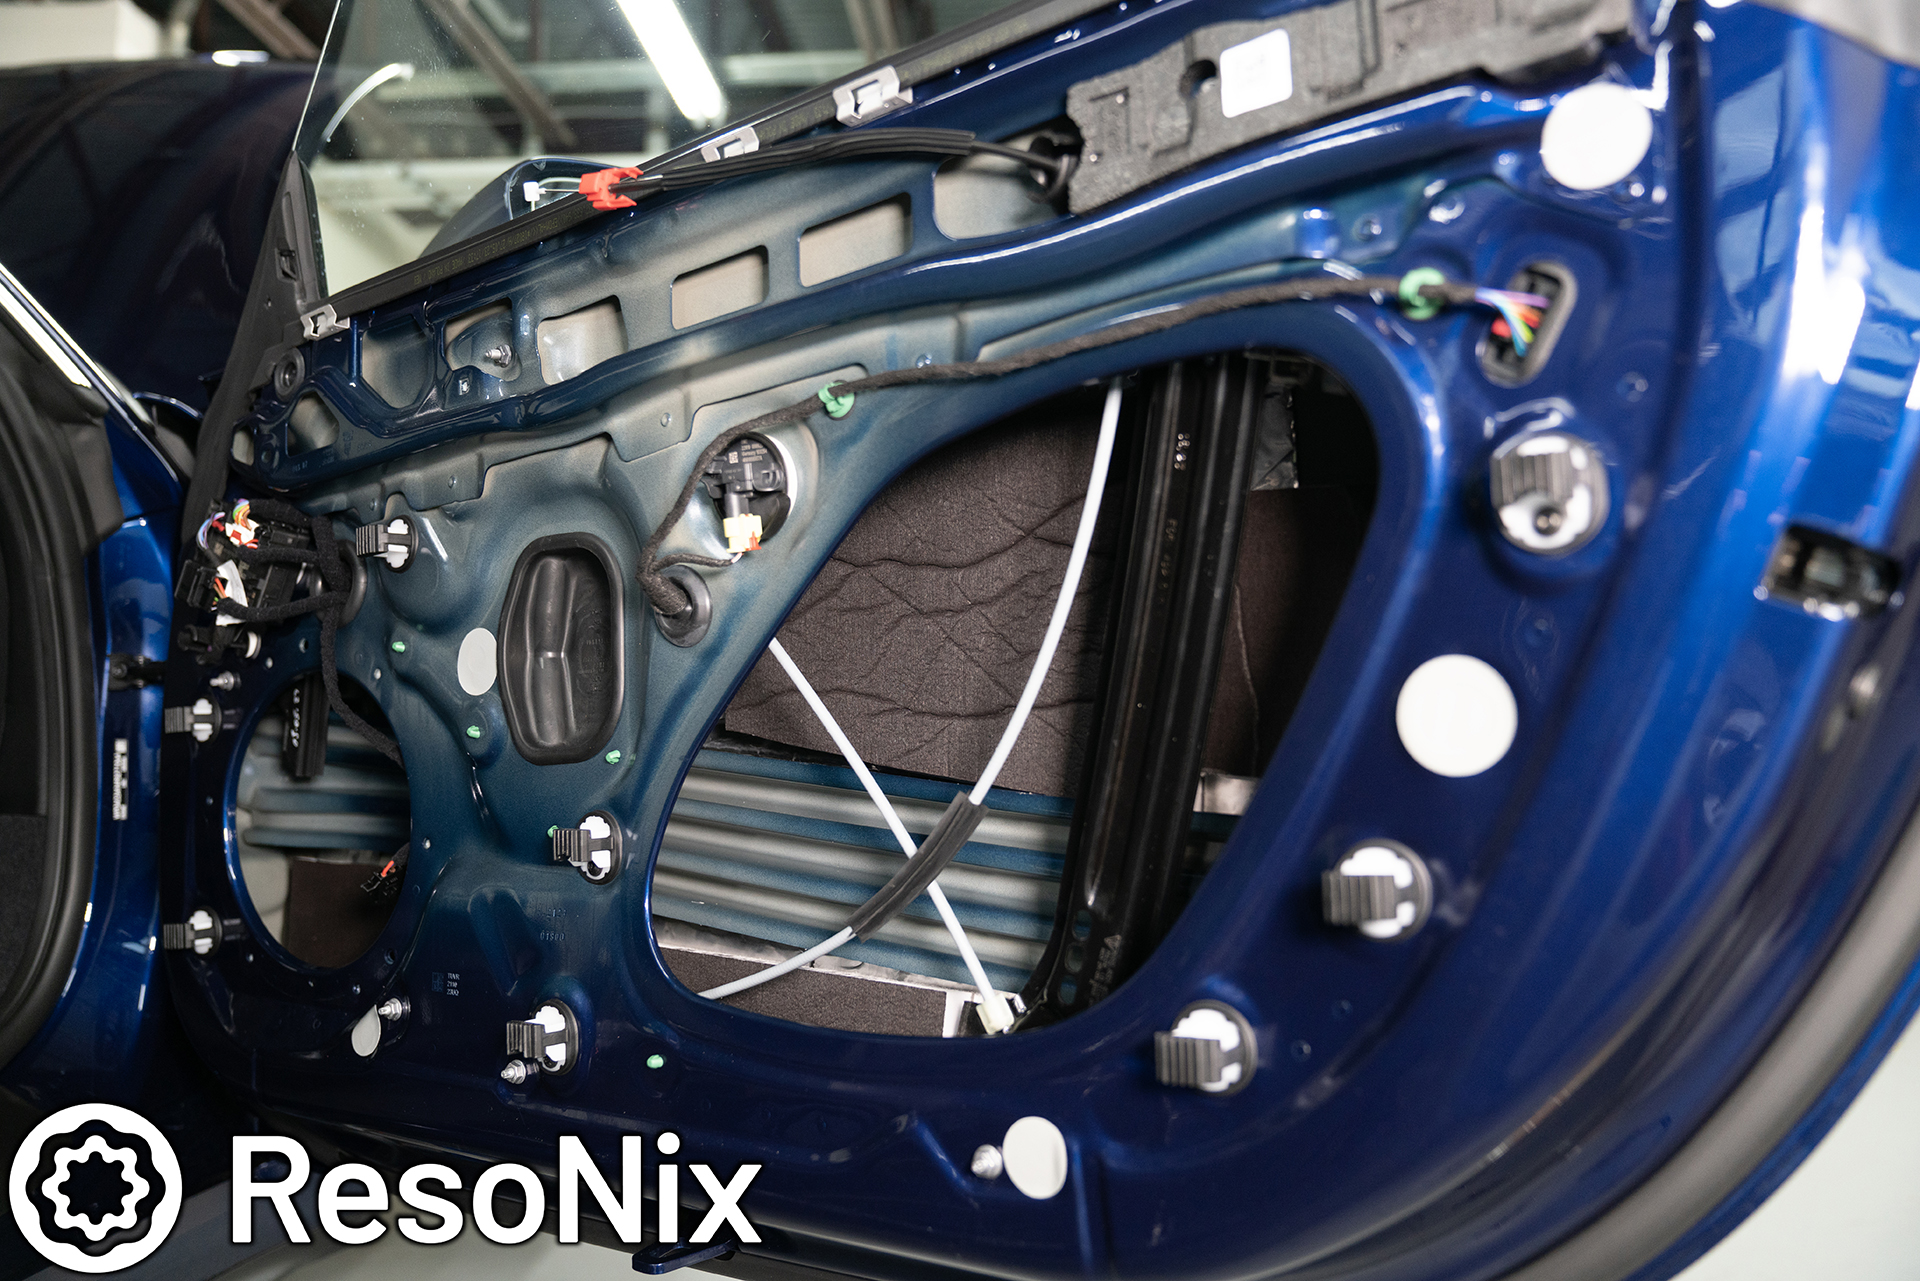
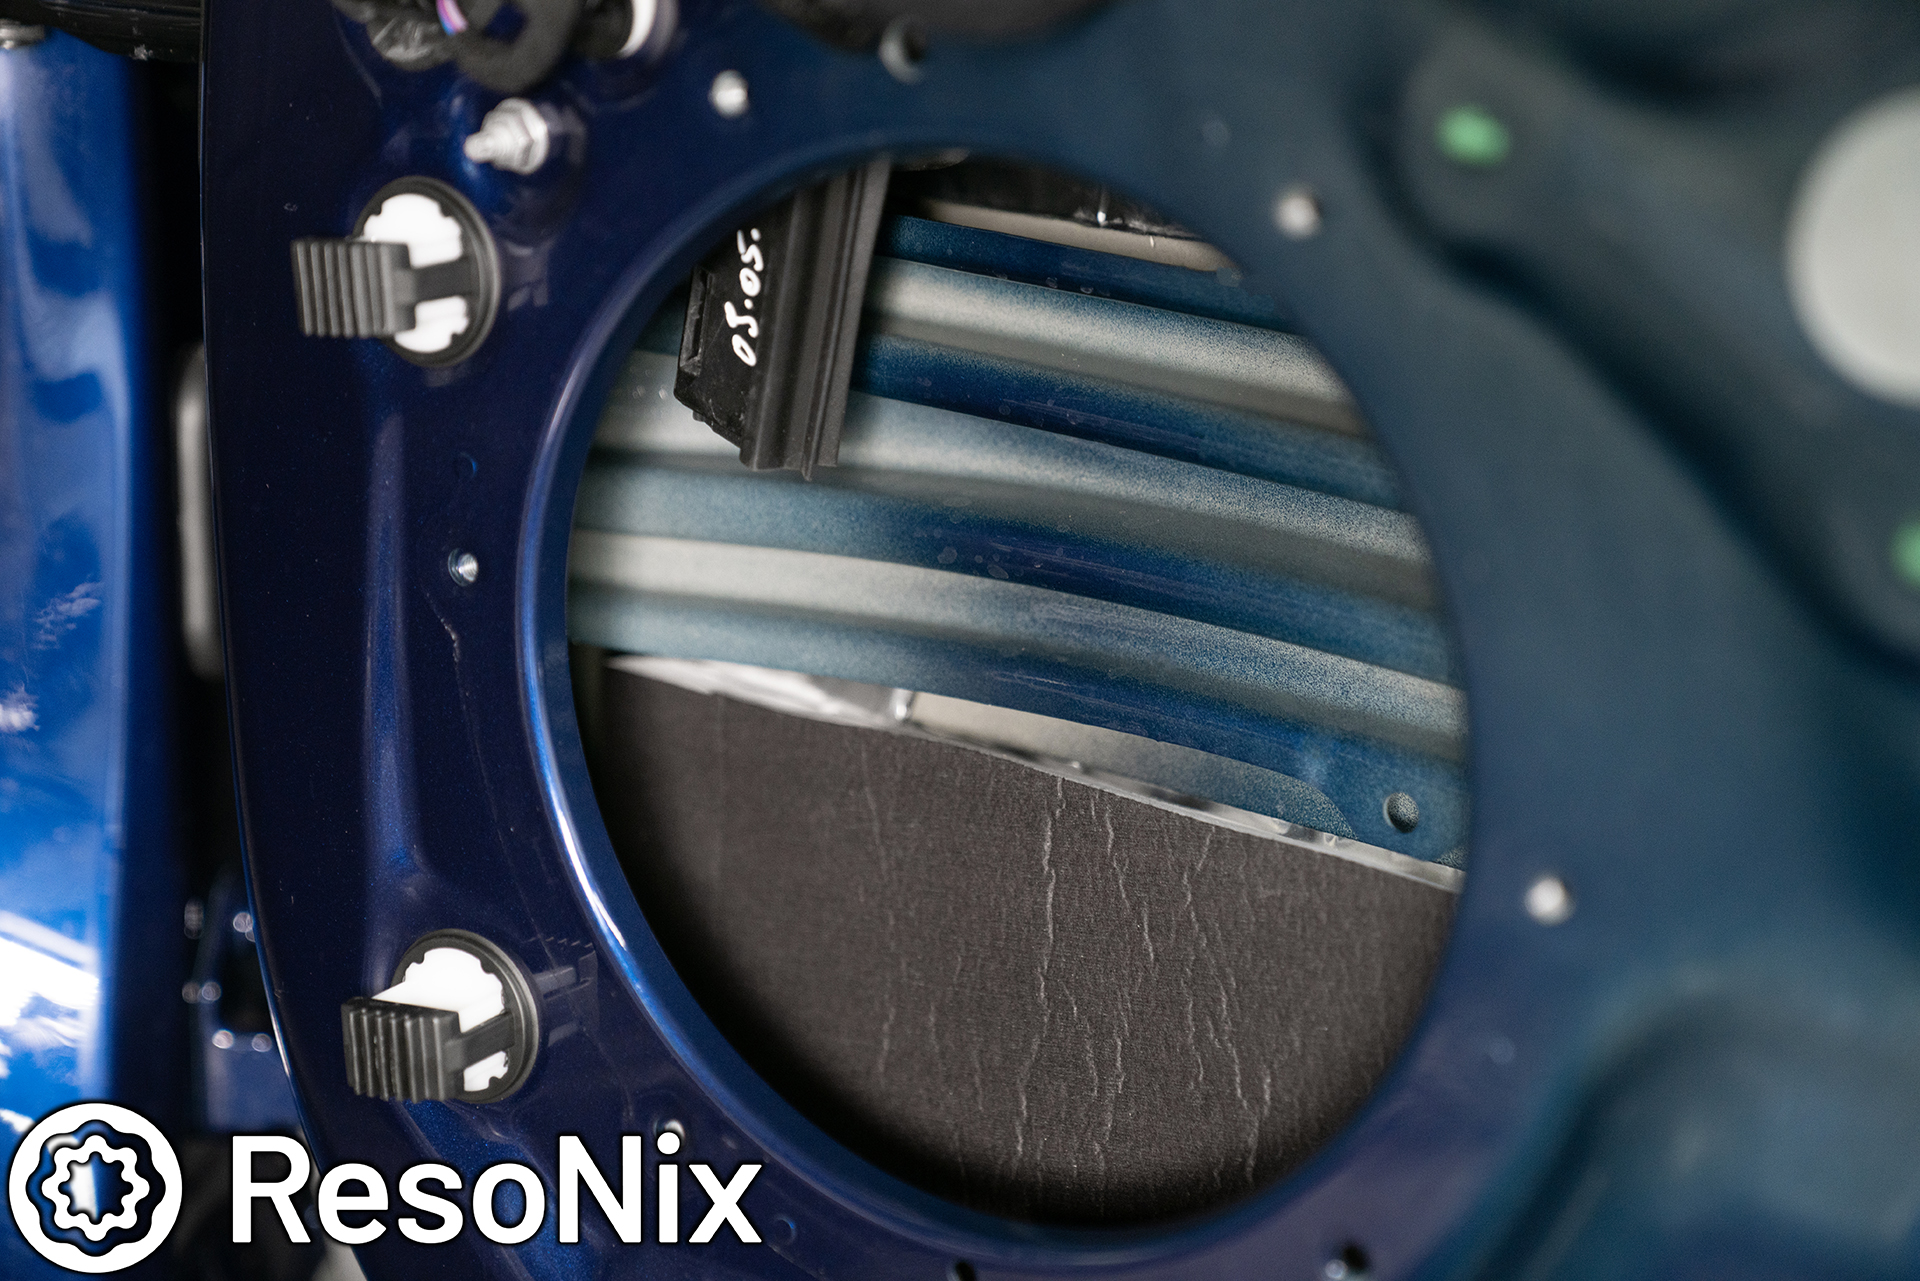
       Doors: The doors were the first thing that stood out to me because as soon a I started the car, the doors started rattling at idle. Very weird, and definitely not something I would expect out of a car like this. The rest showed up while driving. The wind noise through the doors and resonance from the door was drastic. It sounded like a hollow drum, just while driving. The drone and wind noise from it at speeds over 50mph were really bad.

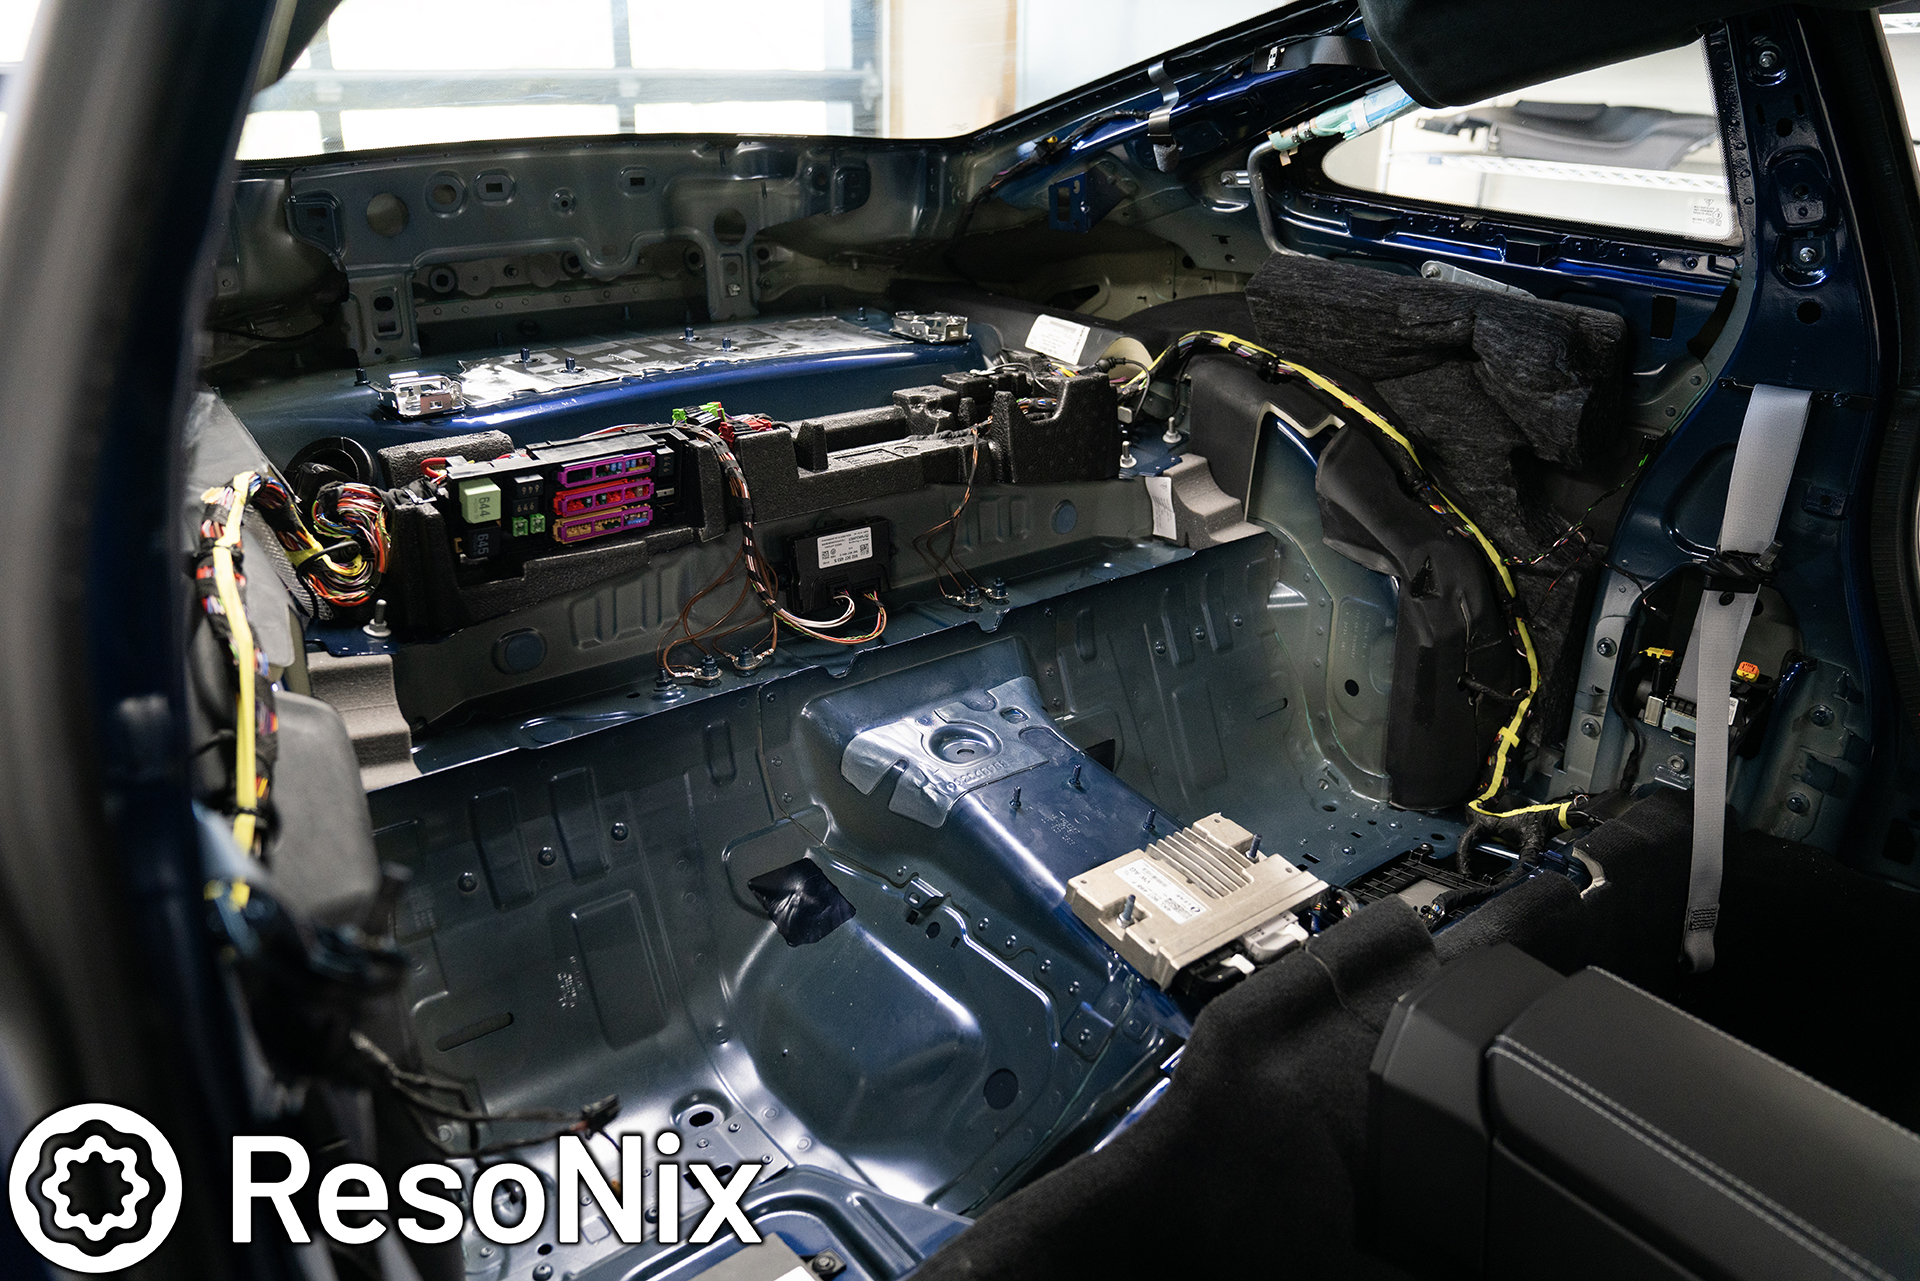
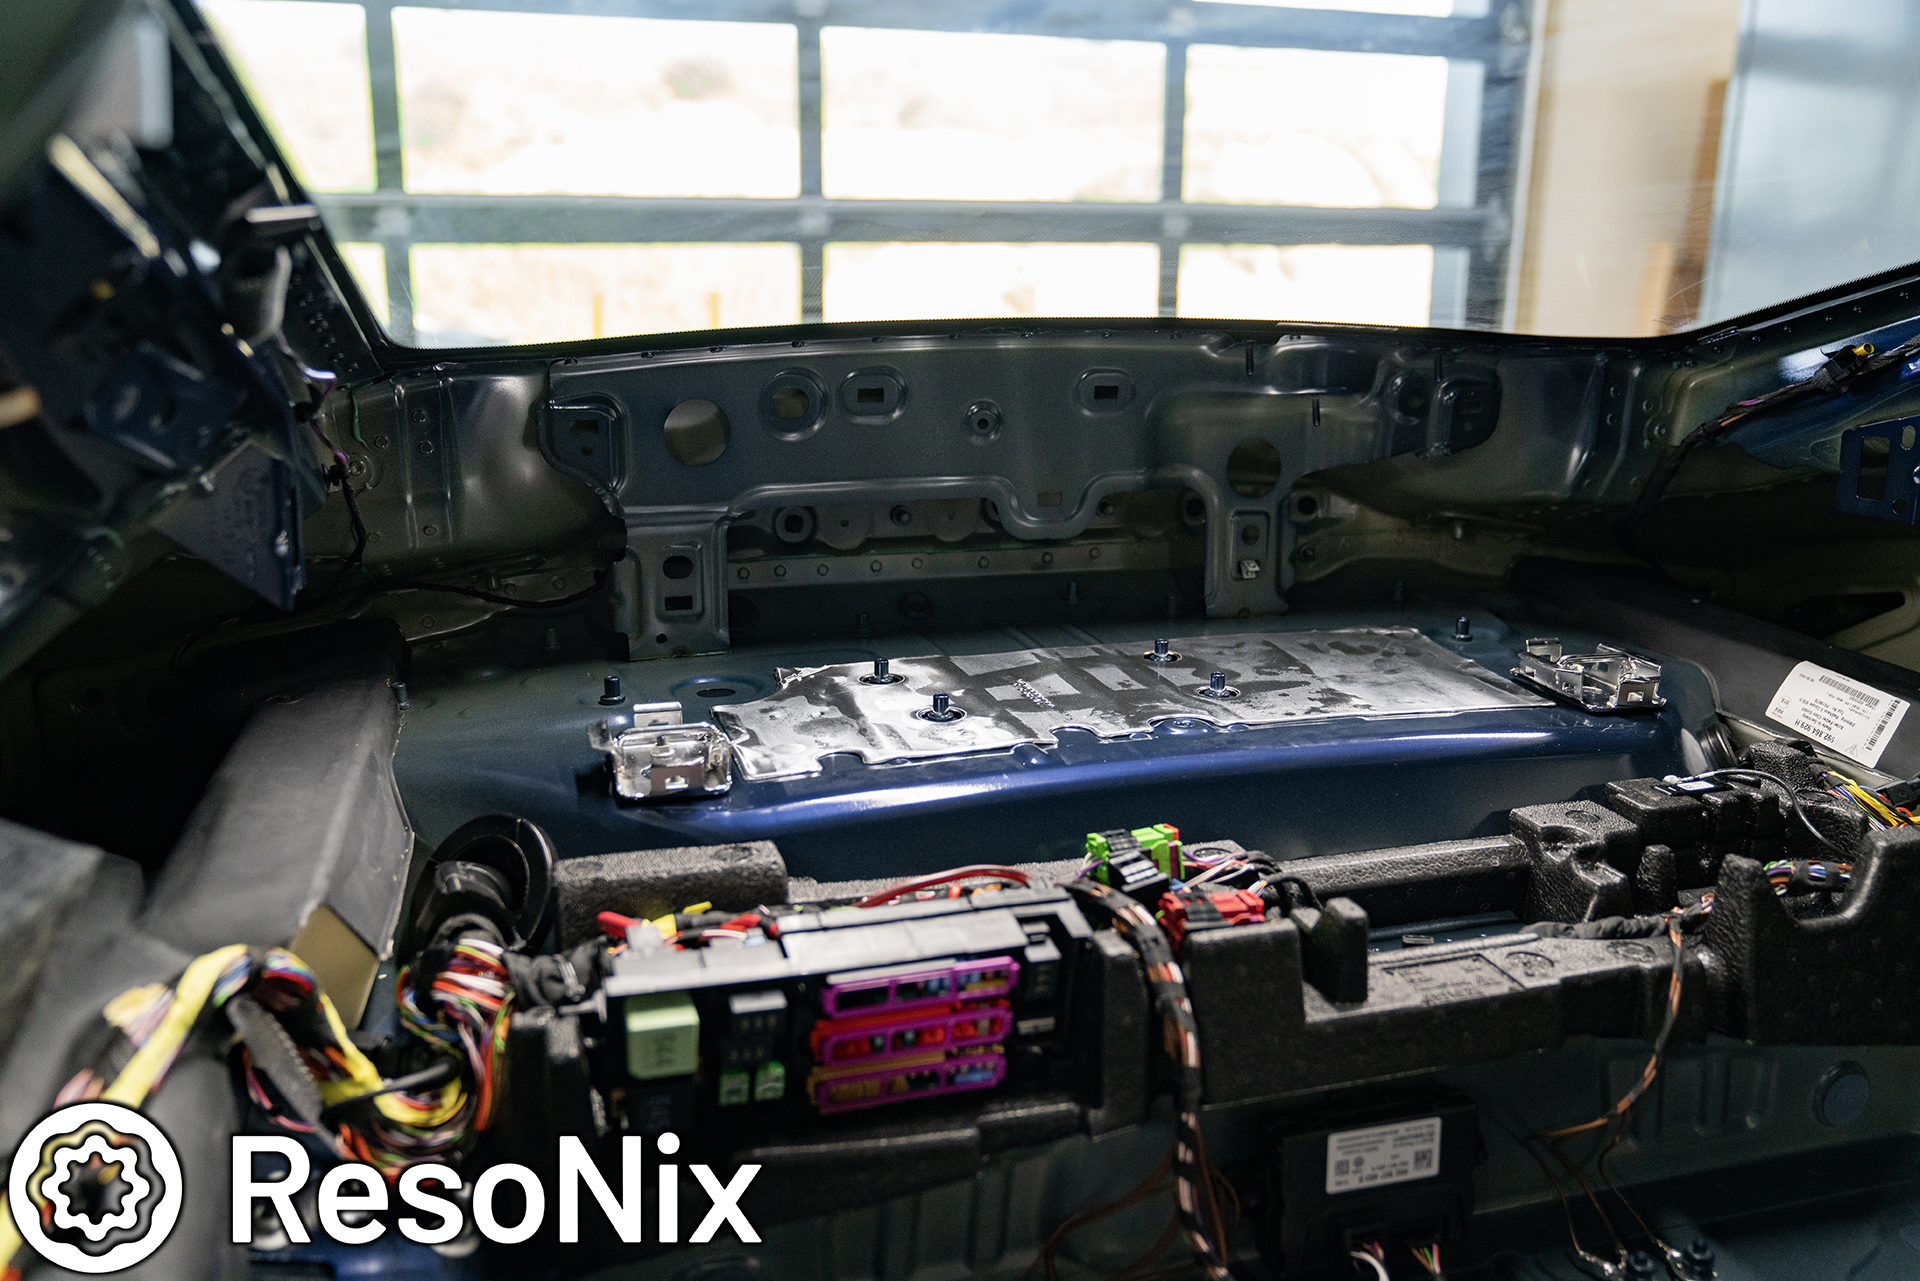
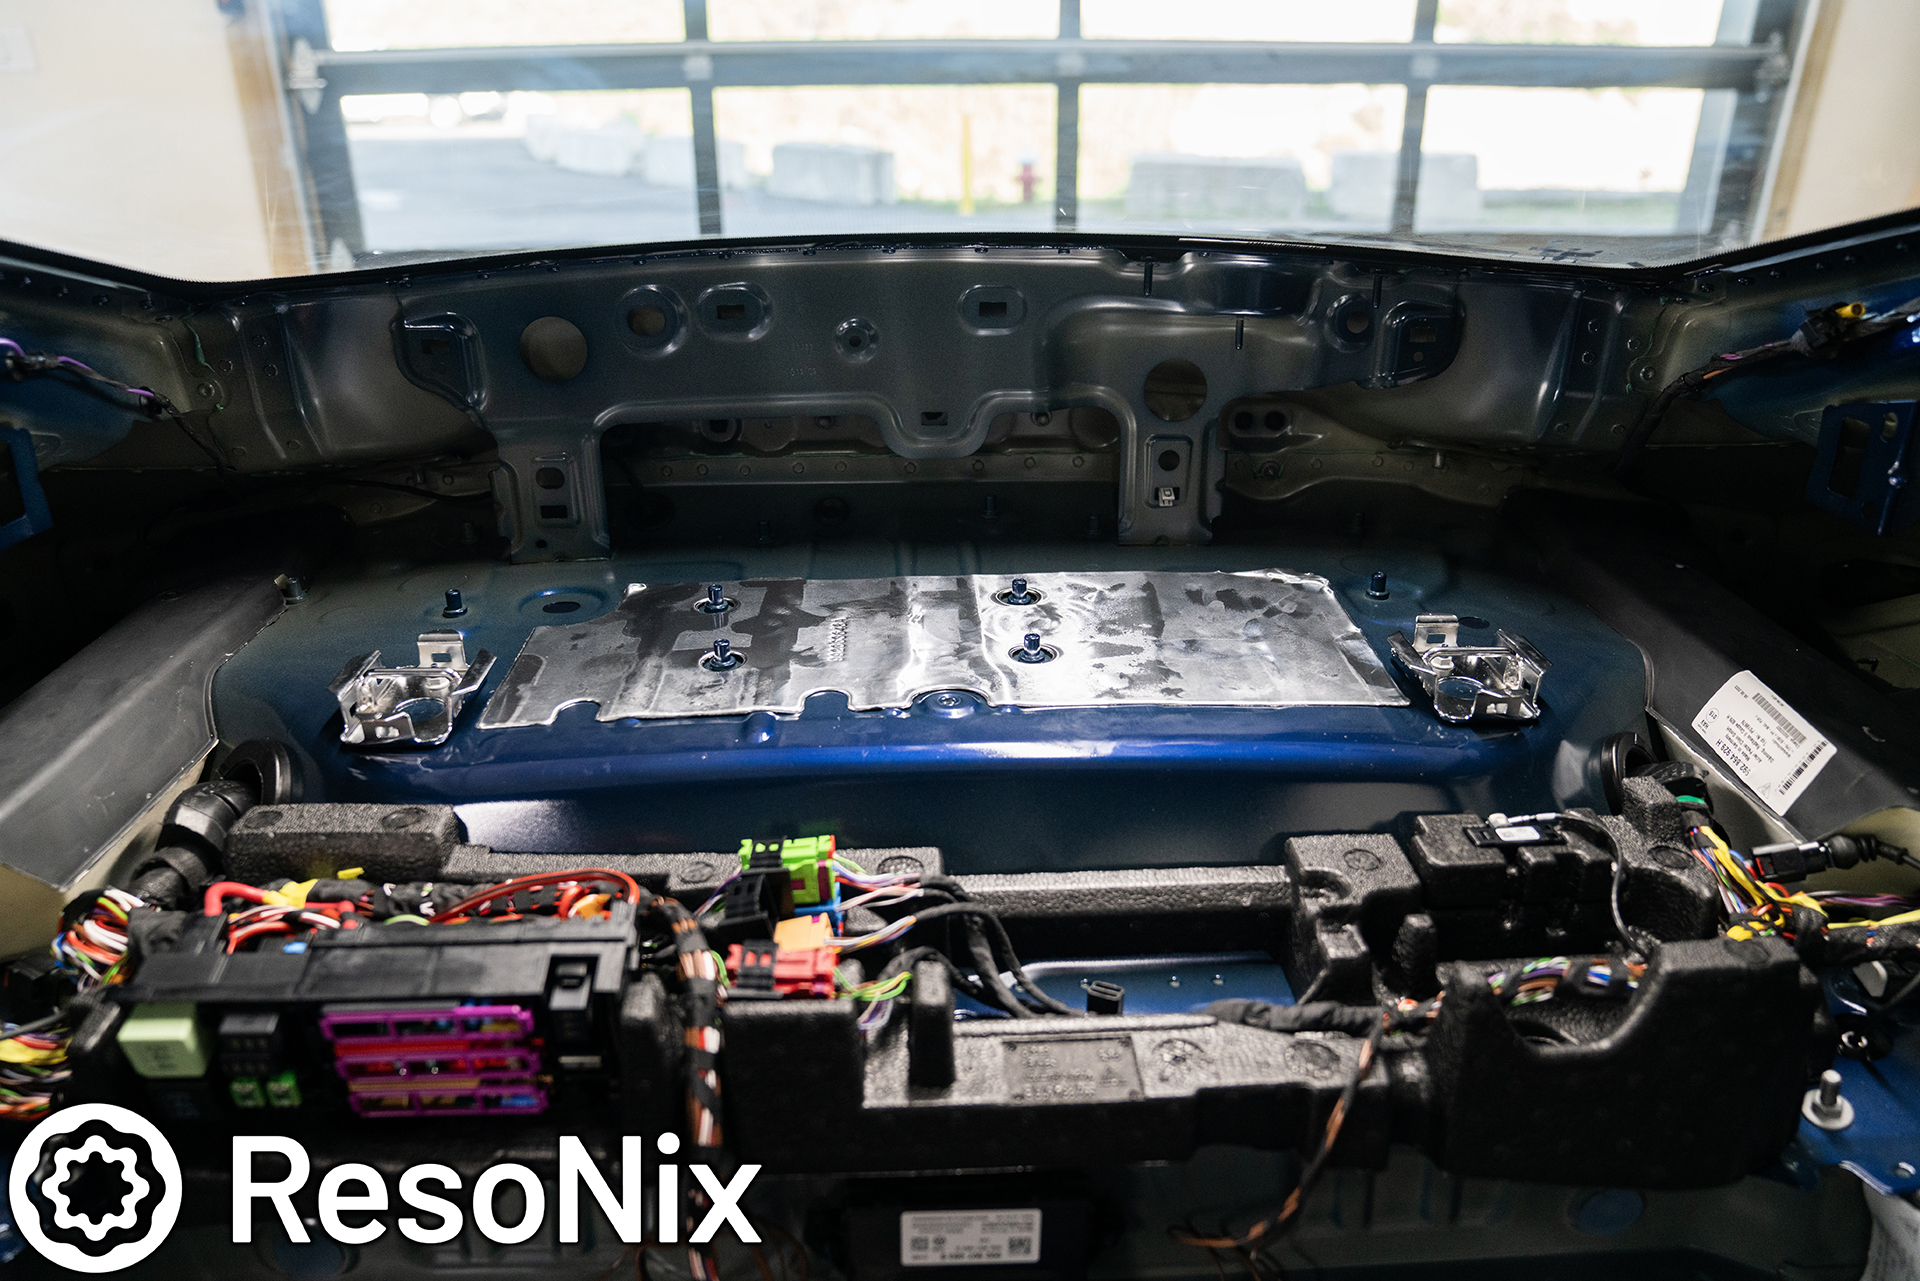
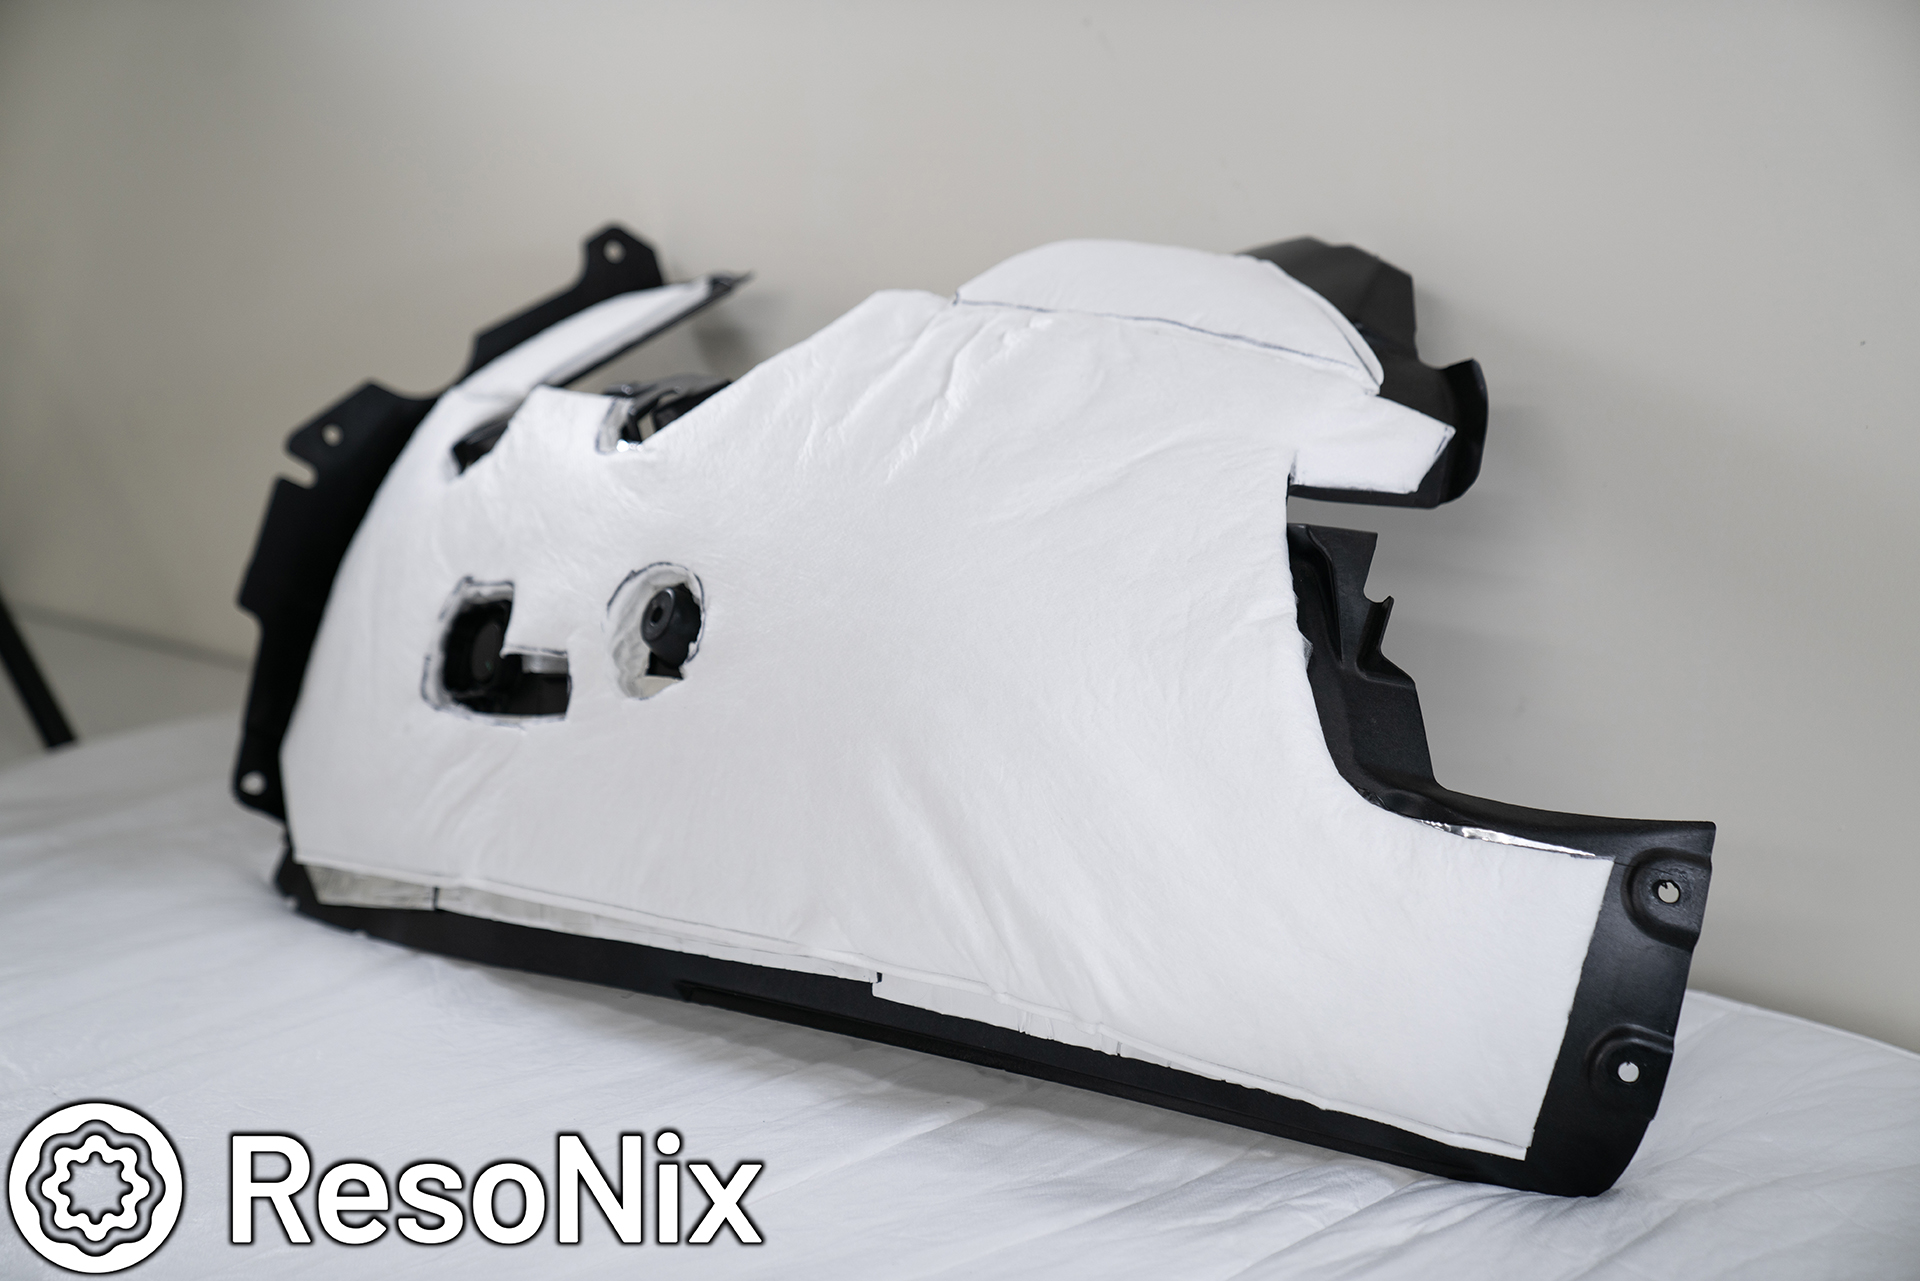
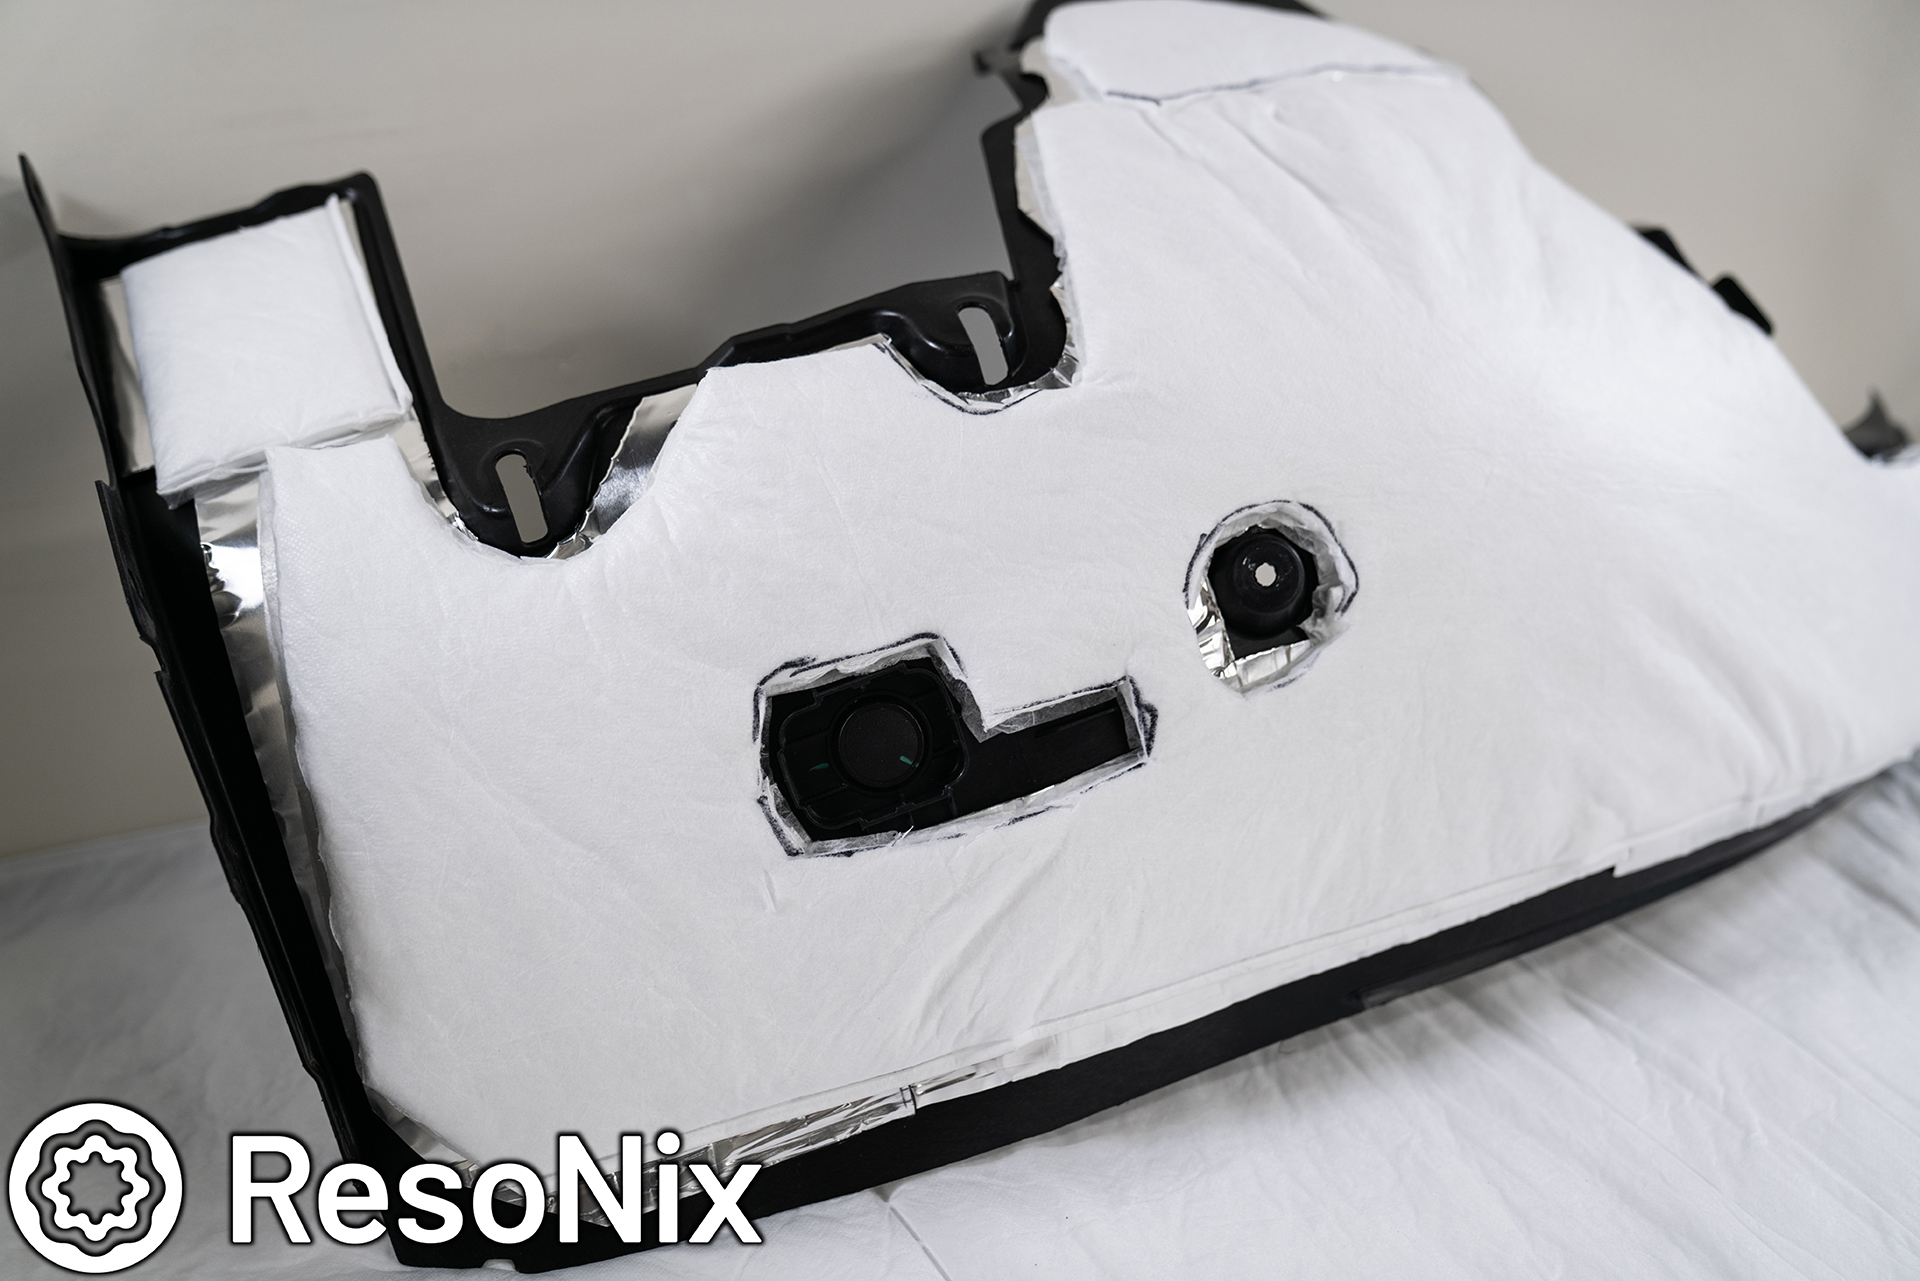
       Rear Parcel Shelf/Quarter Panel Area: The rear portion of the vehicle was the worst offender. It seemed as if every bit of the body under the plastic trim panels were having a party. The drone from resonance was insane. You could tell that this wasn’t just a loud exhaust causing this noise, but was in fact being caused by resonating panels generating a noise of their own. Once again, this entire area sounded like a hollow drum, but did so at all speeds, even at idle and low RPM’s it was obvious. You also heard a ton of tire noise coming from the quarter panel areas, which brings us to our next and final problem area..

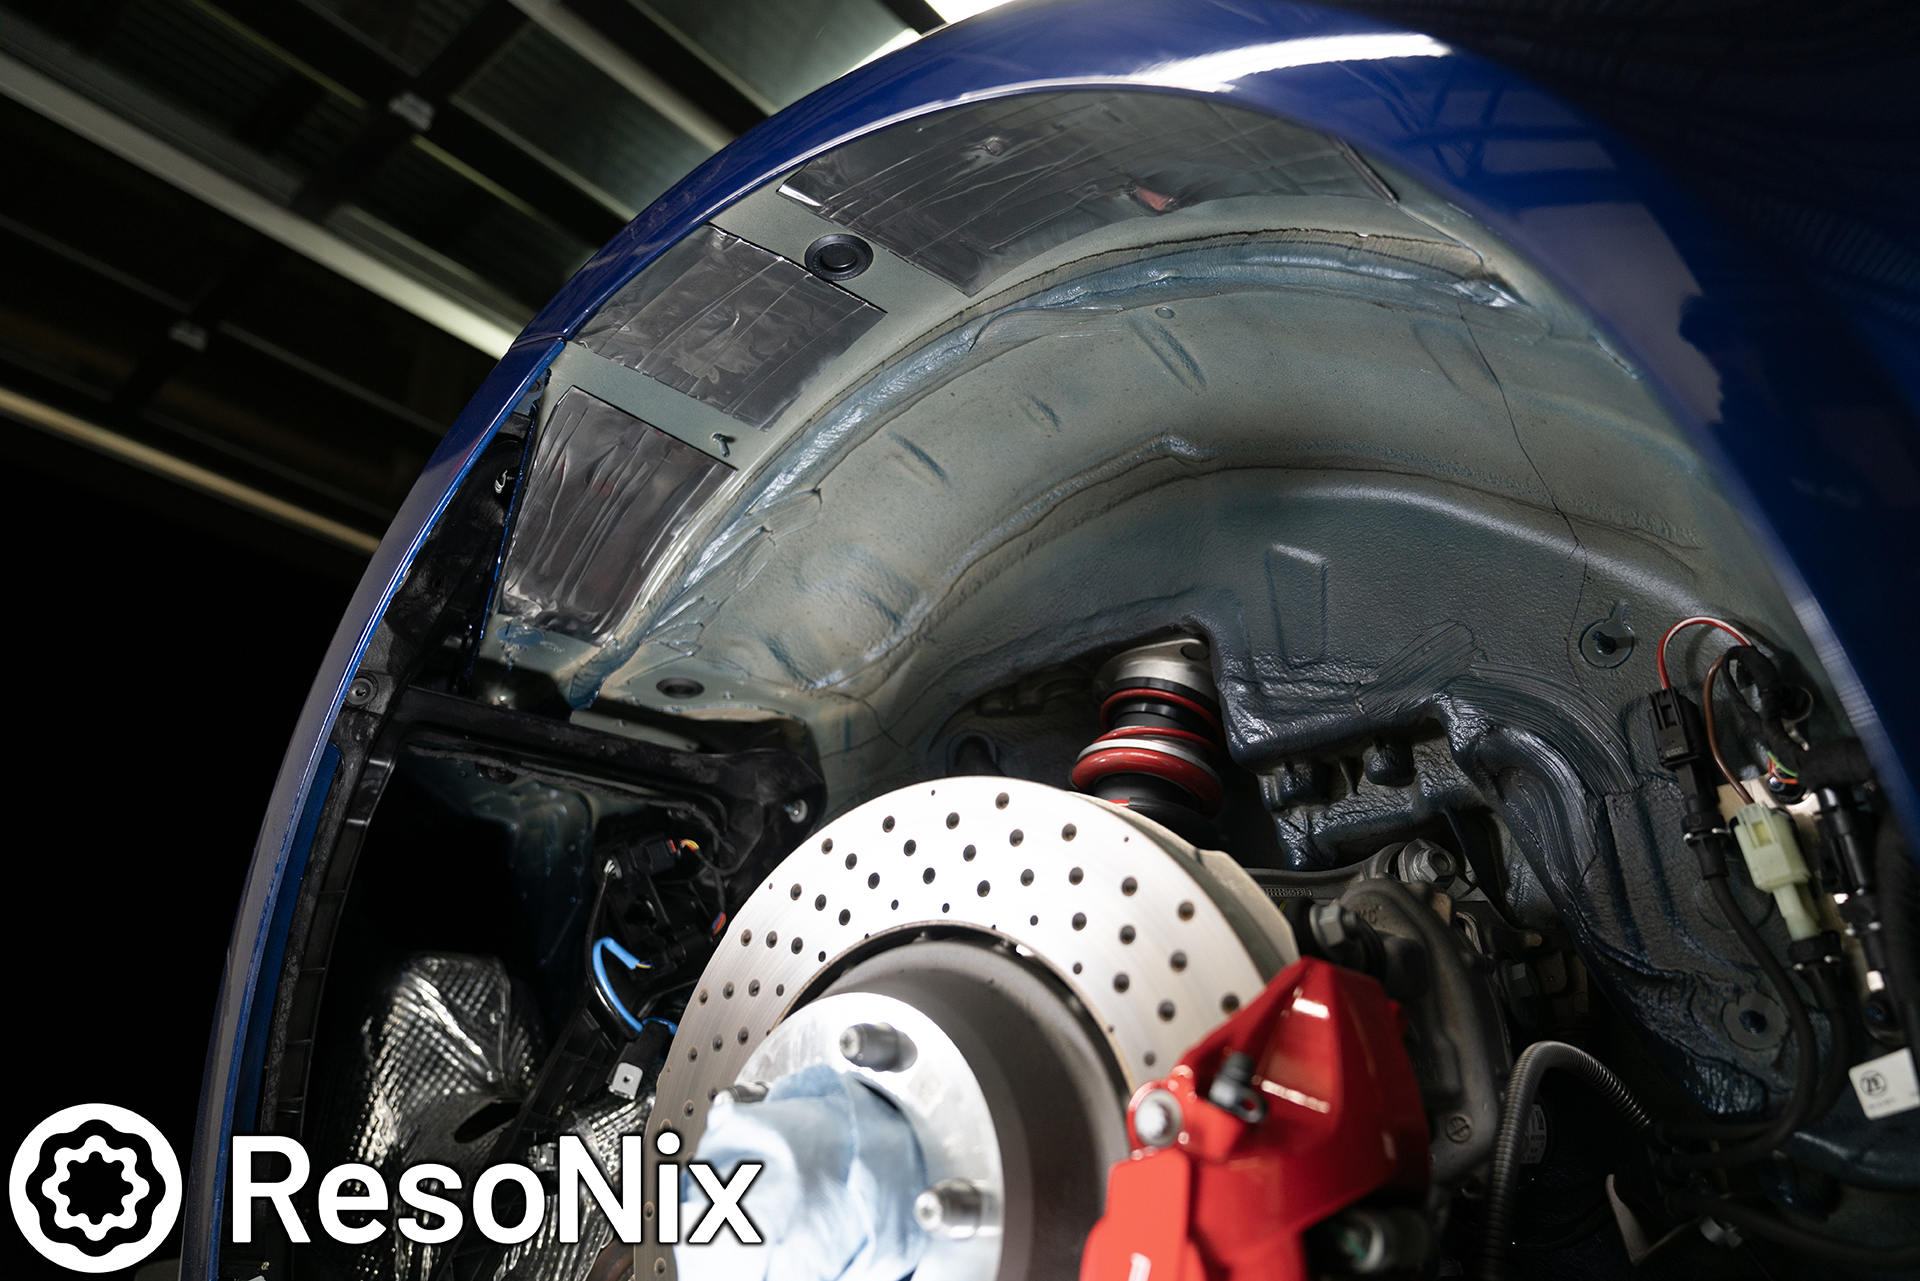
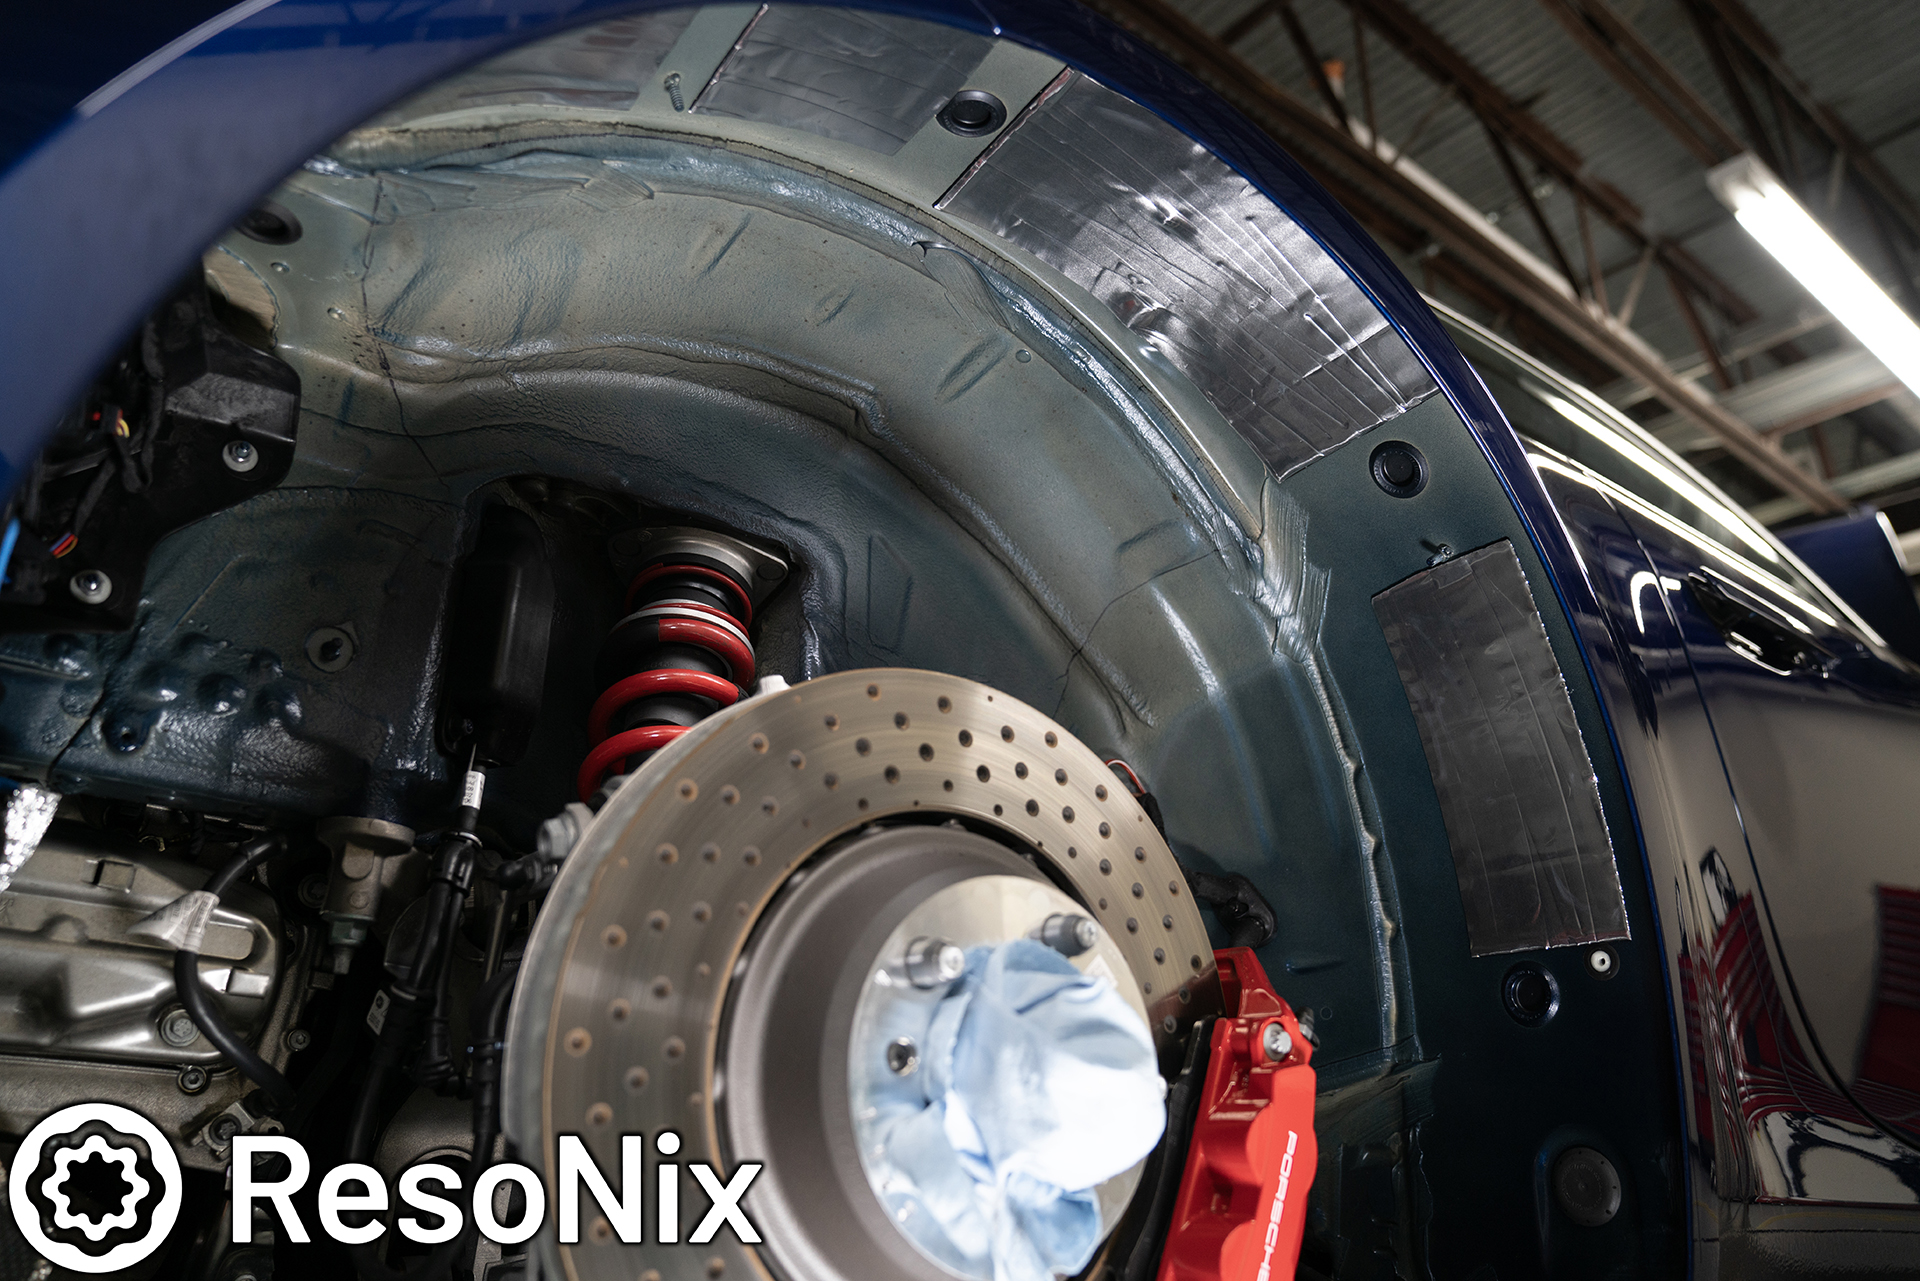
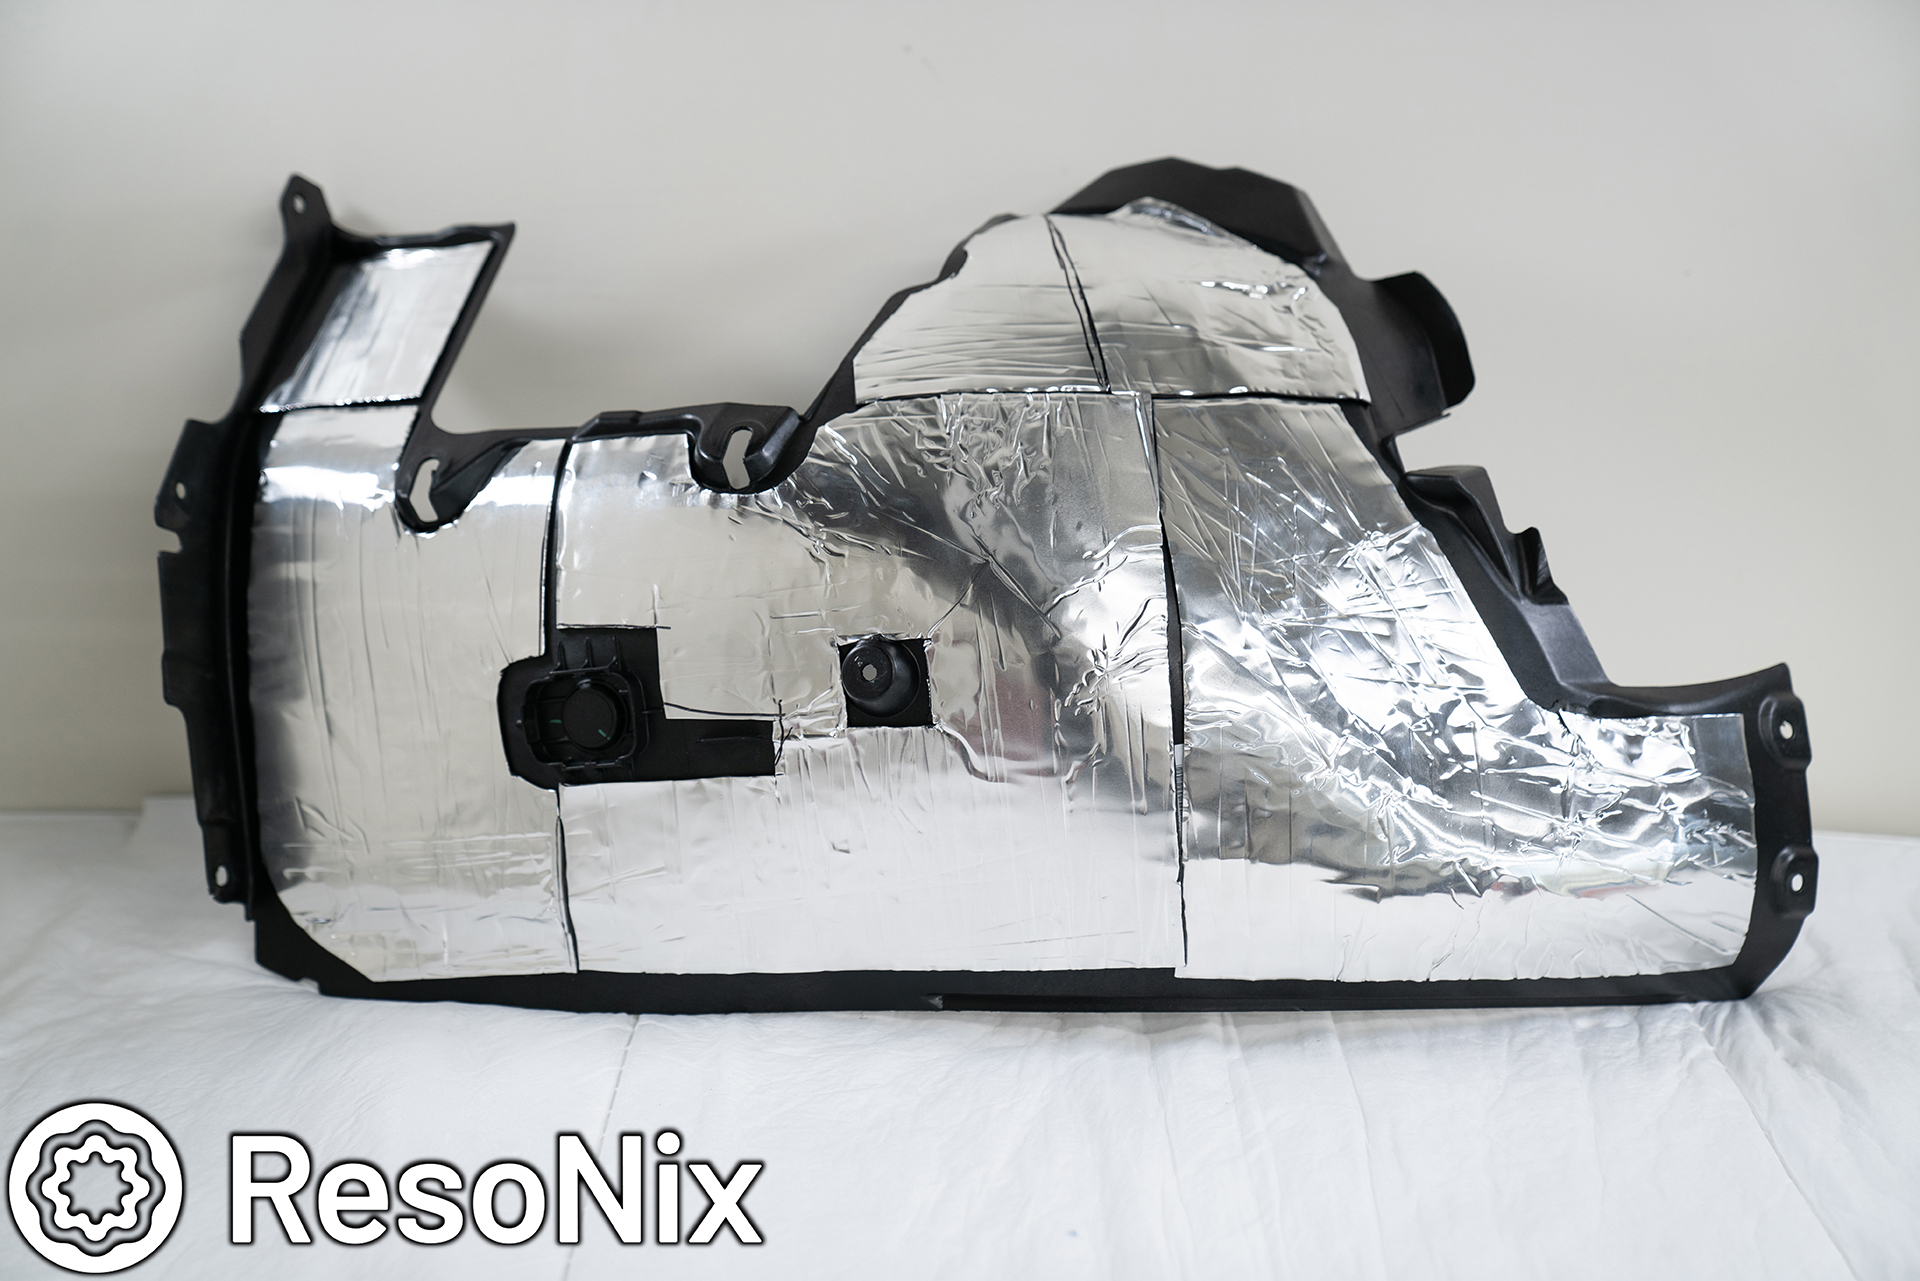
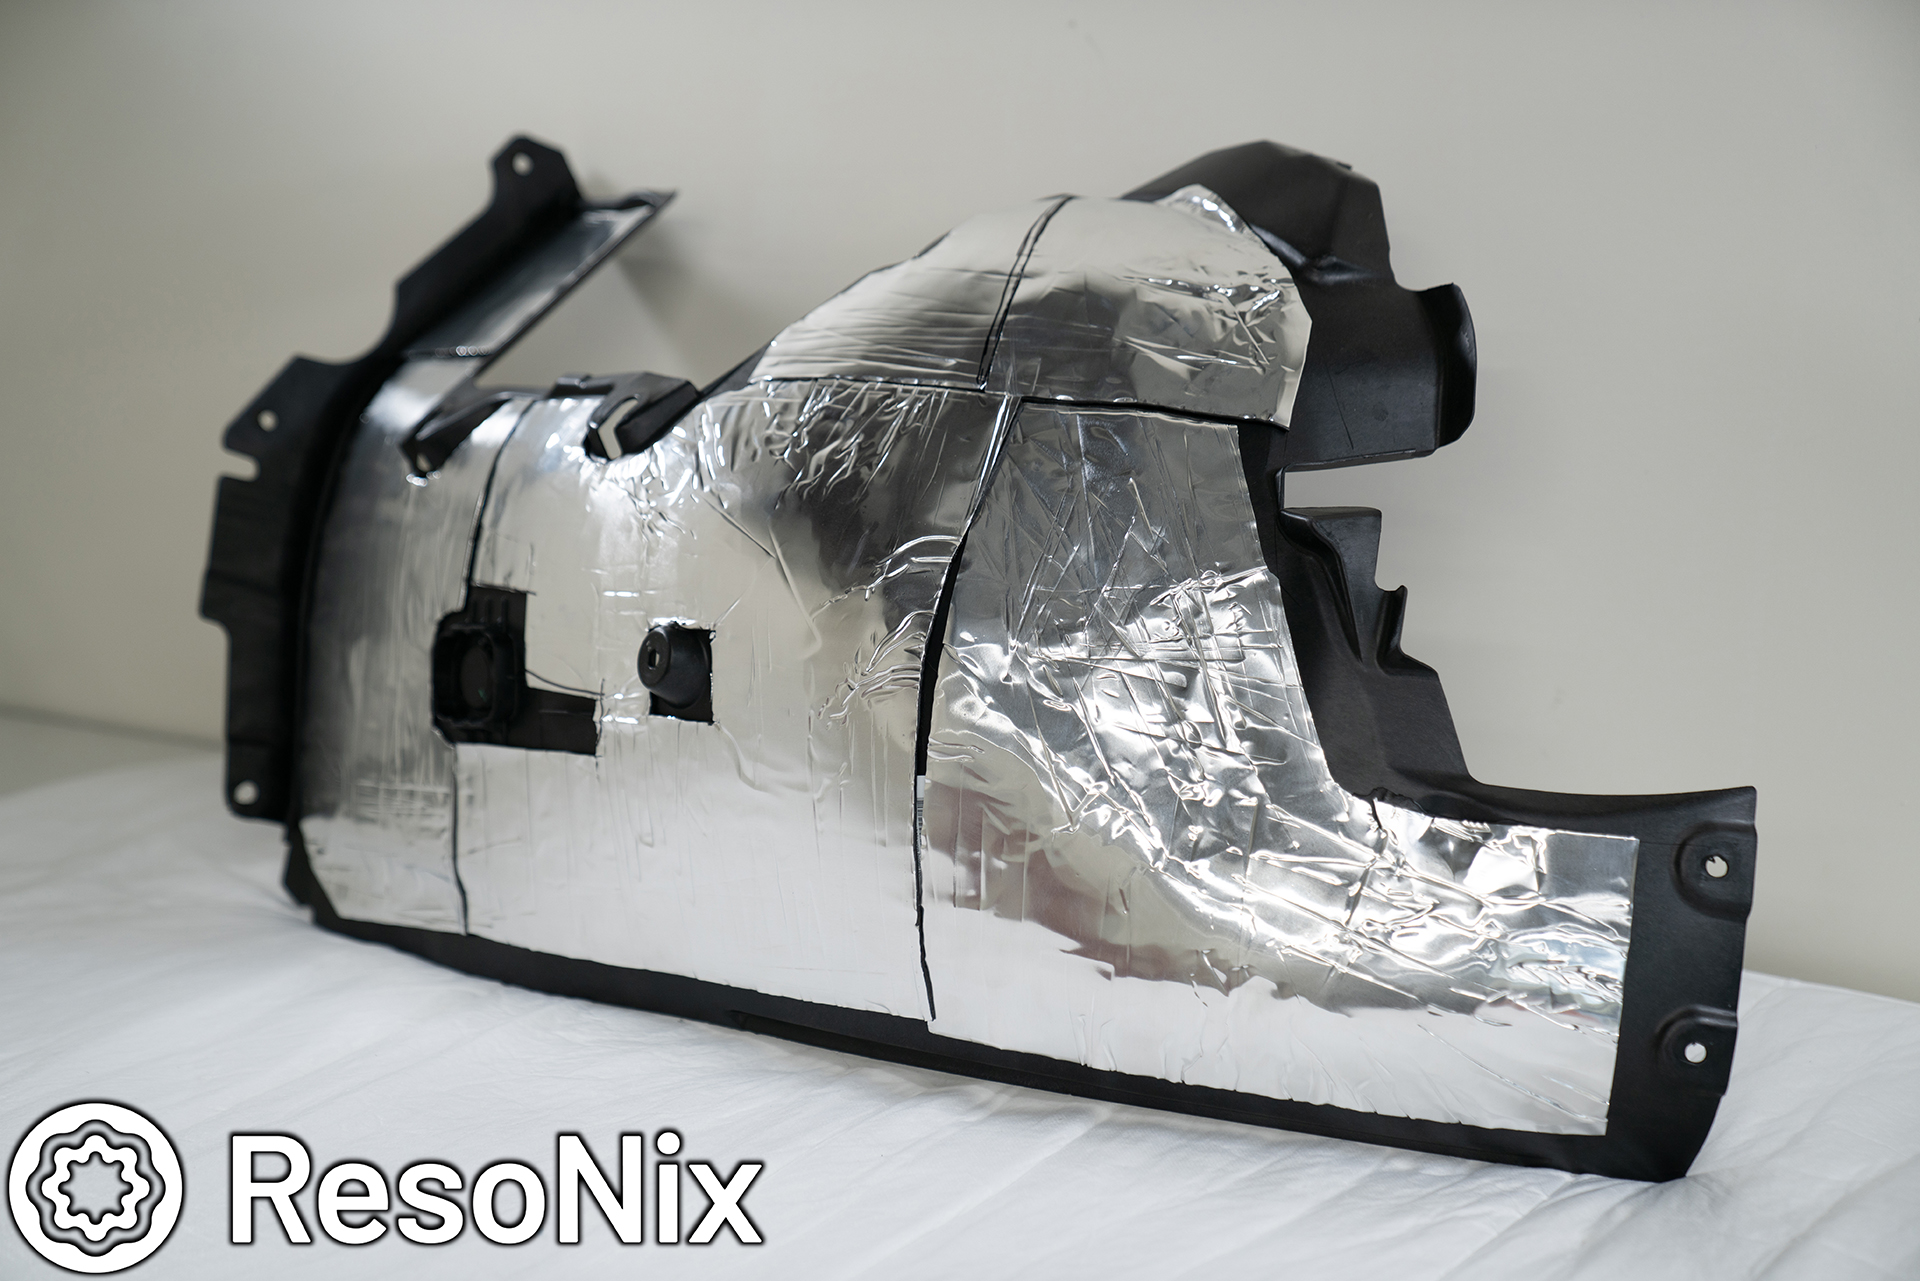
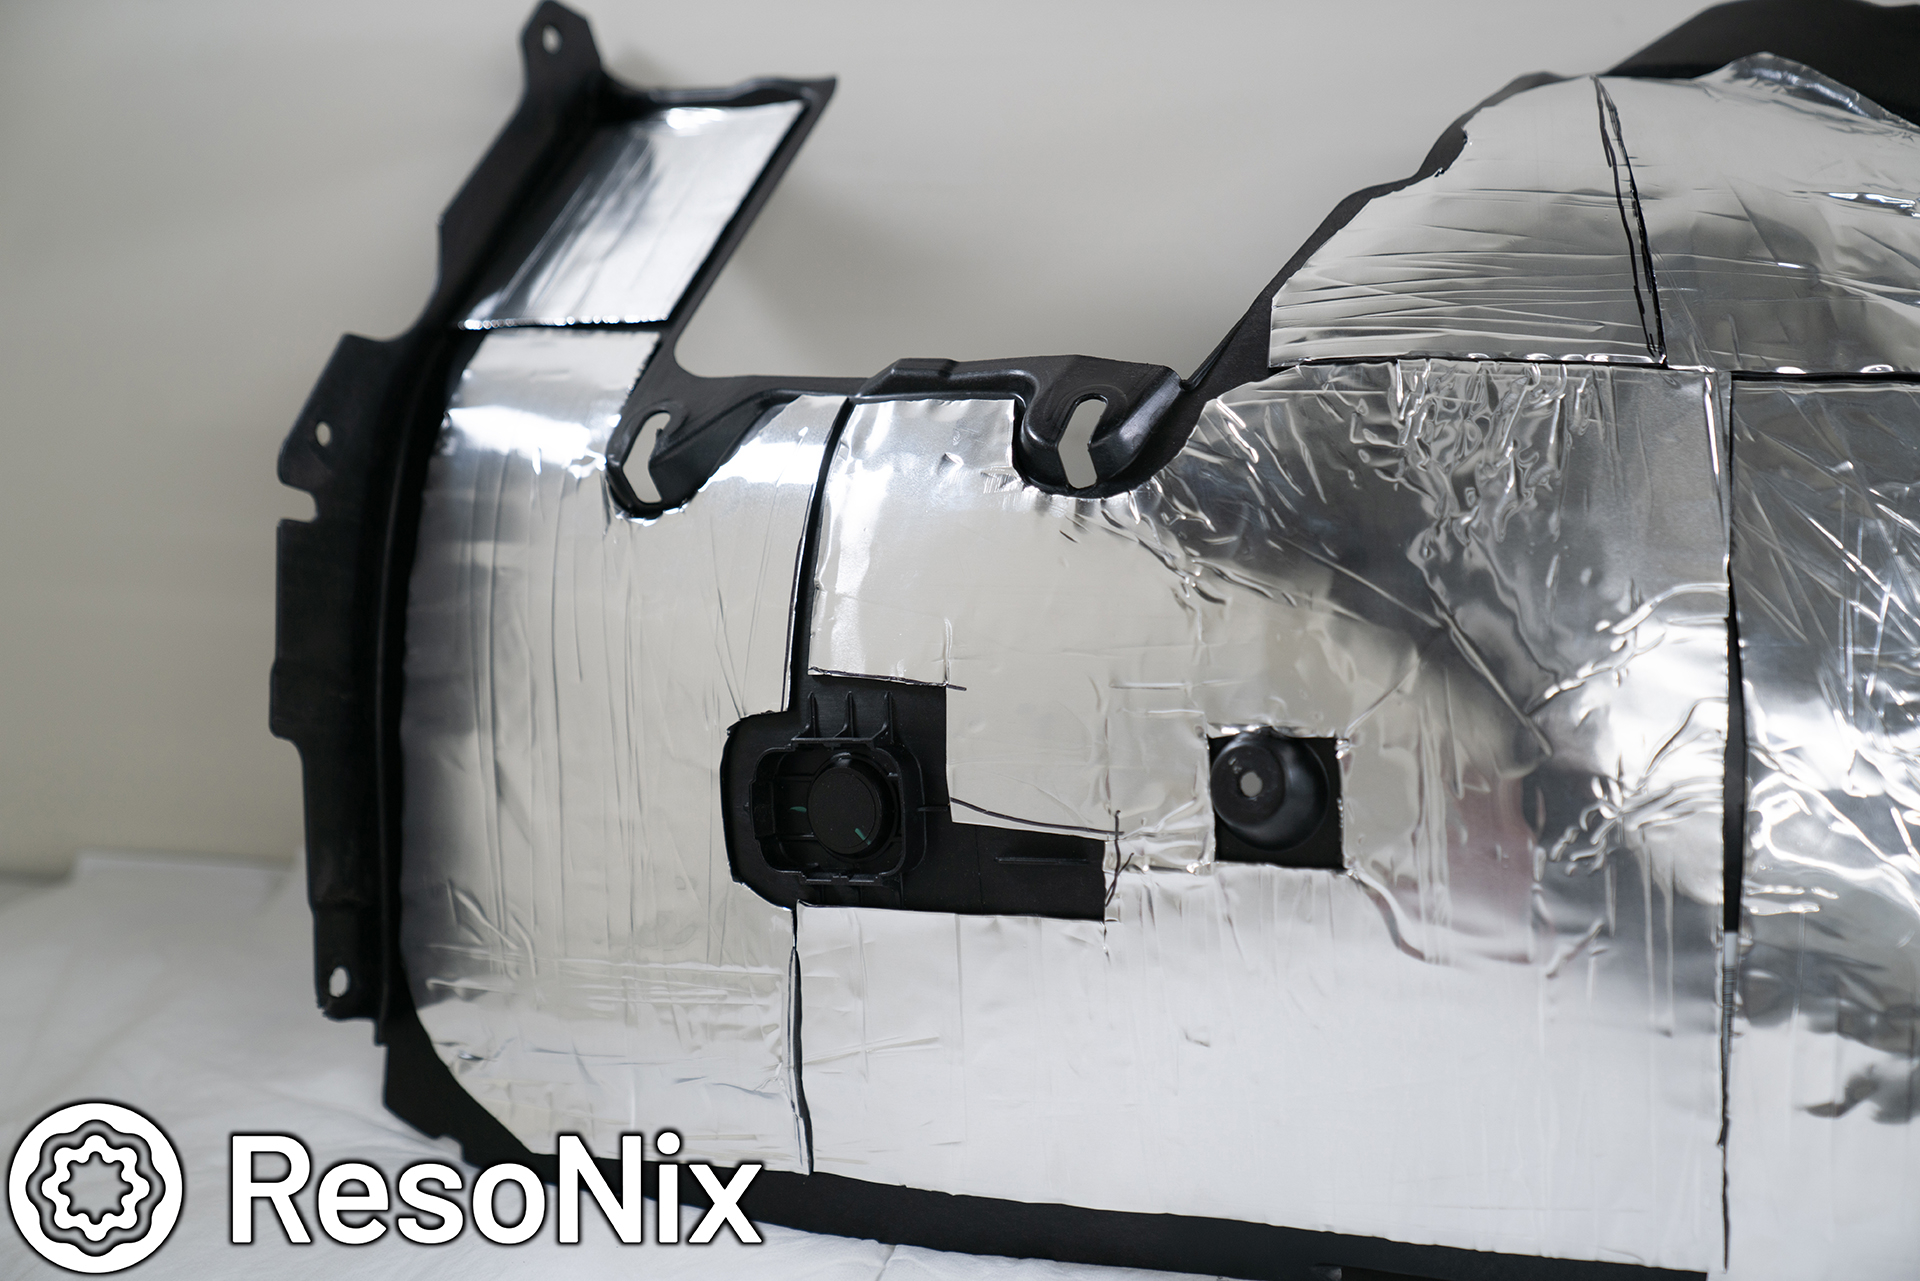
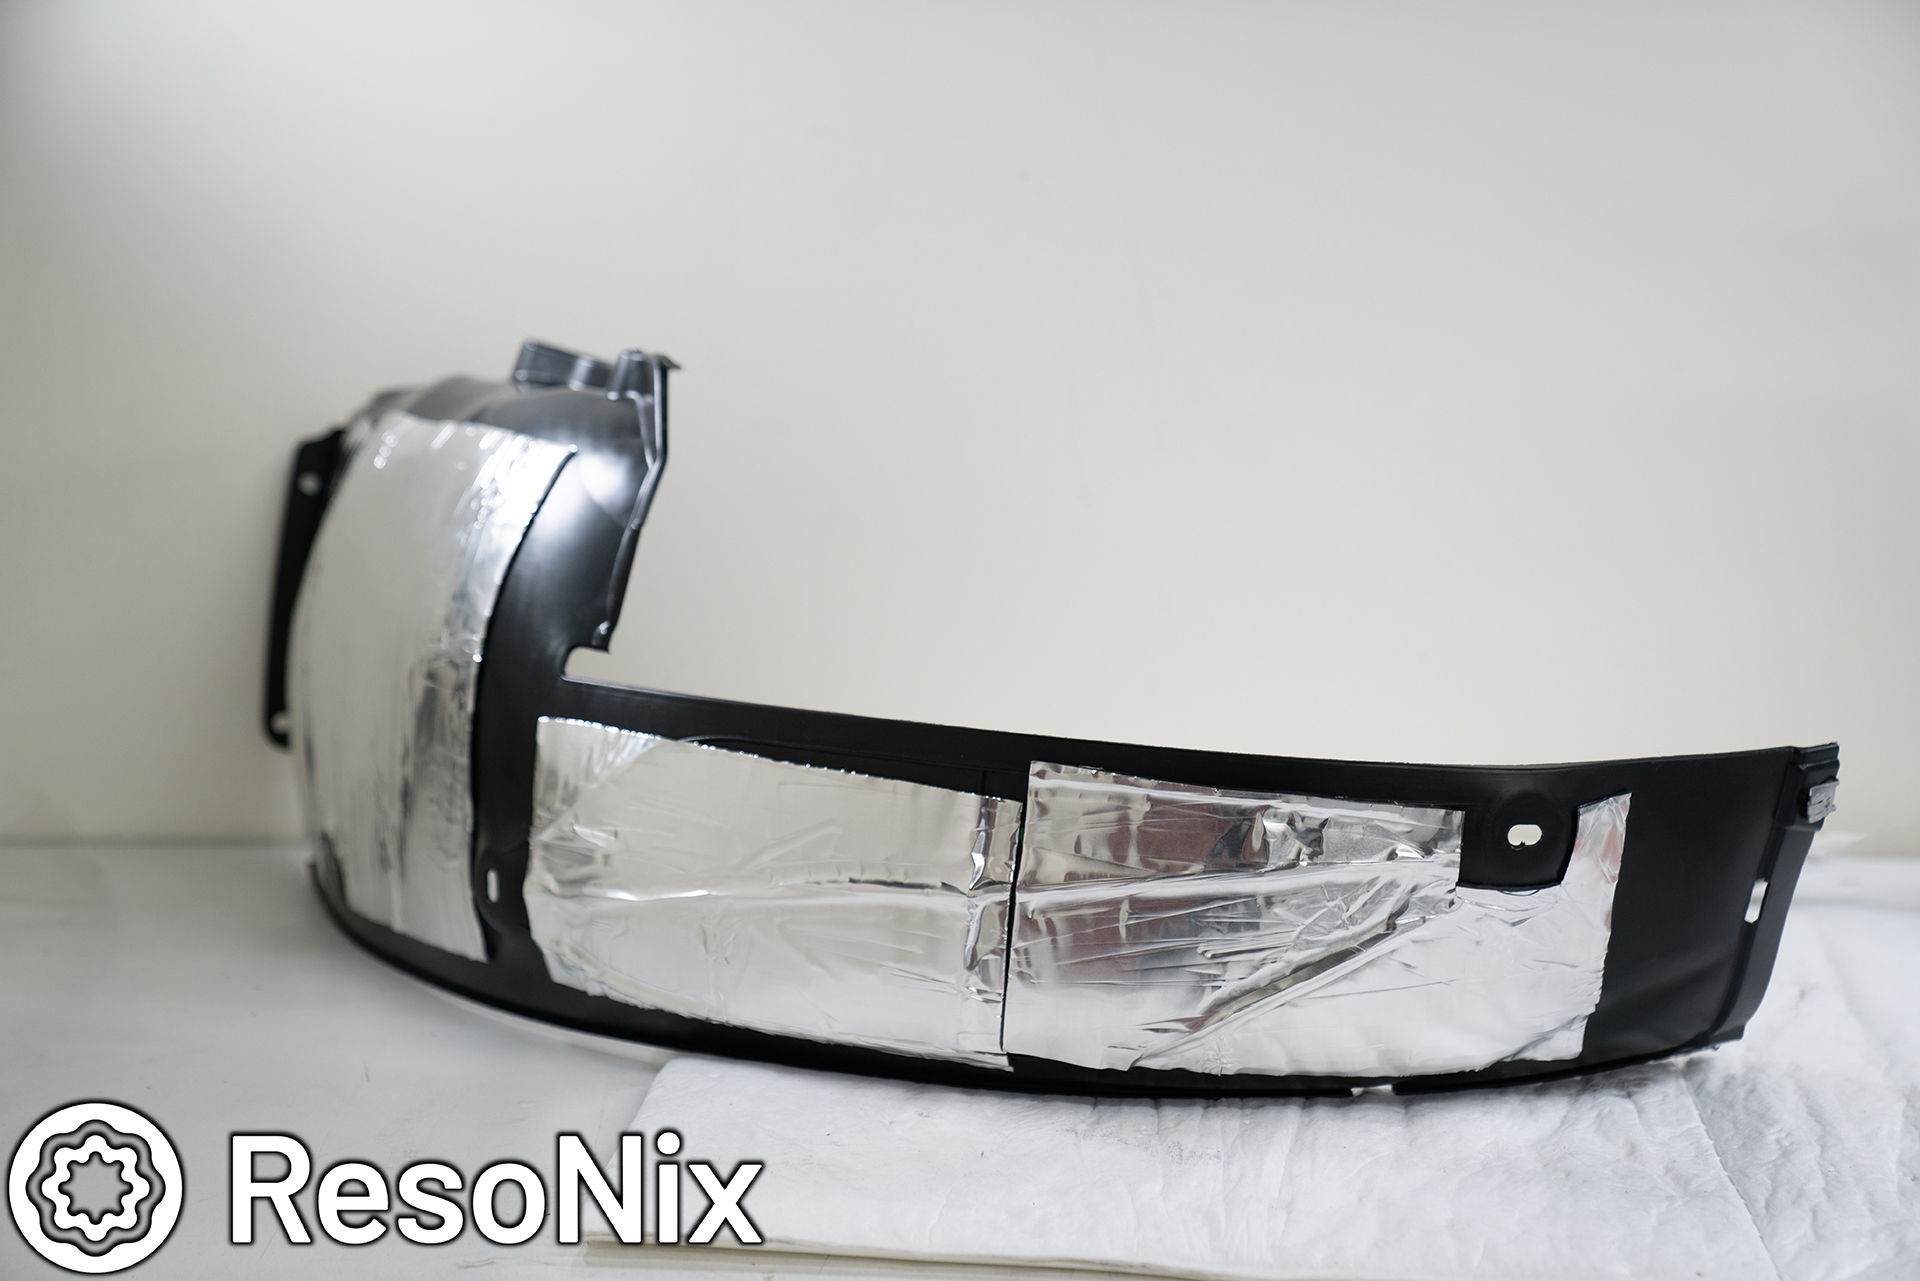
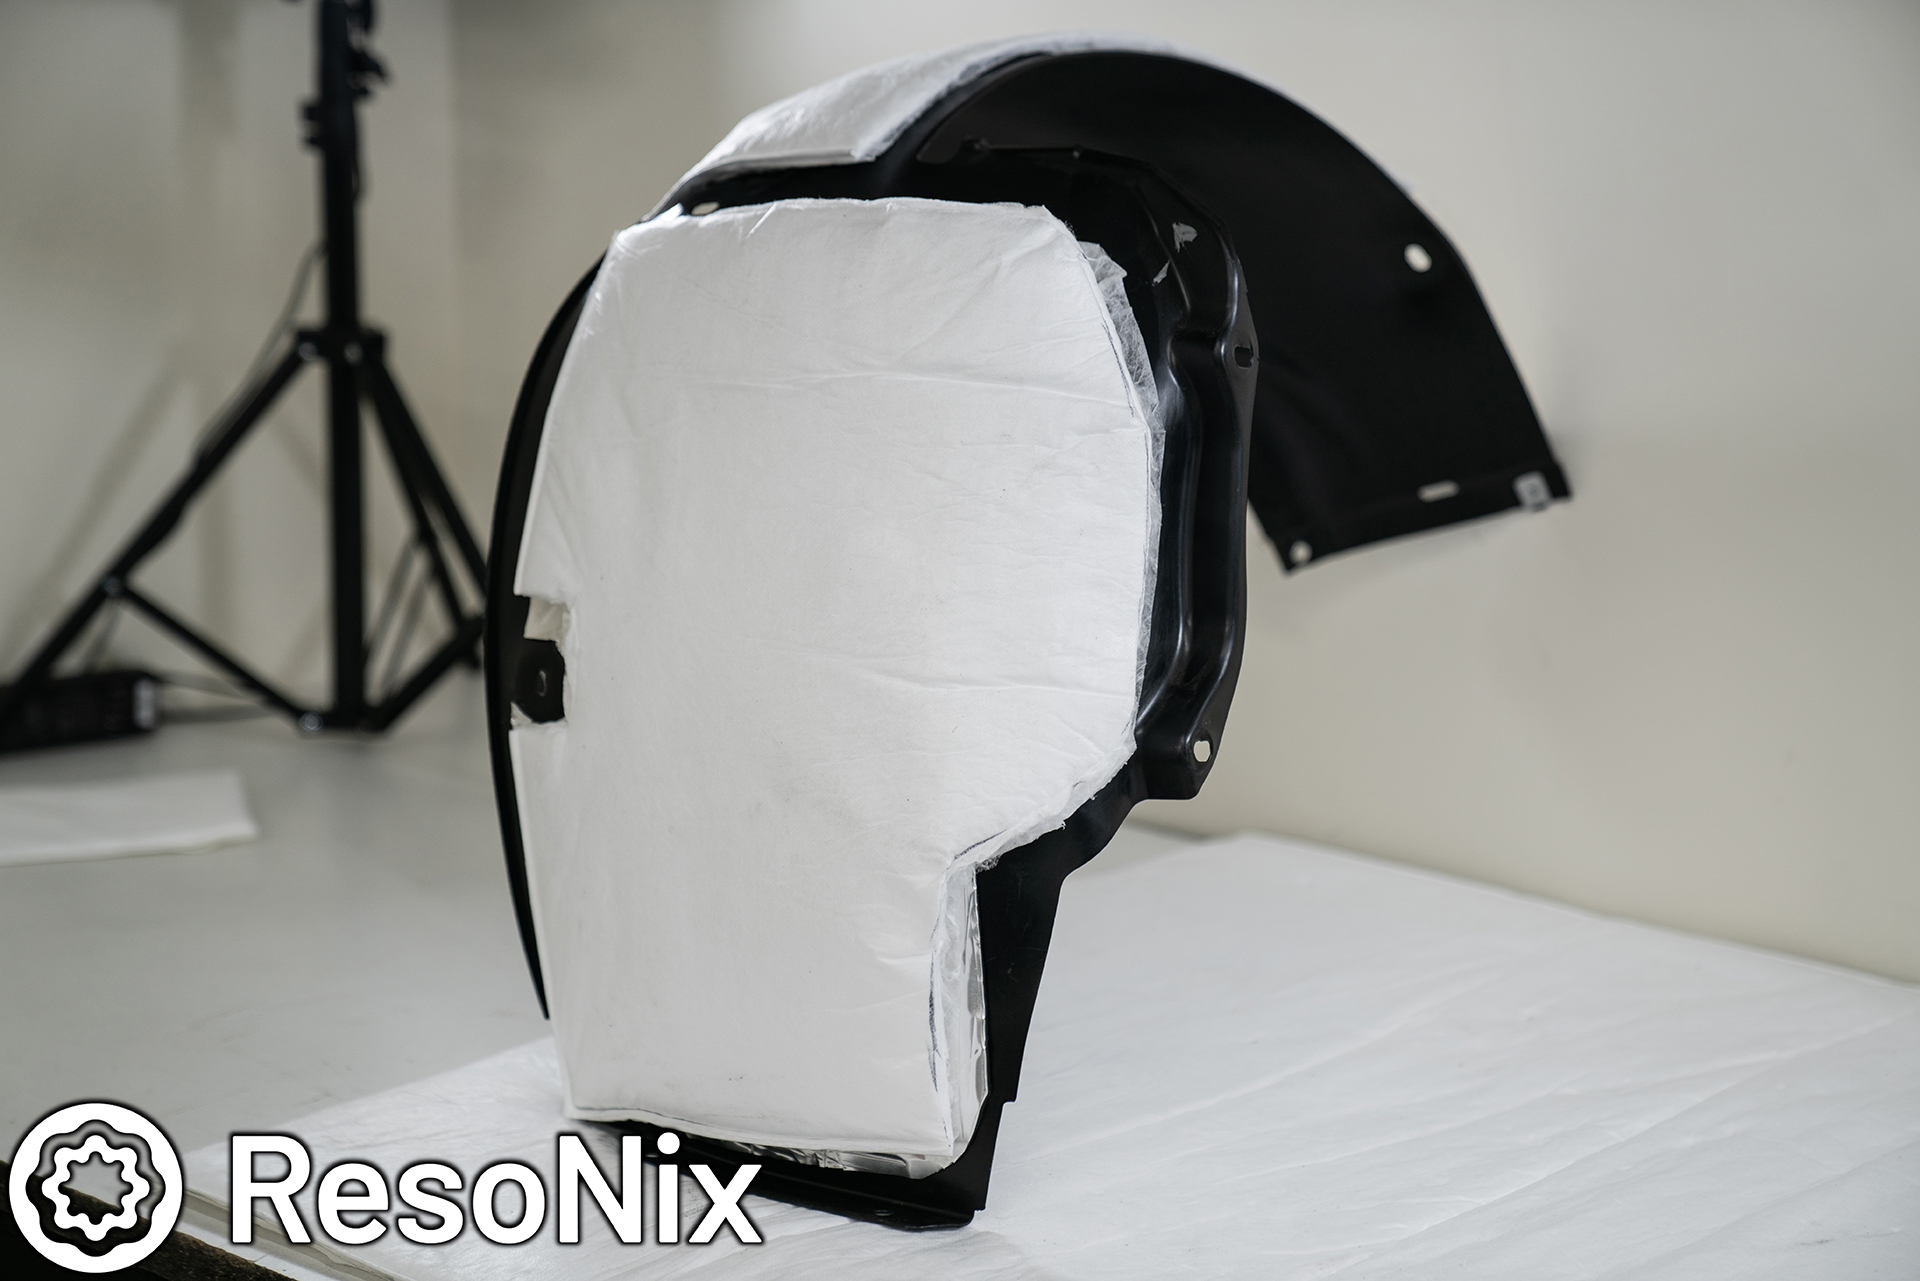
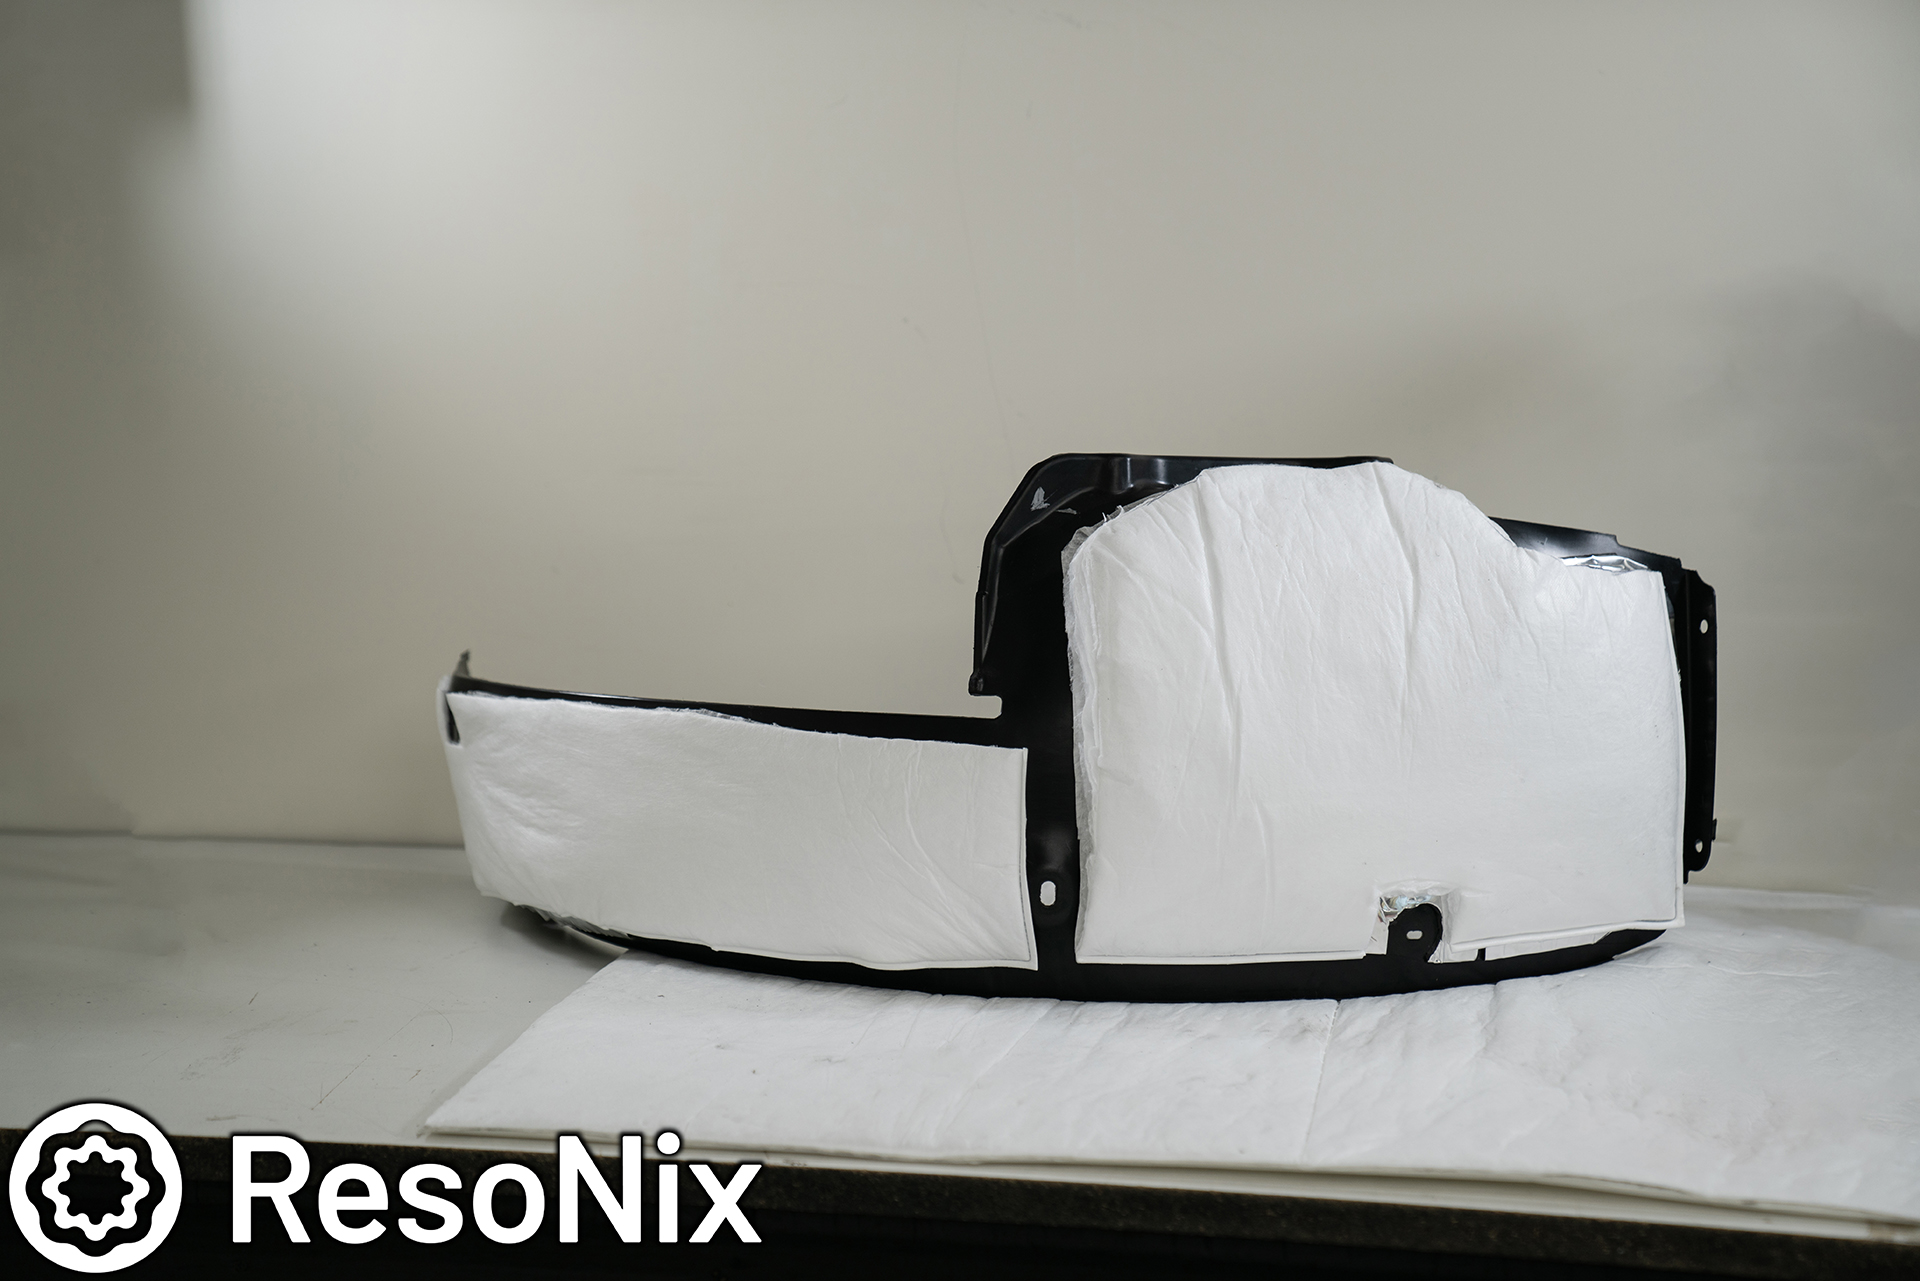
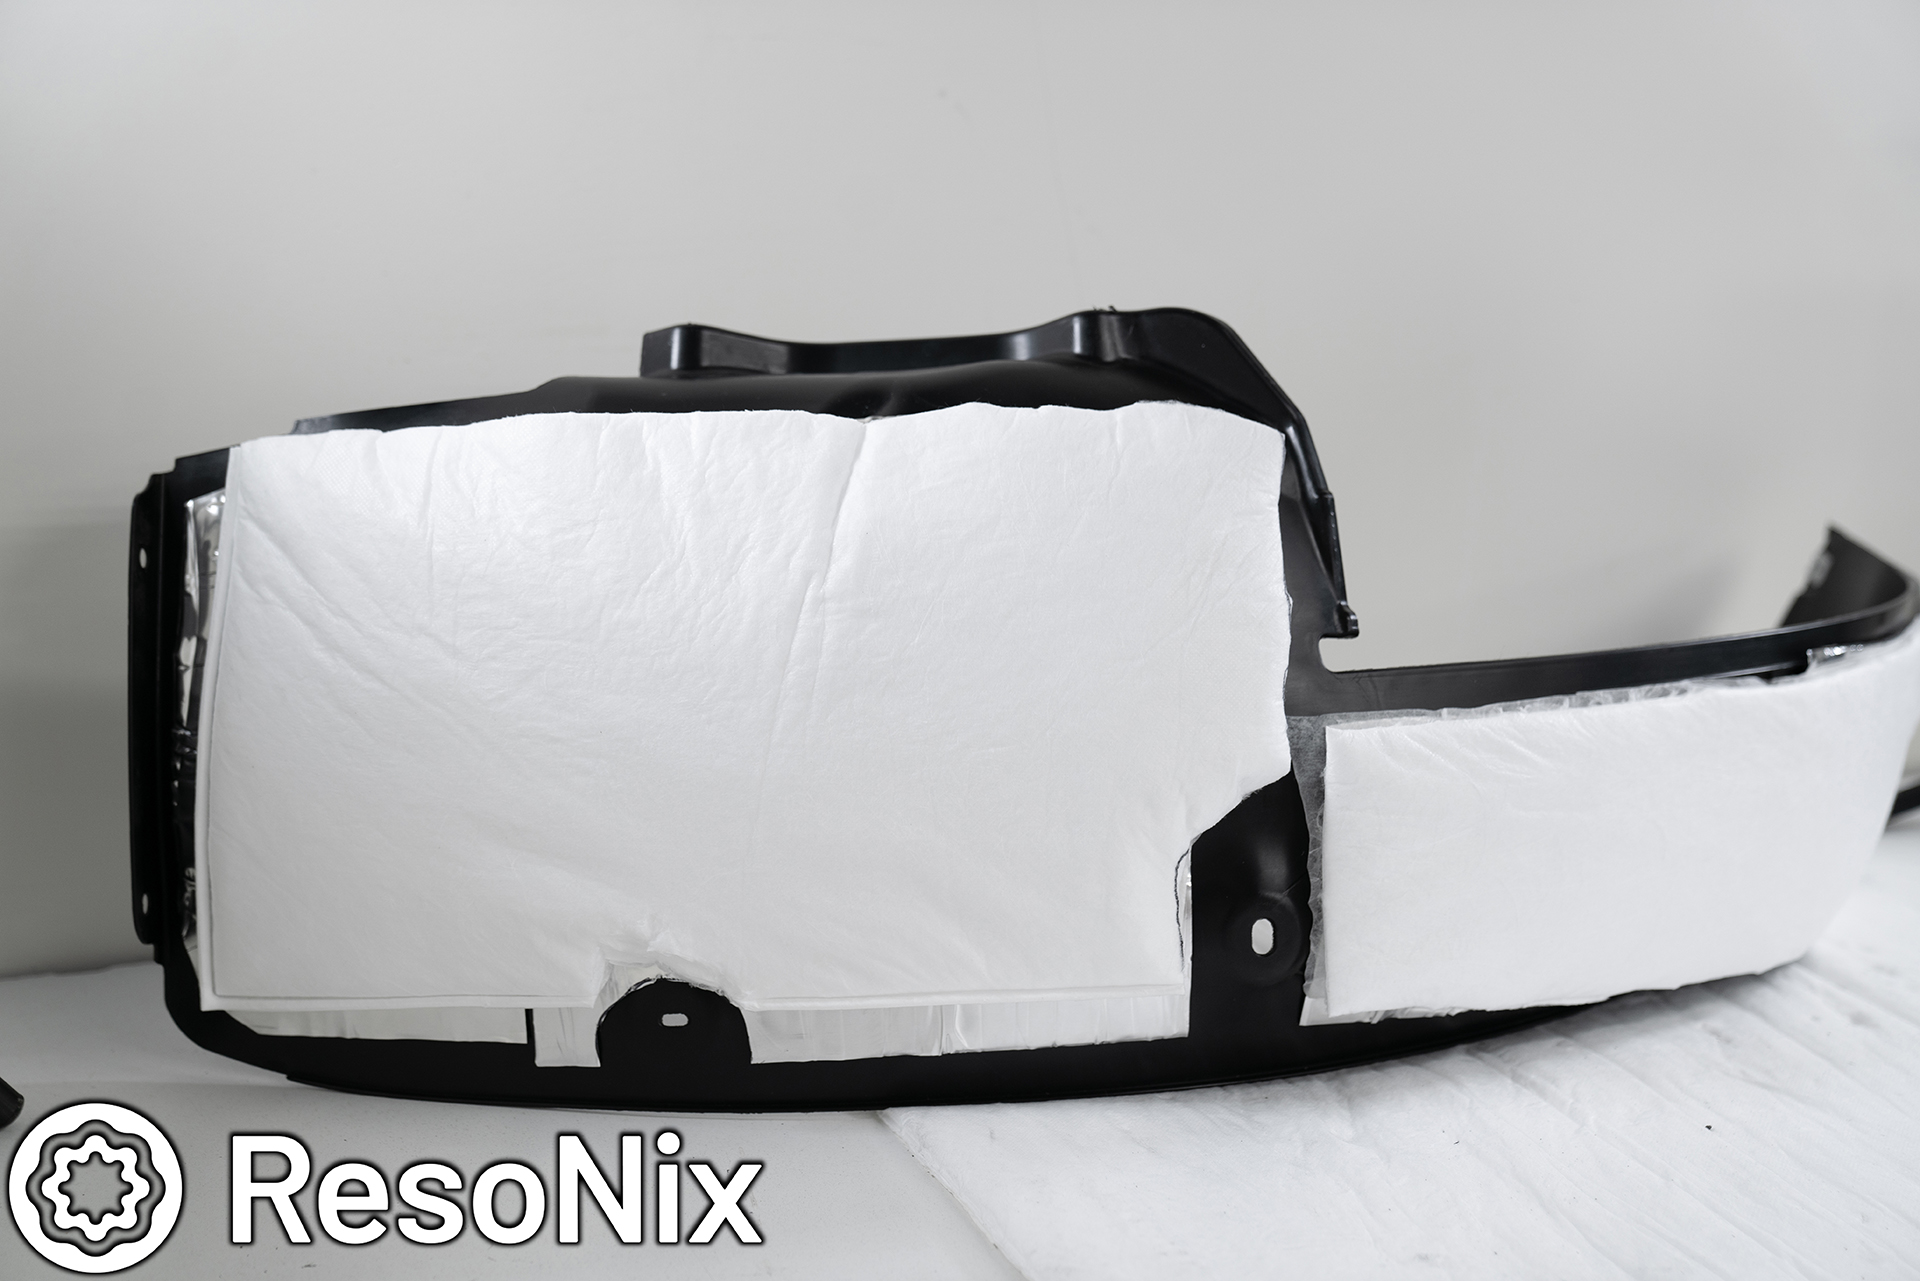
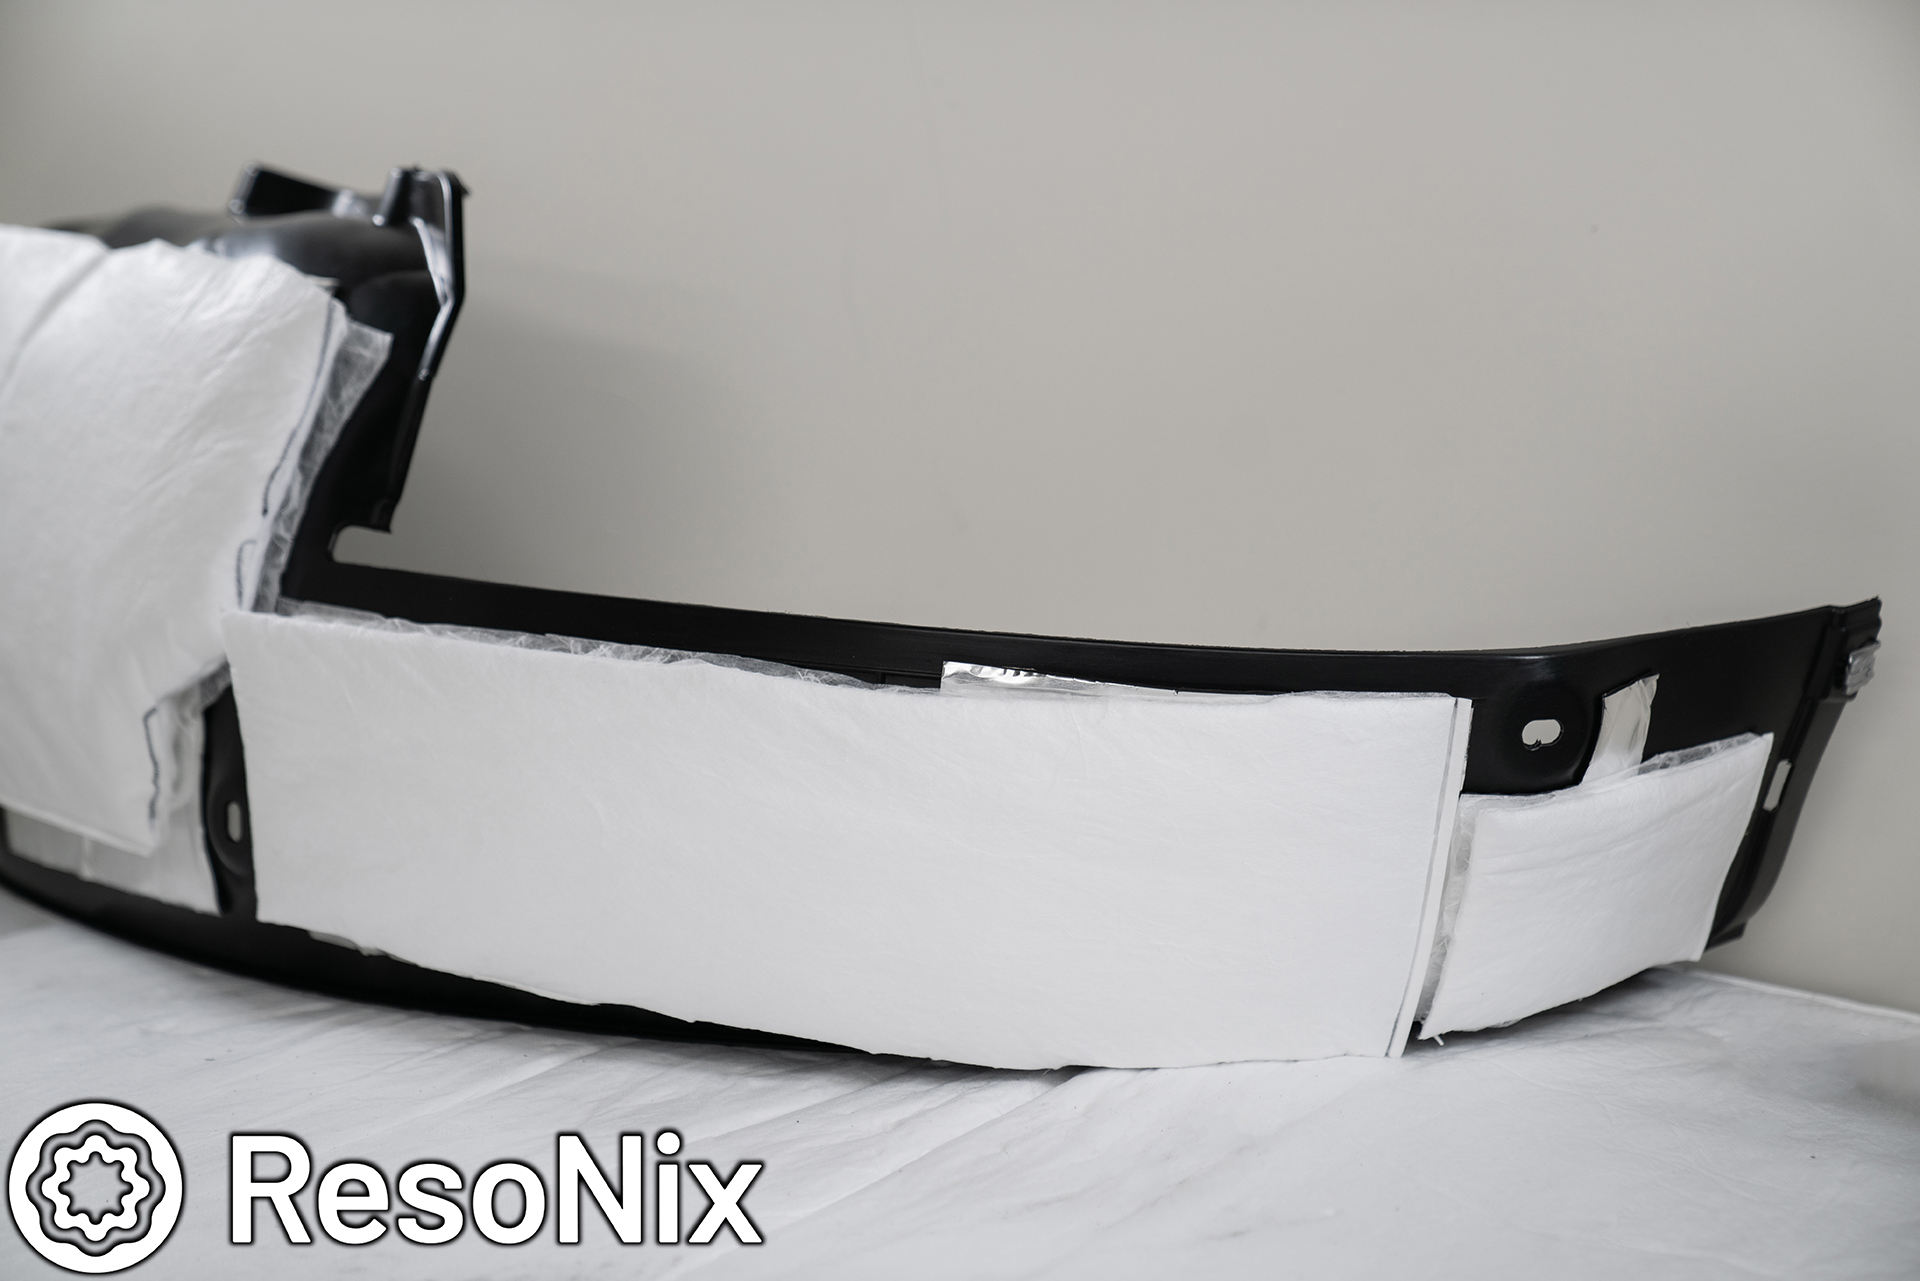
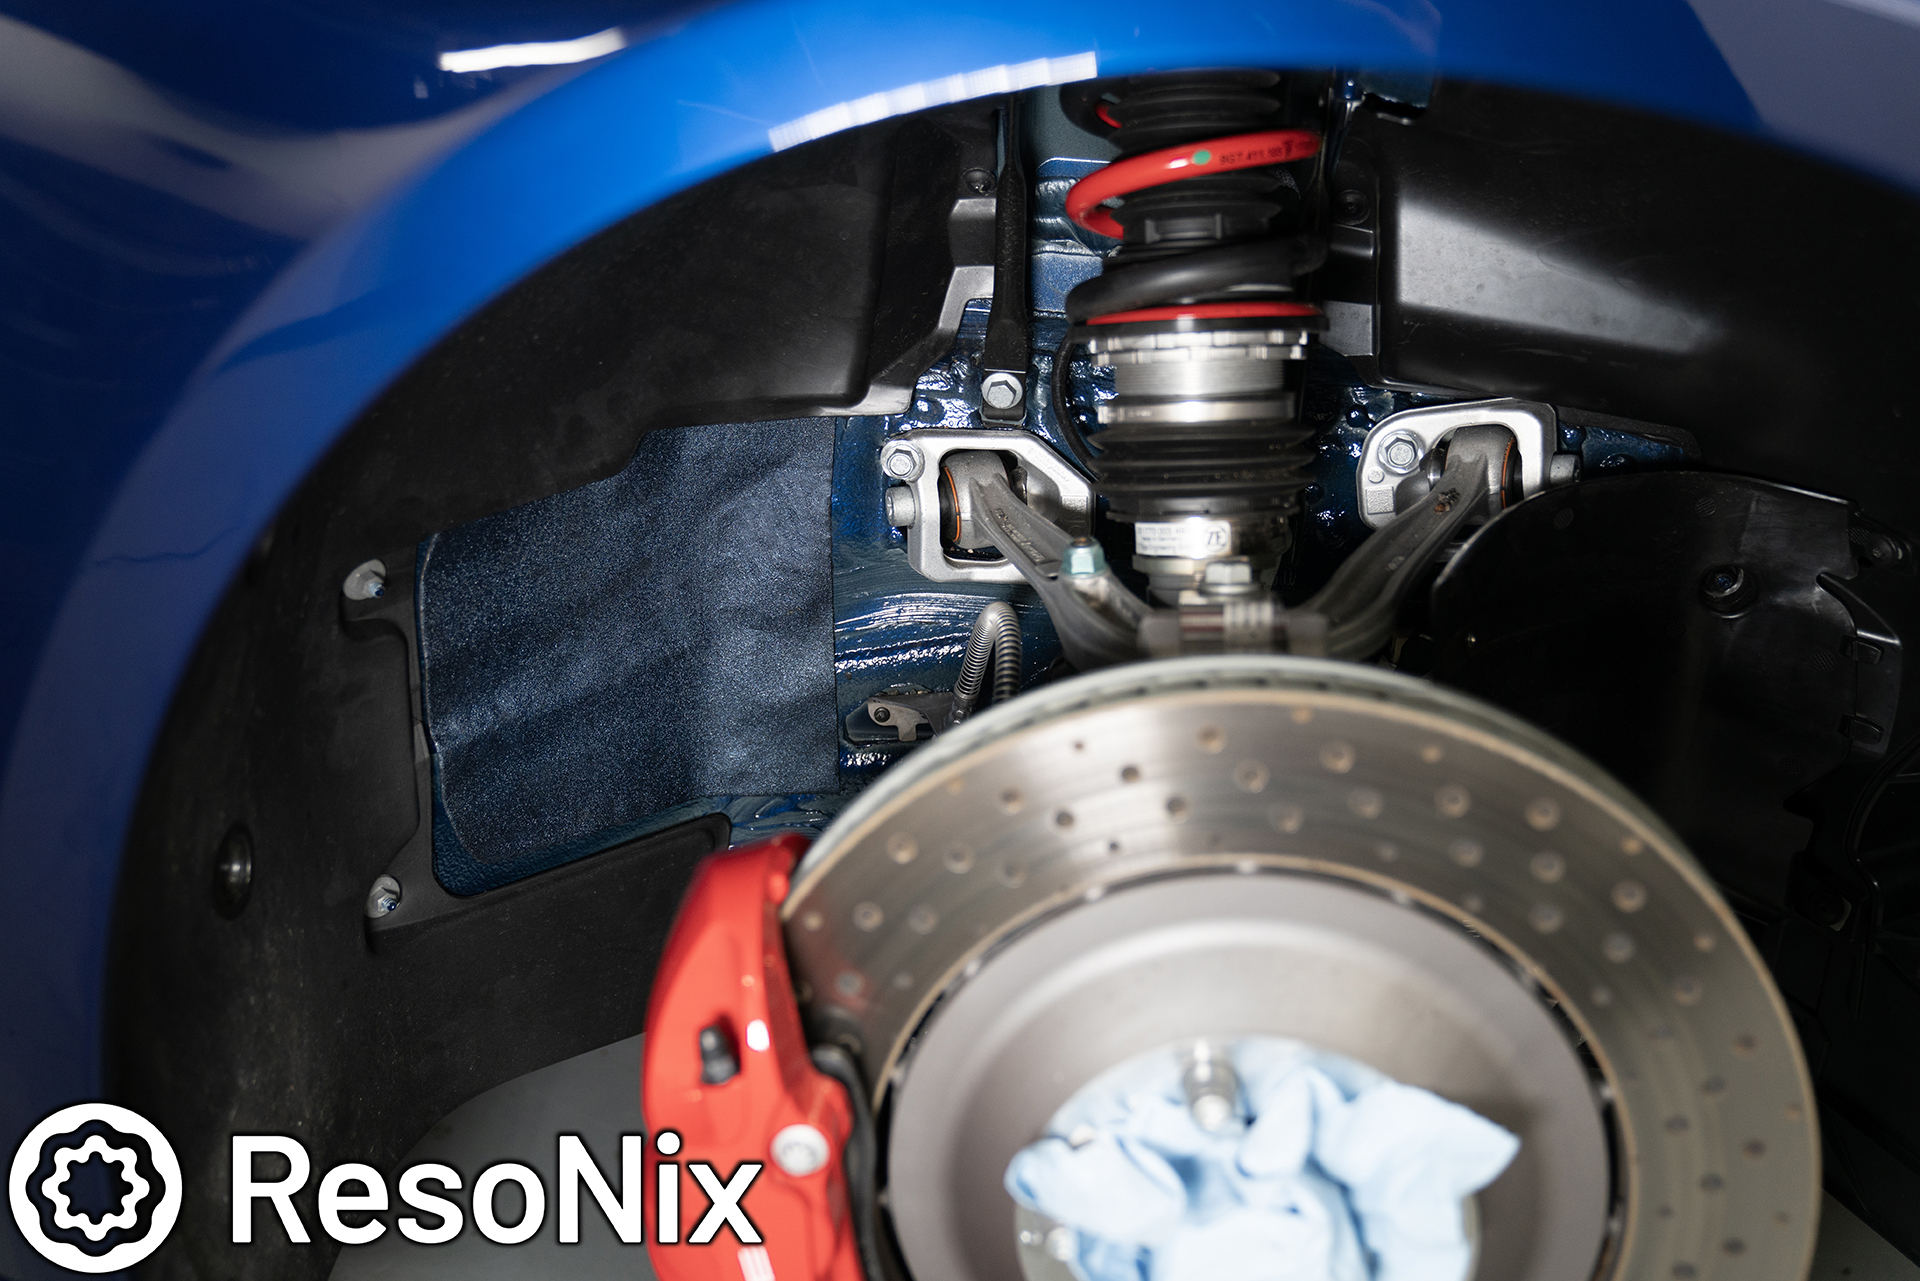
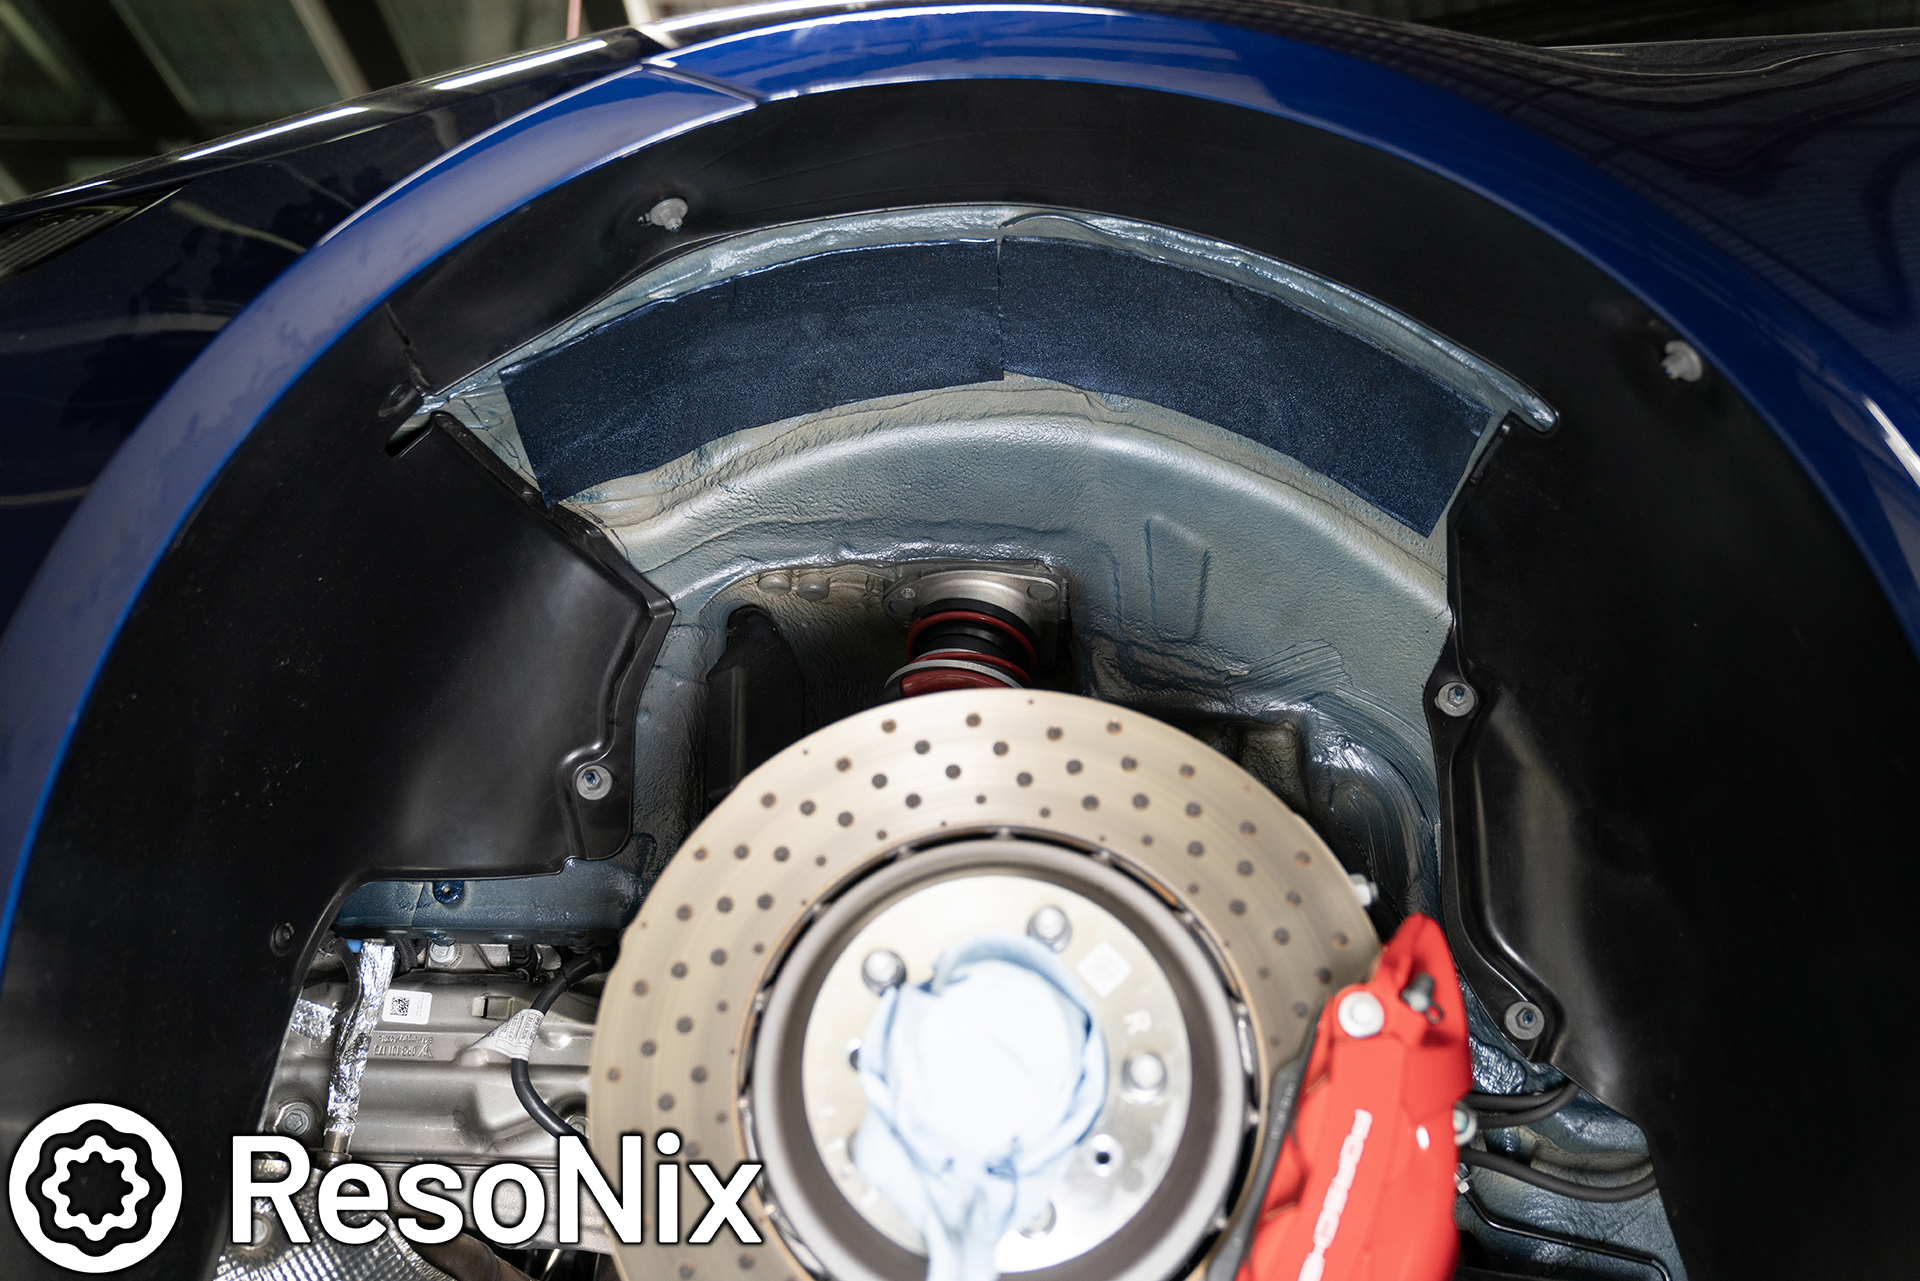
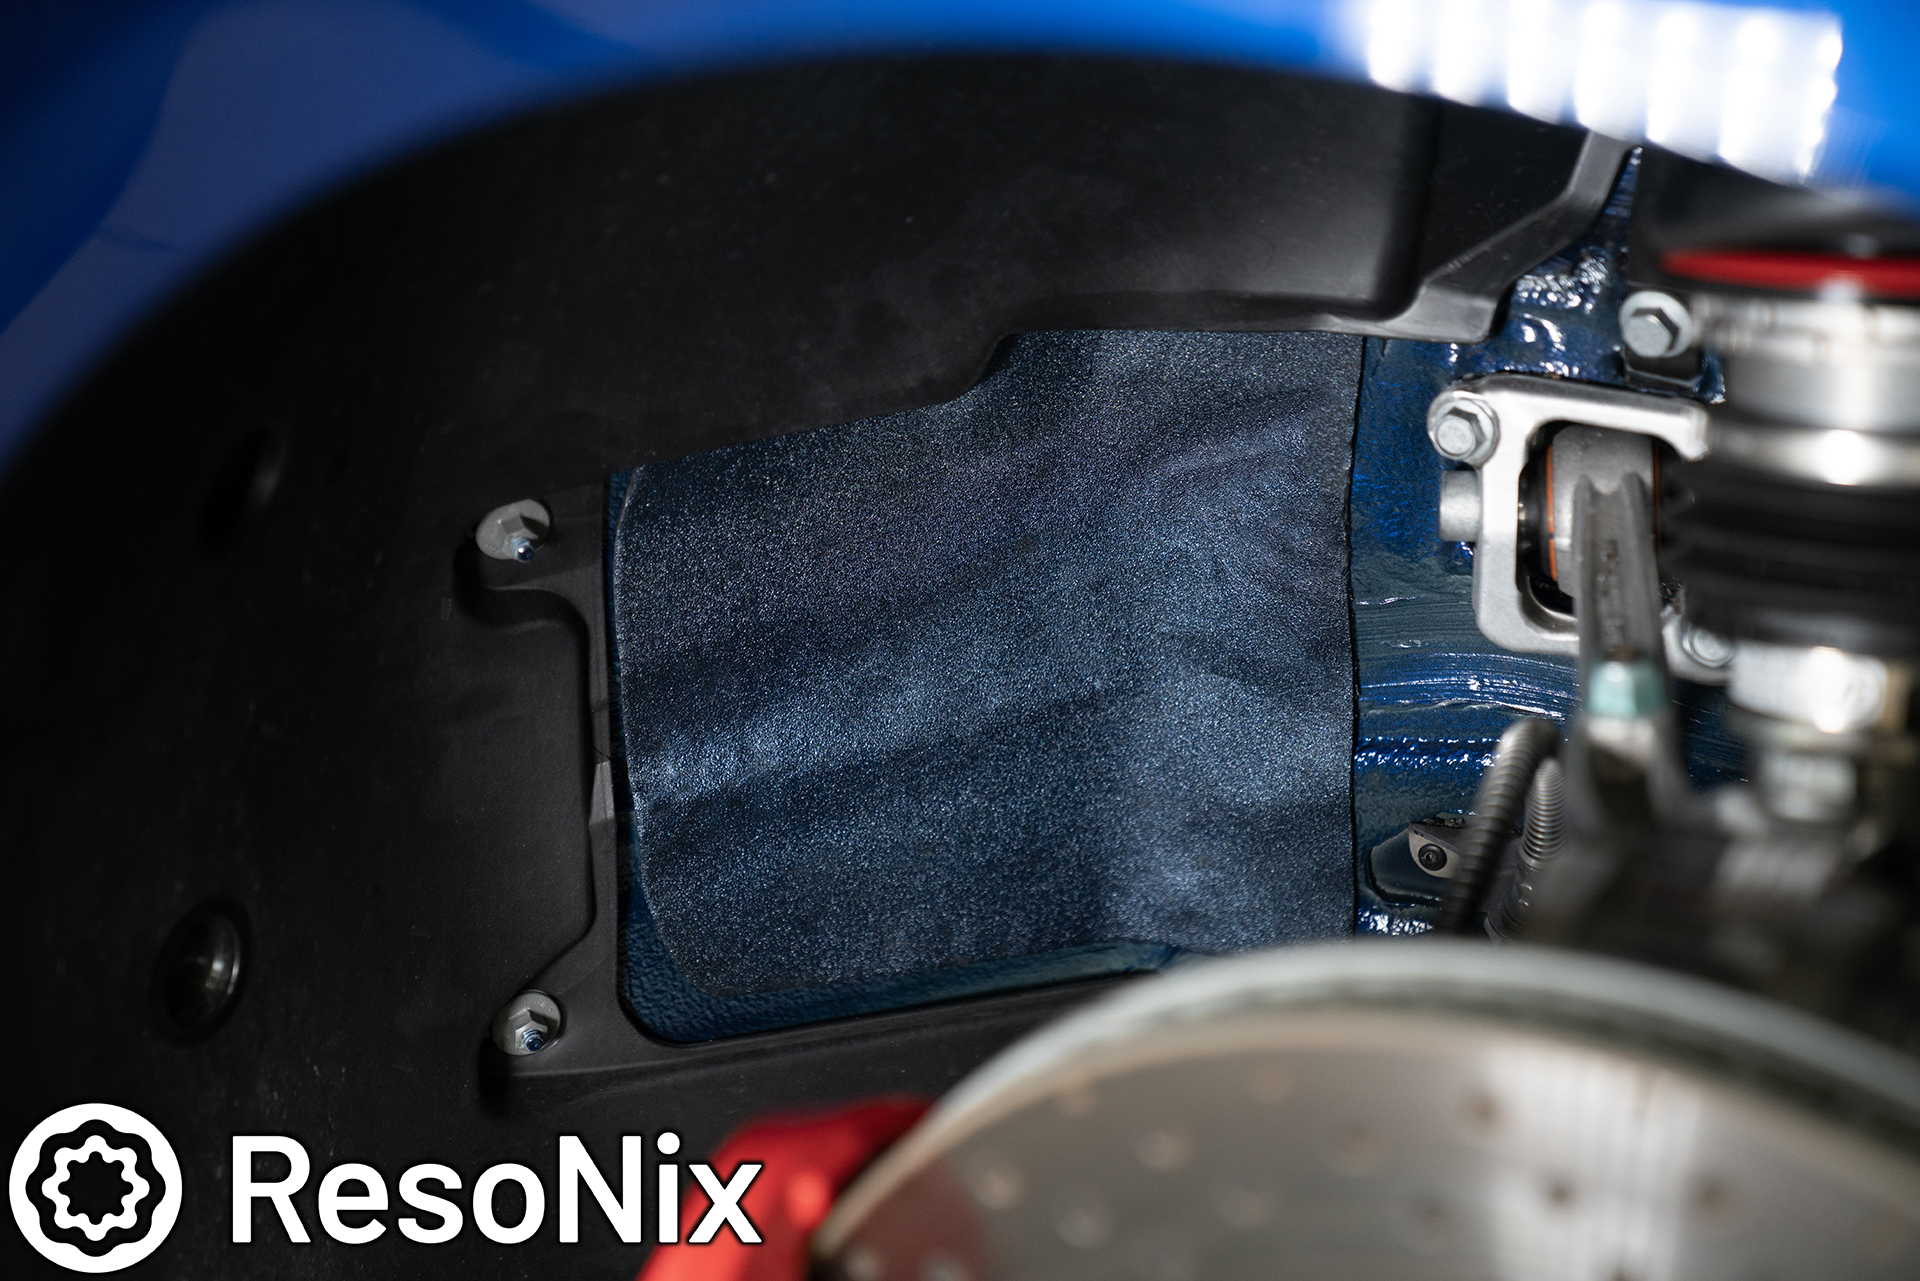
       Wheel Wells: The wheel wells are usually the largest source of noise in any given vehicle that doesn’t have a loud engine/exhaust. While they weren’t the loudest source of noise to my ears, they certainly were more offensive in this car than most others. That can be attributed to three things. First, the tires themselves. The tires on a sports car such as this are very hard, and the sound they make slapping on the pavement is much less forgiving than most other tires. Second, is the suspension of the vehicle. A stiffer and sportier suspension will mean the tires are mechanically coupled to the body of the vehicle more so than a vehicle with a “looser” suspension. This means that more energy can be transmitted from the tire into the body of the vehicle, which can then radiate from the body as sound energy. Third, is the overall construction of the wheel wells. The thinner the metal, the weaker the panel, the less sound absorbers and noise barriers they use, etc. all affect how much sound can be transmitted through it, as well as how resonant this part of the vehicle is as a whole. In this car, the rear wheel wells sounded like a damn wind tunnel, which was surprising upon disassembly of this area, as Porsche utilized a healthy dose of sound absorbing material as well as a molded and decoupled noise barrier over the interior wheel well. Apparently, it wasn’t nearly enough. The front wheels were also not very forgiving. I would say about 30% of the wheel well is “open” and allowed rocks to be slung into the body of the car, creating very loud “ping” sounds. Rocks also got sent onto the very flimsy wheel liners, and created a very loud “pop” noise. So from the wheel wells, we dealt with wind noise, overwhelming tire noise, resonance, and pings/pops from rocks being thrown up by the aggressive tires.


       After discussing the situation with the owner of the vehicle, a plan was formed. I originally proposed a solution that treated the doors, wheel wells, rear interior, as well as the front floor boards and center console area. We decided to skip the front floorboards and center console area since that area would have utilized ResoNix Barrier, and the owner didn’t want to add too much weight.

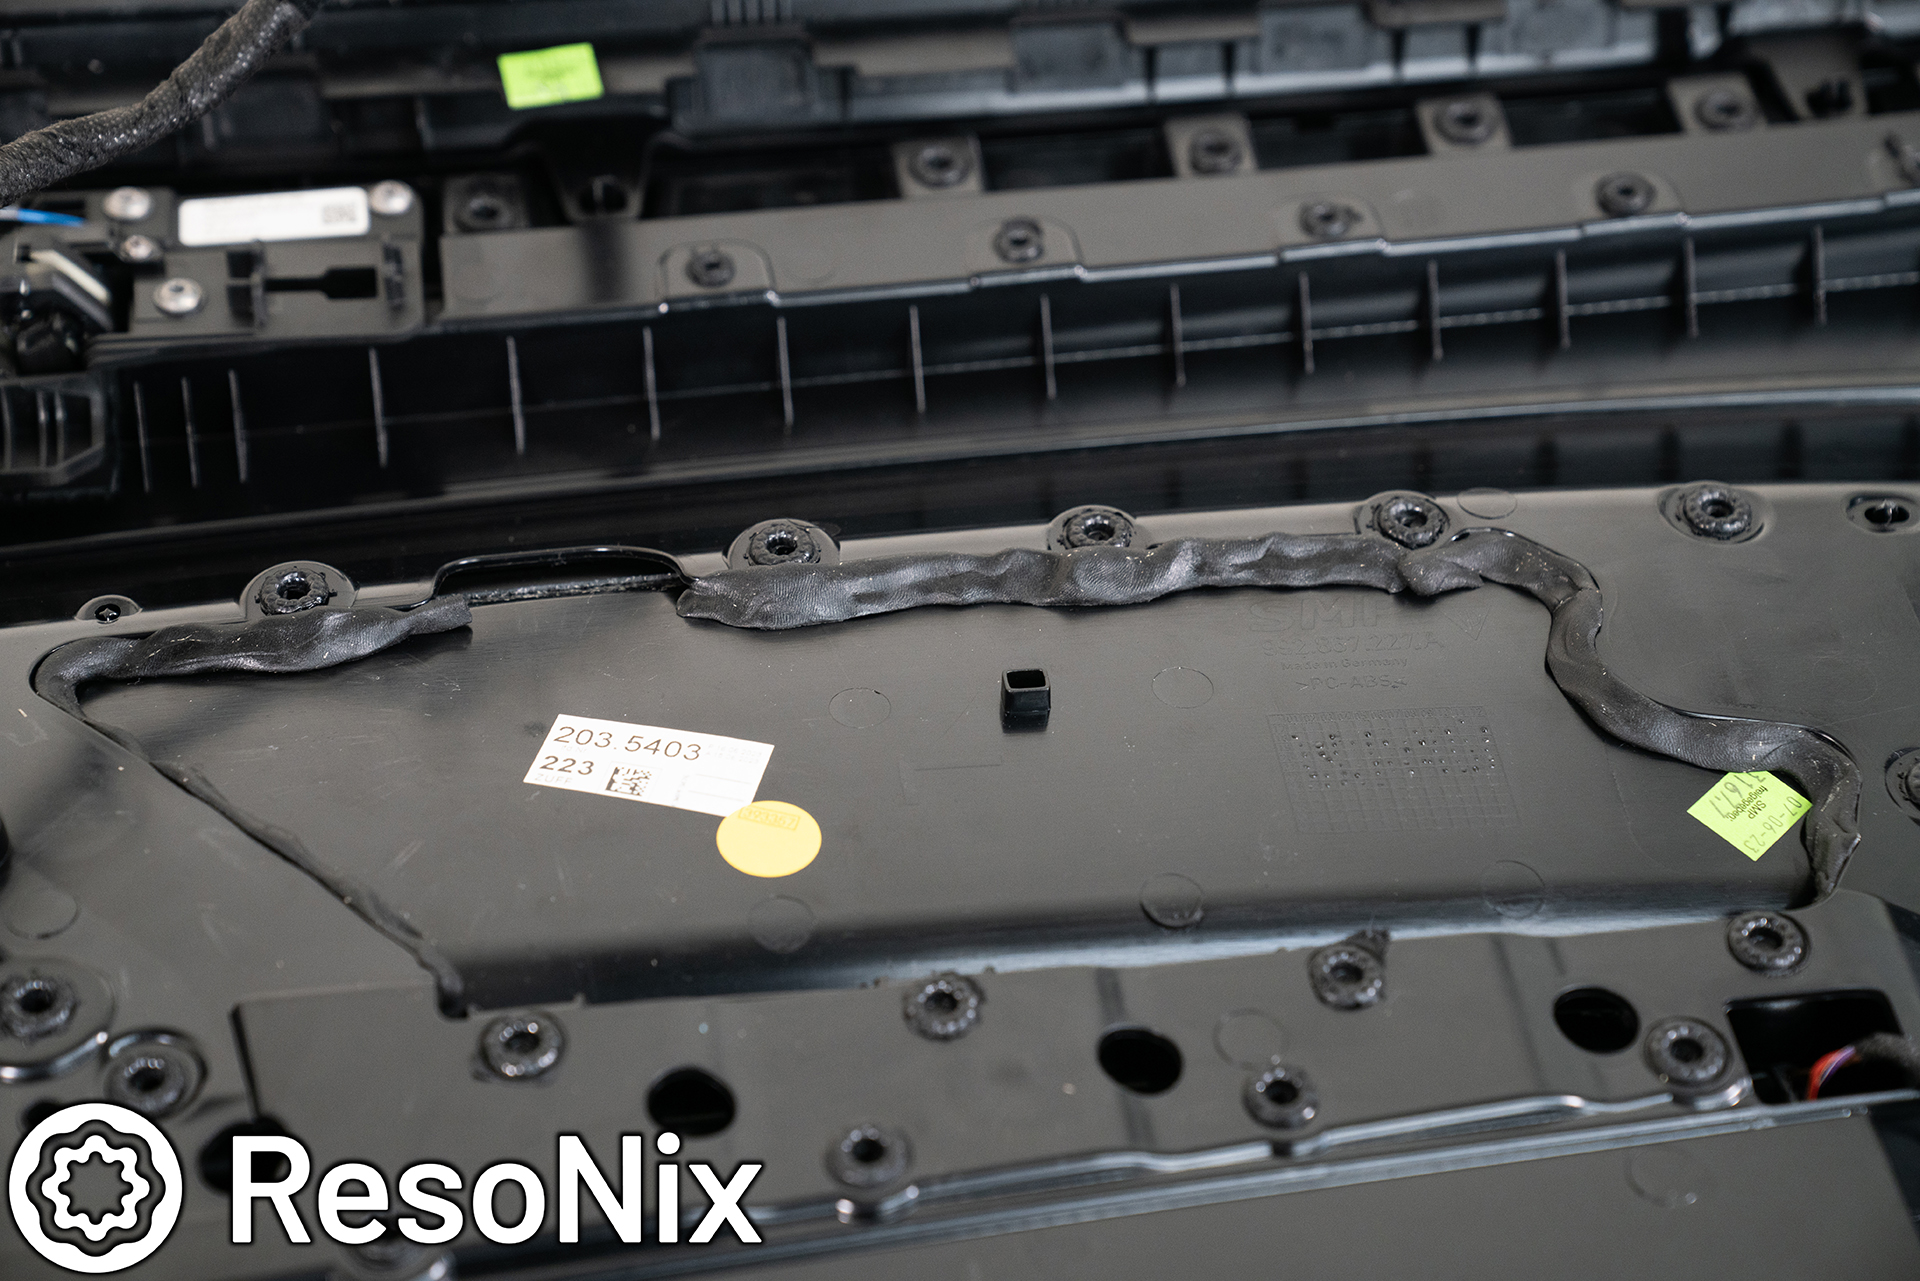
       We ended up with the following. Doors received ResoNix CLD Squares, ResoNix Fiber Mat 25, and ResoNix Guardian. The rear interior received ResoNix CLD Squares and ResoNix Fiber Mat 45. The wheel wells and fender liners received ResoNix CLD Squares and ResoNix Fiber Mat 25/45.


       For those that are unaware, the ResoNix CLD Squares are the highest performing CLD (Constrained Layer Damper, also known as “sound deadener”) product on the market. The function of a Constrained Layer Damper is to reduce resonance in the panel it is adhered to. Constrained Layer Dampers do NOT block or absorb noise, regardless of what other companies say in their marketing material about their constrained layer damper products. How much the end result is contributed by a CLD is very dependent on the vehicle and the panels you are working with. If the car you have has thin sheet metal with no real structure to it and is overall very resonant, then doing just a Constrained Layer Damper will have a very meaningful end result. That said, most noise in a vehicle is not generated from panel resonance. Most of what you hear while driving a car is going to be tire and wind noise. This is where ResoNix Fiber Mat comes in and does the heavy lifting. ResoNix Fiber Mat is the very best automotive sound absorber on the market, and also acts as a panel decoupler to prevent panel-on-panel vibration. ResoNix Fiber Mat is to be used anywhere we can get it in our offending areas in order to absorb sound that passes through to reduce sound transmission from noise that originates outside of the car, as well as generated by the resonating panels that reside behind the Fiber Mat.


Note about Constrained Layer Dampers. They perform best in larger singular pieces. Not a bunch of smaller pieces. They also aren’t very useful on panels that aren’t resonant. Areas that are structural do not really benefit much from the application of a CLD. Sure, it never hurts, but in an application where we are trying to save weight, such as doing sound treatment in a GT3, we can skip this structural areas without second thought. If you can knock on it with your knuckle and there is no ringing, CLD application to that area won’t be as useful compared to an area that does ring.

Note about sound absorbers, such as Fiber Mat. Sound absorbers work by imparting an acoustic impedance to the sound energy that is trying to travel through it, and by the cells or fibers (depending on what the absorber is made of, Fibers are vastly superior for our application) vibrating and moving as sound energy passes over them. This reduces the overall amount of sound energy due to a large portion of it being converted into mechanical and thermal energy. In order for this product to work correctly, those fibers need to be able to move. What I am getting at here, packing in and compressing as much ResoNix Fiber Mat into an area wont work nearly as well as filling an area without compressing it. More is always better when it comes to sound absorbers, but that rule goes out the window the second you start compressing it. Compressing Fiber Mat does have other benefits, such as providing stability to the panel it is pushing against, but for general automotive sound reduction, we want to stay away from this.


       Now that we are done with that essay, let’s move on to this Porsche 911 Sound Deadening install!

Porsche 911 Sound Deadening: Doors

       Alright, first up for this Porsche 911 Sound Deadening installation, the doors. Specifically the door panels. These are easy to do on this vehicle for two reasons. First, the door panels are very easy to remove and work with, and two, the door panels themselves don’t have a lot of area that can be worked with for sound treatment products due to many moving parts and service areas, as well as the general shape of the door panel. But, there is still enough workable area, as well as problem areas that need to be focused on.

       First up, we started with ResoNix Butyl Rope, and using that to get in between various overlapping parts of the door panel. The point of this is to prevent this overlapping parts from buzzing and rattling against each other. ResoNix Butyl Rope is the perfect product for this.

       Second, we apply ResoNix CLD Squares to the large/flat areas. Many people seem to be under the impression that you apply CLD only to the metal of the vehicle. This is not the case. Plastic panels also have a lot of resonance, which allows them to act as a speaker of sorts, which generates noise. Applying CLD to plastic panels that resonate will not only help lower this noise, but also lower their ability to rattle against other panels.

       Third, we use ResoNix Fiber Mat (25 for this vehicle) to help absorb sound entering through the doors, as well as decouples the door panel from the inner door skin, preventing vibration.

       And lastly, we used small pieces of ResoNix CCF Decoupler 3S to act as a thin yet soft gasket on certain areas that are prone to panel-on-panel buzzes, but have very tight tolerances.

       So, here we have the door panel removed from the vehicle. Like I said, not many easy areas to work with for a CLD and Fiber mat, but any door panel is always treatable to a degree.

       These next few photos will show the areas where layers of the door panel overlap and can buzz against each other. This is where we push some ResoNix Butyl Rope in to prevent this. This is the first step in treating any door panel as you will most likely be applying CLD over some of these areas, blocking off future access. This area in particular is in the center of the door panel.

       As mentioned, ResoNix Butyl Rope was pushed into the gaps in order to prevent these areas from buzzing against each other.

       Next up for this Porsche 911 Sound Deadening install was the ResoNix CLD Squares installation. As mentioned before, we need to focus on the large, flat areas, and we want our pieces of CLD to be as large as possible without any cuts or breaks, and we also want to use a flat roller, such as the one ResoNix offers. We also need to pay attention to stay away from service areas, such as lights and wires/wire attachment points, as well as moving parts, such as the door latch.

       Applying the ResoNix CLD Squares made a noticeable difference to the door panels while driving as it drastically reduces the amount of resonance coming from the door panel itself, as well as the buzzes and rattles caused by turning the volume up on the sound system. Speaking of the stock Bose sound system, while still atrocious sounding, the sound treatment did improve its performance to a noticeable degree. Much better low end response and midbass impact with much less distortion.

       I used a piece of the wax paper that comes with the CLD to make a template for this area. Very quick and easy for complex shapes without having to reduce the effectiveness by cutting it into multiple smaller pieces.

       Next up for the Porsche 911 Sound Deadening install was the ResoNix Fiber Mat 25. All of the areas that we treated with ResoNix CLD Squares were covered with ResoNix Fiber Mat 25. We also need to keep this away from any service points or moving parts. Also be careful to not block, cover, or impede the attachment hooks.

       Note: ResoNix Fiber Mat can be cut with heavier duty upholstery scissors, insulation shears, or something like the WORX wireless electric scissors. When cutting, it is perfectly okay if the edges arent sealed. The product will be fine, it is able to handle the harshest automotive elements, even with the sides open.

       The last step for the door panels was spot treating a small area that I suspected of being a cause of some audible buzzing. For this, I used ResoNix CCF Decoupler 3S, and cut it into small pieces. The area I applied it to either makes contact, or is very close to making contact with the doors inner skin, and while it is not possible to say that the specific rattle I heard previously was fixed by this, it was a quick and easy treatment that I consider preventative maintenance. Why I didn’t use Fiber Mat here is simple. Its just too small of an area that had too thin of a tolerance. Fiber Mat was too thick and “clumsy” to work for this area.

       Next up for the Porsche 911 Sound Deadening install, the doors themselves. First things first, I removed the access panel and the midbass speaker so I can easily access the outer door skin, which is way more important to treat than the inner door skin. The reason why is very simple. The outer skin is much flatter and has little to no structure to it. Inner skins are usually full of dips, crevaces, bends, and supports, so it naturally is very strong and has little resonance.

       Anyways, once the outer door skin was accessed, first thing I did was remove the hardly-applied CLD strip that was installed from the factory in the lower portion of the outer door skin. That was pretty easy to remove since it was hardly stuck down. I covered it with as much ResoNix CLD Squares as possible, in as large of sheets as possible. Dont worry about covering every single nook and cranny, but do pay attention to not impede any of the moving parts.

       Please note, multiple layers are damn near useless of a constrained layer damper. These products do not work by adding mass. They work by constraining the panel they are adhered to via the shear forces generated by the viscoelastic butyl rubber sandwiched between the panel its applied to and the aluminum constraining layer. One layer of a good Constrained Layer Damper is all you need.

       Once the ResoNix CLD Squares were applied to the outer door skin, I started prepping for the installation of ResoNix Guardian. ResoNix Guardian is a composite of Hydrophobic Melamine foam and Mass Loaded Vinyl, and is topped with an acoustic fabric facing.

       ResoNix Guardian’s main purpose is to be a rear-wave sound absorber (hydrophobic melamine) and sacrificial layer for the rear wave’s energy (mass loaded vinyl), but is obviously also going to be able to absorb as well as block outside noise that is entering through the doors. For this product and considering its purpose, the more coverage, the better.

       ResoNix makes Guardian in 12″ x 12″ squares, and the user is meant to cut them to their desired shape and size. The harder, but cleaner way to install them (and in theory, more effective if you are trying to get the benefits of the build in MLV noise barrier) is to follow the same idea as CLD.. in as large of pieces as possible. This presents challenges getting them installed into the door, because the adhesive layer is EXTREMELY sticky, and can cause issues if you cannot get them into the door without touching anything. An easier way to install them is to cut them into smaller pieces and install as closely as possible. I opted for the more difficult route. I have done the easier route, and it is in fact much easier. But I’m always up for a challenge and like things to be perfect.

       What I do is use the wax paper from the CLD to create templates, and then use those to cut my shapes. If I want it to be easier, I just do the bulk in 4″ x 4″ squares, and then make some smaller pieces to fill in the smaller areas.

       The templates were traced onto ResoNix Guardian using a silver sharpie, they were cut to shape, and then installed. If going this route, I highly suggest putting them in the door and general area first, and then peeling them. This way, you do not risk touching the adhesive on anything that it shouldn’t be stuck to.

       Another tip: peel off nearly all of the backing paper, and then very lightly apply it back down. This way it is easy to peel from the inevitably weird angles you will be working with.

       Once the ResoNix Guardian is applied, you can apply CLD to the access panel, and reinstall it along with the midbass speaker. In this car, there is zero need to apply CLD to the inner door skin.

       And that’s all for the doors. As mentioned, just reinstall everything and enjoy!

Porsche 911 Sound Deadening: Rear Parcel Shelf, Quarter Panels, & C-Pillars


       Next up for the Porsche 911 Sound Deadening installation, the rear. Doing the treatment here was the most tedious out of the 3 areas we tackled, but also the most beneficial in this vehicle. Also, I want to make a note to all of those saying the GT3’s don’t have sound deadening. They do. They actually have way more than I expected. But they are either using it in ways that are ineffective, or the products aren’t very good considering how loud the car is, stock. Especially considering the difference after we did our treatment. They have a large piece of CLD on the rear parcel shelf, they have two large sound absorber pads on the rear quarter panels, and they have a decoupled and molded MLV noise barrier over the wheel wells.

       Anyways, when removing the interior from the rear to prep for the Porsche 911 Sound Deadening install, I thought I was kinda screwed since I saw that level of OEM sound treatment, playing devils advocate to myself that if this wasn’t doing the trick, nothing will, especially since all of the main parts are covered/treated. But, on I went.

       The only places to really apply ResoNix CLD Squares in the rear are in the rear seat bottoms, the rear parcel shelf (after removing the OEM CLD, which was pretty easy to do), and in the quarter panels and on the top of the wheel wells, which I later found could be accessed by removing the OEM sound absorber and Noise Barrier.

       The parcel shelf was straight forward. Just remove the OEM CLD, and install ResoNix CLD Squares over as much area as you can. The OEM CLD feels thick and strong, but is clearly not a quality product and doing much, because the difference was drastic. The rear seat area was also straight forward. Just apply CLD as needed.

       For inside of the quarter panels, I installed ResoNix CLD Squares as far as I could reach, which as much coverage as I could get. Once that was taken care of, I fully stuffed the area with ResoNix Fiber Mat 45 to absorb any sound that is travelling through there from the tires, or any other road/wind noise. This was a large open area that sees a lot of turbulence, so this was very important, and explains why Porsche tried their best with their sound absorbing pad. Remember, do not install it to the point where you are compressing it. Fill the voids with the product still fully lofted. This will net the best results.

       The C-Pillars and rear “wall” area, which are a big area for wind noise, were treated with a healthy dose of ResoNix Fiber Mat 45. I paid careful attention to use as much as possible, but not to build it up so much that it extended past the mounting points of the interior trim panels. The rear pockets that are found in the area between the C-Pillars/wheel wells were also stuffed with Fiber Mat 45.

       First up for the rear section of the Porsche 911 Sound Deadening installation, remove the poor-performing factory CLD and replace it with ResoNix CLD Squares. Then, apply CLD to the rear seat bottoms, and the small shelf above them. In these next few photos you will be able to see the open cavity that is in between the B-Pillar and wheel well arch. This is how you access the quarter panel. It is a HUGE area that is a large source of the noise you hear from the rear. You can also see better angles of the pocket in the rear corners below the C-Pillar/behind the wheel well arches.

       Please note, it looks like I forgot to get an install of the quarter panel cavity being treated with CLD and stuffed with Fiber Mat. You will be able to see this in my video that will be coming out following this installation log. Long story short, as much coverage of CLD and as much fill of Fiber Mat as possible. For the top of the wheel arches, I applied ResoNix CLD Squares across its whole length.

       Once the parcel shelf, seat bottoms, and wheel wells/quarter panels were done with ResoNix CLD Squares treatment, I moved on to installing the ResoNix Fiber Mat 45 into the C-Pillars and rear wall areas. Remember, as much as possible without compressing it.

       Some of the rear panels also received a bit of ResoNix Fiber Mat 45 in areas they could fit. This was the only picture I took of this. This wraps up the entire rear section before the re-installation of the rear trim panels.

Porsche 911 Sound Deadening: Wheel Wells & Fender Liners


       Alright, last but not least for the Porsche 911 Sound Deadening installation, the wheel wells. First I had to get the car up on stands so I could take the wheels off and remove the wheel liners to treat them, as well as to work on the wheel wells.

       Note: To anyone doing this on a Porsche with Centerlocks, you NEED the appropriate torque wrench to reinstall them properly. Not just the adapter, but they need to be torqued very specifically. If you do not have the tools or knowledge, do not do this yourself.

       Another note, as soon as you take the wheels off, cover the hubs with something like latex gloves or lightly cover with a paper towel. You do not want anything to get into the threads for the centerlock, and you do not want to get antiseize ANYWHERE. One drop of that stuff can paint an entire house silver.

       Once the wheels were off and the liners were removed, I treated the rear wheel wells with a healthy dose of ResoNix CLD Squares in the areas that are hidden by the liners.

       Now, the wheel liners themselves. First step, cleaning them with isopropyl alcohol. Next, FULL coverage in ResoNix CLD Squares, minus the mounting points and away from the edges (fitment purposes). The point of full coverage is simple, but a bit hypocritical to one of the things I preach about CLD products. So, in a normal application for CLD, such as on a door skin, or trunk, or roof, etc, noise from the outside is transmitted through the body of the car. Remember, sound is just the movement of molecules. Sound traveling through the air, can also travel through solids, such as body panels, and then transmitted back into the air, and this is how we end up with hearing outside noise in a car. Here’s the thing. All of those panels that I just mentioned are fully coupled to, and are a part of the cabin. Fender liners on the other hand, are hardly coupled to the body of the vehicle, and the sound energy that is making into the cabin from them is super miniscule. Considering this, loading them up with a lot of mass from the CLD can create a noise barrier of sorts, therefor effectively blocking noise from passing. Still doing this in as large of sheets as possible.

       This also DRASTICLLY reduces the amount of noise from gravel being thrown into the from the tires. Its more of a lower frequency thud instead of a louder “pop” type of noise.

       Once the ResoNix CLD Squares were installed, ResoNix Fiber Mat 25 was installed on top of them, also staying away from mounting points or the edges. Staying about 1 or so inches away from the edge that meets the rim of the quarter panel allows for proper fitment.

       The fender liners were then re-installed. Once they were installed, I took some of the wax paper and made templates of the open areas of the front wheel wells that rocks/gravel could hit. ResoNix CLD Squares were painted with a healthy layer of Rubberized undercoating, and then a layer of close-matching paint, and then were cut to match the templates, and installed on these open areas. The point here is to be a much softer thing for rocks/gravel to hit as opposed to the metal, which will help reduce the rock ping noises further.

Once this is done, install the wheels, and our Porsche 911 Sound Deadening install is complete!

As mentioned earlier, if you would like specific guidance for your installation, please do not hesitate to call or email us at any time. Thank you!

Contact ResoNix