ResoNix Sound Solutions

Premium Automotive Sound Treatment Solutions

our shop

  • Home
  • /
  • Archive by category "Uncategorized"

How to sound deaden car doors

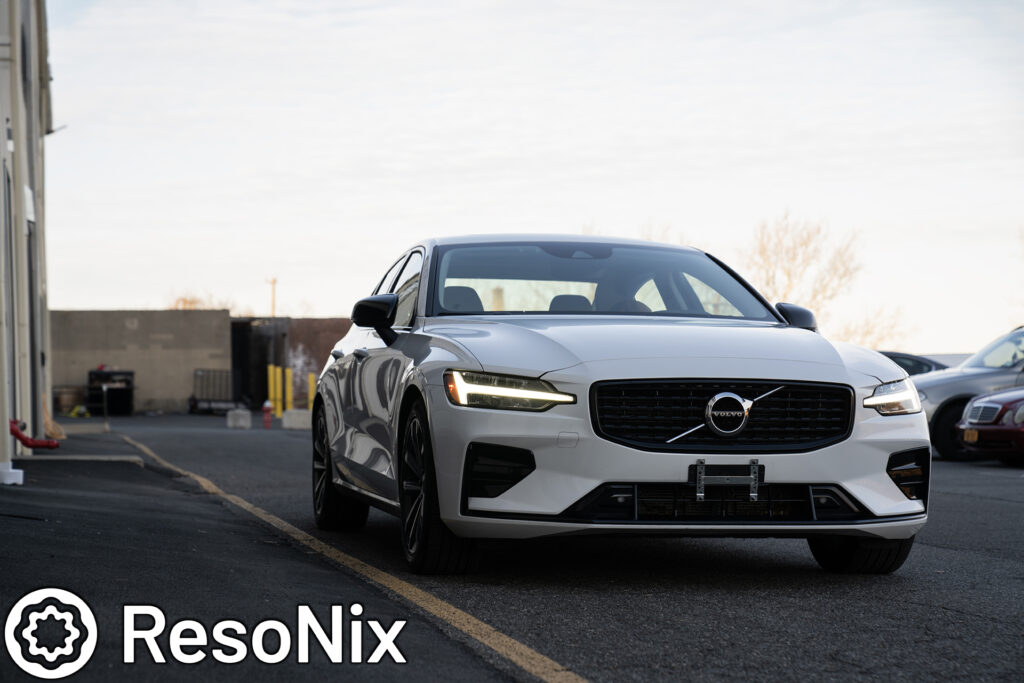
2019 Volvo S60 R-Design – ResoNix Sound Solutions Demo Sound System

Elevating Sound and Functionality: The Ultimate 2019 Volvo S60 R-Design Sound System Build Log

       Hey everyone, I have a pretty exciting build log to bring you all today. This time, its my personal 2019 Volvo S60 R-Design that I use as a shop demo car. It features equipment from the different lines that we carry that and can showcase how we can adapt to a specific goal of this particular build. The goal for this vehicle is first and foremost, the highest level of sound quality possible. The next, the car needed to remain pretty much 100% functional. This is what most of our clients are looking for, and we need to prove to them that we can do that without a problem. The third, high volume. Not only do some of our clients like to crank it to 11, but I do as well and I’ll be damned if I cannot reach concert levels of output in my own car. Another thing to note.. this vehicle was chosen for a very specific reason. It checked almost all of the boxes that I required. Full black interior, a look and feel that matched what most of our clients are used to so they can feel like it relates to their vehicle when they sit in and listen to it, good aftermarket AND OEM locations for speakers, something fun to drive, and something that will have the space to house these two semi-separate sound systems while still being able to lug around my snowboard gear in the winter. Two separate systems? Yes. There is a system in the OEM locations, and a system in the new after-market locations. This way I can demo two different types of systems and levels of product in one setting with ease. The only downside to this vehicle was that the trunk is a little bit small, but in the end, I made it work out perfectly.

       So what did I use to achieve these goals?

       System 1: OEM Locations (no pictures of the mentioned list, sorry)

. OEM Head Unit

. Helix V Twelve DSP Amplifier

. Focal Utopia 3.5WM 3″ Midrange

. Focal Utopa TBM Tweeter

. OEM rear door speakers

. OEM rear deck speakers

. (midbass and rear subs are shared between the two systems)

System 2: Aftermarket Locations. While they may be custom locations, they are still designed to appear OEM.

. OEM Head Unit with optional DAP and USB input (pretty much never used)

. Brax DSP with Conductor and USB HEC Input

. (3) Mosconi Pro 4|10 4-channel amplifiers (recently updated to 1 Mosconi Pro and 2 Sinfoni Prestigio’s, more info below)

. (3) Mosconi Pro 1|10 mono amplifiers

. Accuton Automotive C30 Ceramic Tweeter

. Accuton Automotive C100 Ceramic Midrange

. Accuton Automotive C165 Ceramic Midrange

. Illusion C12 Carbon shallow subwoofer (passenger footwell)

. (2) Illusion C12XL Carbon subwoofers in the trunk And last but certainly not least…

. FULL ResoNix Sound Solutions soundproofing.

There is also a Radenso RC-M Ultimate Edition Radar & Laser defense system installed as well. The car is also fully wrapped in Xpel Stealth Paint Protection Film. AJ at Supreme Shine in Long Island did this for me before we started offering these services in house at ResoNix Sound Solutions. Shout out to AJ. Love you, bud. For those that want to hear it, feel free to reach out. Im always open to giving demos. This very well may be the best sounding car I have produced. Everything seen in this build log was done by me personally, except for an old friend helping with soundproofing, and Matt helping with wiring the radar/laser system.

 
Sound Deadening Products by ResoNix Sound Solutions

. ResoNix Mega CLD Squares Sound Deadening Material

. ResoNix CLD Squares Sound Deadening Material

. ResoNix Barrier (Thin Foam)

. ResoNix Fiber Mat 25 Automotive Sound Absorbing Material

. ResoNix Guardian Rear-Wave Door Cavity Midbass Absorber

. ResoNix Fiber Mat 45 Automotive Sound Absorbing Material

. ResoNix Rope – All Purpose Spot Treatment Sound Deadener

. ResoNix CCF Strips – Foam Speaker Rings

. ResoNix VW/Audi OEM Interior Non-Woven Tape

. ResoNix CCF Decoupler 3S

. ResoNix CCF Decoupler 3F


For those that want to hear it, feel free to reach out. I’m always open to giving demos. This very well may be the best sounding car I have produced.

Everything seen in this build log was done by me personally, except for an old friend helping with soundproofing, and Matt helping with wiring the radar/laser system.

Before we get into this, it is important to note that every situation is different, every application is different, and everyone’s needs/wants are different. If you would like guidance that is specific to your situation, please do not hesitate to reach out to us.

Contact ResoNix

Sound Deadening The Volvo S60 R Design Floor

First photos we will show you is the ResoNix Sound Solutions soundproofing job. We laid down a good amount of ResoNix CLD Squares on all surfaces. Doors received nearly 100% coverage on the outer skin and door panel, while the floors and everywhere else was about 70% coverage. Why that much instead of the “25% rule of thumb”? Because frankly, its not real. Constrained Layer Damping a panel is a bit more complicated than just throwing an arbitrary number at it. You have to consider size, resonant frequency, where its being treated on the panel and where is left bare, etc.. And, I have ZERO intention of second guessing myself and doing this ever again in my car. One and done. We then did a full coverage layer of ResoNix Barrier for soundproofing. Various areas received extra CLD, CCF12 and CCF7, and even some of the samples (at the time) of our Fiber Mat, which is now available on our website, and customers are loving it. The car wasn’t only treated to lower the road noise, but was also done to enhance the sound system so all little nooks and crannies were taken care of to prevent any rattles or resonance. This is how sound deadening is done properly 🙂

Volvo S60 R Design Door Sound Deadening

       First step is removing the door panel. You can find a detailed explanation on how to remove the door panel of this car in our other Volvo S60 Installation build log. This also includes a more complete write up and explanation on sound deadening the doors.

       Moving on to how we do deadening for high-end audio installs such as this. Every, Single. Panel. Gets treated and gone over with a fine tooth comb to make sure that NOTHING will rattle or resonate when installed again. The photo of the door panel is actually from an older version of this install. There is a different door baffle now which required a different ring that wasn’t nearly as tall. We also used ResoNix Barrier as well as our ResoNix Fiber Mat. The holes for the OEM locations are blocked in some of these photos because nothing was installed at the time.

       Once the ResoNix CLD was installed onto the outer door skin, it was topped with ResoNix Guardian (not pictured)

The door panel was fully treated with ResoNix CLD Squares, and then topped with ResoNix Fiber Mat 25 (not shown). Not a single rattle from these doors.

       Being the North American distributor of your long-time favorite speakers is nice. Here is the Accuton Automotive 6.5″ midbass speaker installed into the OEM door location with a full layer of ResoNix Barrier over the inner door skin.

       ResoNix Barrier with an extra layer of CCF7 on the back, and Fiber Mat installed onto the door panel, along with the Accuton Automotive C165 Midbass drivers. They are mounted to Acrylic Baffles that mimic the OEM speaker shape and use the OEM mounting hardware and OEM mounting locations.

Sound Deadening Various Volvo S60 R-Design Interior Trim Panels

       Various panels were also treated for the sake of sound system performance, as well as regular driving noise reduction. This is the rear driver side sill panel that partially sits under the rear seats. The B-Pillar. Overboard? Maybe to you. But I prefer not to have rattles right next to my ears 🙂

       Various panels were also treated. This is the rear driver side sill panel that partially sits under the rear seats.

       The C pillars. What you cannot see is the small pieces that make sure the clips cannot rattle.

       Every single plastic trim panel in the vehicle was treated with ResoNix CLD Squares to reduce resonance, but they were also treated with CCF Decoupler 7S and/or ResoNix Fiber Mat to reduce panel on panel reattles. This may have been the biggest improvement that I made in any iteration of this system over the years. Reducing the distortion caused by resonance and the distractions that are rattles allowed the system to be what it is truly capable of. The soundstage is pinpoint, high, wide, deep, there is no noticeable distortion even at extreme volumes.. its great. 

Rear Deck Amplifier Rack Fabrication & Installation

       The amplifier rack for the rear deck houses 6 Mosconi Pro amplifiers. Three of the mono’s, and 3 of the 4-channels. The point here was to create something that can house these amplifiers but keep them nearly completely out of the way. This assembly is constructed out of steel square stock, and bolts to OEM mounting locations located on the rear deck. This whole assembly can be removed easily and quickly, and is easily servicable. 

       This is the old setup that featured the Helix DSP Ultra. It now features the Brax DSP (shown below).

       Everything installed, this is how the trunk appeared before my most recent upgrade/iteration.

Volvo S60 R Design A-Pillar & Custom Dash For Accuton Automotive Tweeter & Midrange

       Accuton Automotive C30AM Ceramic tweeter. The best line of speakers on the car audio market. The tweeters were installed into the A-pillars and is the only part of this install that doesn’t seem 100% OEM. I was okay with this to gain a better frequency response by placing them on axis. The C100 Ceramic midrange drivers are installed into the dashboard corners. The dash was modified to accept this, yet still appears OEM. Ideally, I would angle them a bit as the rake of the windshield is a bit much relative to the angle of the dash top.

       The A-Pillars house the Accuton Automotive C30AM tweeter, which was aimed in between the front seat head rests, and then finished in an OEM-matching fabric.

       The Accuton Automotive C100AM midranges were installed into the dash corners. There is not a speaker location here originally. I ended up cutting the dashboard to do this. The panel that houses it was designed to appear OEM. Everything down to the shape, the matte/engraved/gloss combo, the texture of the outer beveled rim, etc.. all of this was taken into account. Why did I choose these locations? Because they look OEM, and this location typically yields the best sounding end results. The pattern on the top mimics the OEM speaker grilles that are a part of the door panels OEM speaker location.

Helix Conductor & Radenso RC-M Ultimate Controller Installation

       The Helix Conductor is installed right where the 12v cig output was located. The OEM cover can still slide over and cover it. The Conductor, in this install, controls master volume, subwoofer volume, digital volume, HEC volume 1, HEC volume 2, tone controlls (bass and treble over the whole system), and presets. This thing is amazing for what it is. It can be fully covered up by the OEM sliding panel.

       The Radenso RC-M Ultimate Edition controller was installed in an easy to reach and see location right above the rear view mirror.

Volvo S60 R Design Front Passenger Footwell Subwoofer Enclosure

       Now for the front subwoofer. The Illusion C12 Carbon 12″ shallow subwoofer was installed here in an infinite baffle configuration. Yes, you read that correctly. Why did I do this? Many reasons. 1) I was wrong in the past by thinking you can have perfect, up-front bass by doing a sub in the rear and door-mounted midbass drivers and getting them perfectly in time/in phase. Yes, you can have great end results with this traditional method, but it is no match for large, kick panel mounted midbass drivers, or an up-front sub to go between the sub to midbass transition. Resonance and rattles will ALWAYS be a problem in doors as well no matter how well you deaden and treat it. Also, in most cars you will have a cancellation from door mounted midbass driver at around 80hz on the drivers side, and many cars also have a cancellation in the ~100hz area with a trunk mounted subwoofer. You can still work around it with very careful filter selection and tuning, but again, its near impossible to get it truly perfect. I was never a proponent for front mounted subs. After trying it in the sealed enclosure first, and then moving to this, I am now a firm believer. Sorry to those who I misled in the past.

       Why did I do it this way? Well in the middle of this whole 2 year long build, I had a front sub mounted in a sealed enclosure so I could have my whole trunk and spare tire. Problem was, my fiance has legs like telephone poles and wasn’t a fan of the lack of leg room. So, here is my solution to all of it. Infinite baffle through the firewall. Yeah, it doesn’t sound pretty, but my car happened to be perfect for it. There was a small pocket in the firewall in the passenger footwell that had a large section that was made out of single layer non-structural steel. There was also a ton of foam behind the carpet, so the plan was to open the firewall up where it was non-structural, build a small “enclosure” around it, and bolt it in. I was going into this on a whim, not sure how it would work and if the open area was enough to act as if it were actually infinite baffle, or if it was acting as a improperly sized/tuned ported enclosure. I lucked out. After all was said and done, I used Dayton DATS to check how the enclosure was behaving, and sure enough, true IB. QTS matched outside of the baffle, and when mounted to it. Measured frequency response was actually insanely impressive. Flat down to 10hz. Of course this subwoofer can only do 10hz at lower volumes, but it can do enough, and I now know I can fully remove the rear enclosure in the winter when I need to haul my snowboard gear and still have a full frequency range. One thing to note for those that will inevitably try to call me out on this, the heat is a non-issue. There is a thick fiberglass heatshield on the other side of the firewall which was spaced about 2″ away from the opening, and the “enclosure” was also filled with fiberglass insulation, then topped with polyfill (to keep the fiberglass away from the subwoofer). After a 2 hour ride, you still cannot feel a hint of warmth on the cone or surround.

       One more cool thing to note. Not even a full inch was lost vs the OEM floor. Only the thickness of the half inch birch that was used to secure the grill was added.

**sorry for the crappy phone pics**

Most Recent Trunk Update

       The updates that I recently made some to the trunk. I added a pair of Sinfoni Prestigio amplifiers to power the midranges and tweeters. Loving the trunk re-design that it required too. So now, I have 9 amplifiers and two processors in the car lol.

       These are incredible amplifiers and are some that I have always wanted. I love the sound, the look, etc. They were also even further upgraded by Gordon Taylor. Once again, fully wired by ResoNix Solderless Custom RCA System.

That Wraps The ResoNix 2019 Volvo S60 R Design Demo Car Audio System Installation!

       That wraps it up for our first car audio install at our new location! If you have any questions, feel free to ask. If you are interested in having a high-performing sound system installed or an already existing one improved upon in your vehicle, feel free to reach out! Again, I am very excited to be back doing this, and am especially grateful that I am able to make this a fun side-gig as opposed to my full time career.


Interested in a similar install or just have questions? Feel free to reach out to us at any time!
Contact Us

How to sound deaden car doors

2022 Volvo S60 Sound System Upgrade & Sound Deadening Installation

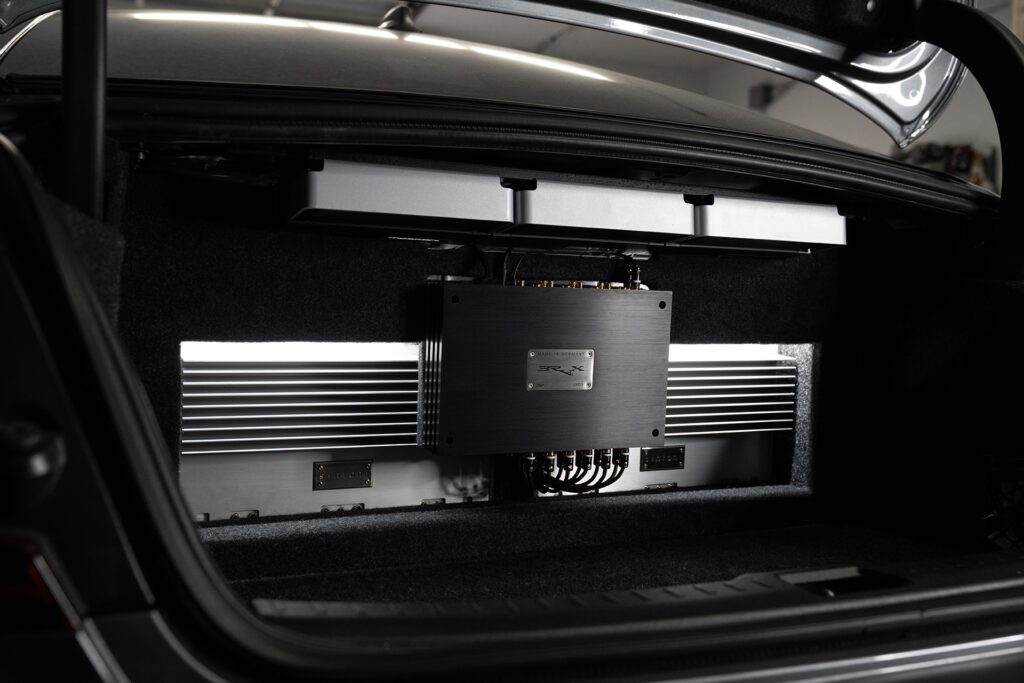
Elevating the Volvo S60 Experience: A nearly completely hidden sound system upgrade with one extra goal; to keep it OEM in function and appearance.

Hello everyone, long time no see 🙂

       Nick Apicella of ResoNix Sound Solutions & Apicella Auto Sound here with our very first full car audio install in our new and finally fully outfitted shop. For those that are unaware, I have decided to make ResoNix Sound Solutions my full time gig, and do Apicella Auto Sound car audio installs on the side. This allows me to still do what I love, but to not take it as a means to put food on the table and I can have more fun with it, and take more time with it, meaning I can get even more detailed on my installs without worrying about the clock running out. This means more photos, more videos, more interesting install techniques, and overall better installs and better content since I am only planning on doing jobs that I see myself enjoying. So, if you are looking for a car audio install that is done right and will sound great, feel free to reach out, as it may be a project I’m more than happy to take on. Speaking of enjoying doing installs, lets move on to what we have here.

If you would like to check it out on Facebook, along with the rest of our installs, here is a link to the album.

Facebook Link To The 2022 Volvo S60 Sound System & Sound Deadening Installation

 
The Car: 2022 Volvo S60 – Base Model Audio System

       So this is a 2022 Volvo S60, nearly the same exact car that I have, so out of the gate, my interest was piqued. To me, doing a car I already knew very well was the perfect opportunity to get my feet wet in the new shop setup, and as well as getting used to doing the FULL install myself, where as for the past few years I was mostly the office and DSP tuning/OEM integration guy that was doing some install and fabrication work here and there. The owner of the vehicle reached out to me via the contact form on the ResoNix website and mentioned he was getting a new work vehicle and he wanted to upgrade the sound system. The only catch, it is a WORK vehicle. This meant that nothing could be permanently modified, and everything had to be totally concealed, minus adding a bit of show to the trunk, but still keep that functional as well.

       The client came by a couple of weeks before his scheduled drop off date and took a listen to my 2019 Volvo S60. Being a top-of-the-line system and installation, it was well beyond his expectations in sound quality as well as output, but I was still able to give him a reference as far as general staging, imaging, tonality, and overall output were concerned. We also had the chance to go over specifics in his car, and I was able to show him how much space would need to be taken up, what the enclosure would look like, how it would all be secured, etc. Everything was all set, and we planned a drop off date. The install included the following products..

 
Sound Deadening Products by ResoNix Sound Solutions

. ResoNix Mega CLD Squares Sound Deadening Material

. ResoNix CLD Squares Sound Deadening Material

. ResoNix Fiber Mat 25 Automotive Sound Absorbing Material

. ResoNix Guardian Rear-Wave Door Cavity Midbass Absorber

. ResoNix Fiber Mat 45 Automotive Sound Absorbing Material

. ResoNix Rope – All Purpose Spot Treatment Sound Deadener

. ResoNix CCF Strips – Foam Speaker Rings

. ResoNix VW/Audi OEM Interior Non-Woven Tape

. ResoNix CCF Decoupler 3S

. ResoNix CCF Decoupler 3F

 
Sound System Equipment

. ResoNix Volvo OEM MOST150 Interface Prototype (Coming soon to Volvo, BMW Ethernet and MOST, Mercedes Fiber and Coax MOST, Toyota/Lexus, and Land Rover/Jaguar ethernet and MOST, Cadillac optical and coax, and more.)

. Helix P Six Ultimate DSP Amplifier

. Helix Conductor DSP Controller

. Helix P One Mk2 Mono Subwoofer Amplifier

. BLAM Live L165P 6.5″ Midbass & Tweeter

. BLAM Live LFR80 3″ Wideband

. (2) Audiomobile Encore 12″ D4 subwoofers

 
Further Explanation On The Equipment Selection

       We opted for the P Six over the V Eight since we weren’t doing OEM high-level signal and didn’t need the rear speaker signal for OEM functions such as back-up sensors, and preferred the better amplification and more power to the front speakers instead. In this situation, I think it was the right call, especially since this was a base model OEM system trim and only featured rear speakers in the rear doors and not the rear deck. Short explanation, rear deck speakers are preferred over rear door speakers for rear fill. Going with the P Six Ultimate gave us 230 watts per midbass driver since they are 2-ohm, and obviously plenty of power for the mids and tweeters as well. The Audiomobile Encore subwoofers were wired in parallel to 1-ohm to get the full 1500 watts out of the Helix P One Mk2, and were both placed in their own chambers in a sealed enclosure, with each chamber being 0.9 cubic feet. Sounds tiny, I know, and it is. But my god they handled it excellently. You will see more below. Also note, the Helix P One comes with a very steep 20hz subsonic filter that is set to ON by default. If you want extension below 20hz, you need to remove the back panel and turn this switch off. Read the manual for more information.

       To sum up some thoughts before getting into the build log, I am happy to be back to doing things on my own. I think I thrive when I have full and complete control over every square inch of an install. No questioning, second guessing, or wondering. Also no forgetting to pick up the camera and snap some pics. Speaking of which, there are almost 200 of for this relatively simple install. Buckle up.

Before we get into this, it is important to note that every situation is different, every application is different, and everyone’s needs/wants are different. If you would like guidance that is specific to your situation, please do not hesitate to reach out to us.

Contact ResoNix

Sound Deadening The Volvo S60 Doors

       First up, the doors. Specifically the sound deadening portion. We opted to go with a ResoNix Stage-3 kit for this install since as we all know, “removing” the room from the equation is what separates a good car audio system from a great car audio system. What I mean by this is the more rattles and resonance we hear, the more distortion and coloration it is negatively adding to a system. If a door skin or door panel is moving in any way, it is generating its own sound, which is distortion, and will negatively impact the overall sound quality. It’ll make midbass sound muddy, imaging to be smeared and unable to be fixed, it’ll make the sound stage easily defined to the confines of the car instead of allowing the speakers to disappear, and more, and the only way to correct it is to treat the panels to prevent them from resonating and transmitting their mechanical energy into sound energy.

The ResoNix Stage-3 Door Kit (for a pair of doors) includes the following

. ResoNix Mega CLD Squares Sound Deadener (20 Square Feet)
. ResoNix Fiber Mat 45 Automotive Sound Absorber and Decoupler (13.5 Square Feet)
. ResoNix Guardian (6 Square Feet)
. ResoNix Rope (1 Roll)
. ResoNix CCF Strips (1 Pair)
. ResoNix OEM VW/Audi Interior Tape (1 Roll)
. ResoNix Roller

       This is what we used to treat the doors in this vehicle, and had excellent results.

Door Panel Removal

       First up, removing the trim panel that covers the OEM midrange and tweeter. This is done by using a very thin pry tool and working your way around the edge. For those with this car, it takes more force than you think, so don’t be afraid to really put some pressure into it. Towards the back, right behind the handle, there is a hook that has to slide out.

       Once that cover panel is removed, you can remove the 7mm bolt, and pry up the window switch panel (be careful not to catch the corners on the upholstery), and remove the T25 Torx screw.

       On the bottom of the arm rest, you will find an exposed T25 Torx screw. Remove this as well. Once all 3 fasteners are removed, you will want to pull the door panel up and un-hook it from the inner door skin. It does not use push clips, but instead a system of hooks. Once you lift it up, you can pull it right out and it is removed. Once removed, un-clip the wire harness, and un-do the door latch cable.

       To un-do the door latch cable, you will have to pry off the white cover as pictured here. It will most likely fly off. It is a separate piece and meant to come off of the cable, I just have it pictured on the cable here to show you how it is supposed to be positioned for re-installing.

       Once the door panel is off, you will be greeted by this sight, the inner door skin and its large access panel. Having worked on a few of these vehicles now, it seems there are a few different variations of one method to get this access panel removed from the inner door skin for this generation of Volvos. In any variation, you will need to remove the window, the exterior door handle, and the door latch.

       In this case, the Volvo documentation shows that in order to access the clips that hold in the window, you literally have to chisel out two parts of the inner door skin, circled in red. Yes, chisel. Why they didn’t use a removable grommet like in some variations, I have no idea. Pictured here they are already removed, but if you have the same variation, all you will see is two plastic squares that are just a part of the access panel. Not separate pieces. These need to be chiseled off with a chisel and a hammer. I really could not believe what I was reading, but if you are reading this and want the OEM documentation to do your Volvo, feel free to email me.

       The next step is to get the window rolled down to a specific depth (190mm from top of window to the top of the black window trim (if you need to more specifics, again, feel free to email me and I can send it to you). Once it is rolled down to the right height, At the right height, you will see two circles in the glass when looking through the holes you chiseled out. In those circles, a plastic clip hooks in. You will insert a screwdriver into the openings that you created, and through the circle of the glass, and push open the hook while pulling up on the window. Repeat with the second opening. From there, slide the window out completely and set off to the side.

       The next and possibly most difficult part depending on the trim you have, the exterior door handles. This was a bizarre one for this car, as the driver side had them held in with a screw, and the passenger side had it held in with a latch. The screw version is MUCH easier to remove and reinstall. You can see how that is done in this link to an S90 installation that I did in the past. For the latch style, I watched every single YouTube video and read every bit of documentation, and even reached out to some Volvo techs. It still didn’t make sense to me, but in the end, I was able to remove and reinstall the passenger side one of this car without issue.

       Once the handle is removed, remove the screw that is behind it, and remove the 3 screws that hold on the door latch. Once those are removed, you can remove all of the 7mm bolts that surround the outer perimeter of the access panel, and remove it. I would also suggest removing the door wire harness Molex plug from the door jam, and remove this entirely, which you can do easily. I will explain in photos below.

Sound Deadening The Volvo S60 Outer Door Skins - Eliminate Resonance & Distortion

       Once that is all removed, we have a TON of room to work with to sound deaden the outer door skin. And look at that, Volvo was nice enough to include plenty of their own deadening….. which is extremely poor in performance. The first thing that I did was remove it, which was surprisingly easy. The butyl seemed to have absolutely no viscoelastic properties, which may explain its very poor performance.

       Once the two sheets that were installed from the factory were removed, I cleaned the outer skin with isopropyl alcohol to make sure all dirt, grease, oil, and grime was removed. The only place that I DIDNT clean was at the very bottom of the door, and this was on purpose. This area had some very thick grease applied, for what I could only assume is for corrosion prevention. I left this in place and did not install deadener over it.

       Once the door was cleaned, I was ready for the first steps of sound deadening the door – treating the outer skin. This starts with using ResoNix Rope in between the crash bar and outer door skin, and then doing strips cut from ResoNix Mega CLD Squares deadening from the crash bar to the outer skin, and then doing full coverage of the Mega CLD Squares on the outer skin. The only place that I didn’t cover is the area where the exterior door handle secures. I did not want to get in the way of it and cause any issues.

       Some may ask why and scoff at doing full coverage saying it is a waste. I say that is silly, and not true. 2 reasons why. First, the “25% rule” that a lot of people like to throw out doesn’t exist. Constrained Layer Dampers do not know how large a panel is that they are adhered to, and do not know how large their piece is. The way constrained layer damper works is by constraining the panel it is adhered to. Any of the area left without treatment, essentially becomes a new, separate untreated panel. Let me provide an example. Lets take an SUV’s roof skin, and a small vehicles outer door skin. A large SUV’s roof skin is going to be somewhere in the ballpark of 10 feet long by 6 feet wide. 60 Square feet. A small car doors outer skin will be, at most, 3 feet by 2 feet, 6 Square feet. Doing 25% coverage of the outer door skin would yield an untreated area of 4.5 Square feet. Doing 25% coverage of the 60 square foot roof skin would yield an untreated area of 45 square feet. Now let me as you, if you saw 45 square feet worth of untreated flat surfaces, would you leave them alone? Absolutely not. Think of applying CLD as if you are just taking away part of the panel from the equation, but it does not constrain the areas it does not cover. Those untreated areas now become their own untreated panels. Now, if you HAD to do only 25% coverage, you could be VERY meticulous and figure out a very strategic way to place each piece in a way that leaves a “maze” of untreated panels that varies in differing sizes to change up resonance patterns, but things brings me to my second point…. I value my time, and I greatly value the end result. If it takes a few extra bucks worth of material to not have to sit there and waste time figuring out the most efficient way to apply it, and doesn’t leave me second guessing if I did enough, especially on the most important part of the install, it’s worth it to me. Anyone doing a build worth while in a modern vehicle is already spending a large chunk of change to do it correctly, and skimping on arguably one of the most important parts to save a few bucks just doesn’t make sense to me. But hey, call me biased 🙂

       Here you can see the ResoNix Rope that is stuffed in between the crash bar and the outer skin. I did this on the top and the bottom. I would also normally provide some gaps for water to drip through, but Volvo already had this fully sealed up with foam adhesive, so I just ran it the whole length. I normally would have done this first and then done the CLD over that connecting the crash bar and the outer skin first before doing the outer skin CLD treatment, but frankly, I forgot to do that order due to being excited to get to use the ResoNix Super Max Mega Pro CLD Squares for the first time in a customers car. I ended up doing the connecting strip after, which is still fine, but in theory would be a hair better if I did it first. We are talking insanely miniscule differences here.

       Here you can see where I start to install the “connecting strip”. Again, this is to help further couple the crash bar to the outer door skin, and use the strength and rigidity of the crash bar to further stabilize the outer door skin. You can also see the grease at the bottom that I left. Considering there was so much, I figured it must be there on purpose, and I did not want to ruin the integrity of the vehicle.

       I also ran the ResoNix Rope along the bottom gap between the crash bar and outer skin.

       After this, you can see the whole outer door skin CLD and Rope treatment completed.

       Up next was the ResoNix Guardian installation. I used all 6 square feet split between the two doors. With CLD sound deadening products, you get the best performance by leaving them in as large of pieces as possible. This is not really the case with sound absorbers such as ResoNix Guardian. The only reason I kept the pieces this large was because I had such a large opening to work with and it was easy. If I had a vehicle that had smaller access holes, I would be cutting it into smaller pieces that are easier to work with.

Sound Deadening The Volvo S60 Door Panels - Eliminate Rattles

       Up next, the door panel sound deadening. This turned into a combination of ResoNix Mega CLD Squares, ResoNix Rope, ResoNix Fiber Mat 25, ResoNix CCF Decoupler 3S, and ResoNix OEM Interior Tape. Unfortunately, I forgot to get photos of the ResoNix Fiber Mat installed. I am not sure how, but I do have plenty of video coming where you can see what I did.

       First up, as usual, ResoNix Rope. ResoNix’s Butyl Rope is used on the door panel in between all of the overlapping layers that make up the door panel, and can otherwise resonate and vibrate against each other if not treated. The ResoNix Butyl Rope serves two purposes here. First, to decouple the layers and provide cushion for them to prevent them from vibrating against each outer. Second, to actually hold them in place. The ResoNix Butyl Rope is naturally an adhesive and has the ideal viscoelastic properties to work in this capacity.

       Pictured here and in the next couple of photos you can see a couple of specific areas on this door panel that have overlapping layers that are going to be prone to rattling against each other. What I am looking out for here is two overlapping layers that don’t have a large enough gap, or arent completely solid. If I can tap on them with my fist and they “clap” against each other, they need treatment.

       The first area that received treatment with ResoNix Butyl Rope is the perimeter of the insert for the map pocket. As seen in the previous pictures, it is an overlapped panel that is only plastic welded in spots to hold it in place. Parts like this are usually hot-spots for rattles and is perfect for ResoNix Butyl Rope application.

       Tip: When using butyl rope, take some of the wax paper that comes with/on the ResoNix CLD Squares and use that to press down and put pressure on the Butyl Rope. It’ll allow you to form it without it getting stuck to your fingers which would otherwise occasionally pull it out of place, and also leaves a cleaner looking end result. You can see on the bottom right and right side of this photo have the rope pushed down cleanly and evenly, while the rest is lumpy and clearly done with just fingers so far. Not that it makes a difference in performance, it just makes quicker/easier work of it, and ends up looking a bit cleaner.

       The speaker grille area is also a hot spot for needing ResoNix Rope. The overlapping panels being this close to the source of the energy (the speaker) are definitely going to rattle (Having this car, I already knew this spot was a problem in this car, but also working on many cars in my time has let me know that this area is a problem more times than not).

       Another area was the bottom of the arm rest. You can see that when I shine a light from down below, you can see light showing the small gap in between the two panels. Again, these will definitely rattle and buzz. Perfect spot for some butyl rope. In a spot like this, I made sure now to push it through, as pushing it through would be visible from the outside of the panel. I just laid it on top and made sure both sides had proper adhesion.

       Next up, applying ResoNix Mega CLD Squares to the door panel. Considering the thickness of the aluminum on this new product, it was definitely a bit of a challenge in comparison to our original ResoNix CLD Squares, but by no means was it impossible. Remember, use as large of pieces as possible.

       Tip: Use the supplied extra wax paper to make templates.

       Next up, ResoNix Fiber Mat 25 Installation. Sorry, unfortunately I apparently forgot to take finished photos of this. I could have sworn I did though. Maybe I accidentally forgot to upload them before formatting the SD card in the camera. Next are some screen shots from the video that I took where you can see the end result of the Fiber Mat 25 Installation.

       Tip: also use wax paper to make templates.

       Pictured below is a screenshot from the video that shows the completed ResoNix Fiber Mat 25 installation on the door panel. I know, not the best view, but it’s better than nothing. Once the Fiber Mat 25 was installed, the door panels sound treatment was completed.

Volvo S60 Upgraded Midrange & Tweeter Installation

       Up next, the installation of the midrange and tweeter into the OEM upper door locations. While I am putting this after the sound treatment portion, this was technically done first. Anyways, on to what I did here. So with everything that I do, I do my best to retain the integrity of the vehicle as much as possible. Every baffle and bracket for each and every speaker is done in a way that matches the OEM speaker mounting pattern and uses the OEM hardware to secure it in place.

       That said, the way I look at things, I also don’t want anyone messing with my installation if they aren’t qualified to do so. So what I have started doing is using the OEM mounting for the brackets and baffles, but using 316 stainless steel tamper-resistant machine screws for the speakers, amplifiers, fuse holders, and anything else for that matter. I’m only giving those who aren’t qualified “OEM-level” access, and will not let them ruin what I did, as I have had some unfortunate mishaps with dealerships and independent mechanic/body shops doing things incorrectly after making my previous installs too easy to service. They’re either going to have to call me to ask, and I can properly instruct them on what to do, or its going to be someone who is qualified to work on it.

       First up, the midrange drivers. We ended up going with the BLAM LFR80, which is a pretty beefy 3″ wideband driver that fits the OEM location in this vehicle perfectly. The baffles were laser cut out of 1/4″ black cast acrylic, and were tapped to accept the M3 machine screws that we used. I unfortunately do not have photos of this next part, but before the midrange drivers were secured to the baffle, I used very thin strips of ResoNix CCF Decoupler 3F as a gasket that was installed onto the bottom of the flange of the driver. This is an important step and is to create an air-tight seal between the driver and the baffle. Without it, very tiny air leaks will occur, and will cause distortion, and will typically sound as if the driver is blown.

      Note: when doing this, do NOT include gaps in the gasketing material for the screw holes. This just allows the gasket to act as a “riser” and the screw hole areas now have a gap. Instead, wrap your gasketing material (preferably ResoNIx CCF Decoupler 3F) all the way around in one piece, and pierce holes through the material through the drivers mounting holes.

      The drivers were secured with the aforementioned 316 stainless machine screws with a perfect length to make it all the way through the baffle, but without protruding.

       Once the midrange was secured to the baffle, another gasket of ResoNix CCF Decoupler 3F was placed on the door panels midrange speaker opening. The purpose of this again is to make sure everything is sealed and there are no leaks or destructive interference. Again, air leaks will rear their ugly head as audible distortion. Taking the time to make sure that these wont happen before they even show is crucial. Little things like this are what people mean when they say “install is the most important aspect of making a car audio system sound great”… All of these little steps make up the “install”.

       Next up, the tweeter mounting cup and bracket. The BLAM Live tweeter was fully removed from its housing, which left us with some “twist lock” tabs on the tweeter. What I came up with was a cup that secures the tweeter utilizing its own twist lock tabs, and is connected to an OEM-matching bracket that secures using the OEM mounting holes and hardware. The result is a tweeter bracket that places the tweeter only a few mm away from the grille (not sunken back an inch like I see many installers doing because that is the quickest and easiest way. Shame.. Remember, install > everything).. and allows the tweeter to secure using its own tabs. No glue or adhesive required, leaving the tweeter fully in tact and easily removable and can be used in the clients next vehicle, and retains their value if he decides to sell them and upgrade to something else. Glueing them would render them permanently affixed to the vehicle specific bracket, and make the housings unusable, rendering them nearly worthless to any potential buyers, or make things more difficult when it comes time to install them in a new car.

       In some photos below, you can see the slots that were engraved into the acrylic to create the pattern that allows the tabs to lock into place.

       On the front, I also used ResoNix CCF Decoupler 3F to create a seal for the tweeter (to prevent the rear wave of the midrange driver from leaking in and causing cancellations), and used it to create a sealed ring around the midrange driver that seals it to the trim panel and grille, which will “funnel” all of its energy into the listening space instead of allowing a large portion of it to travel behind the trim panel, where it will introduce resonance, rattles, distortion, and lost output. In hindsight, I could have used a ResoNix CCF Strip for this, but I didn’t think it would take 3 layers of the CCF3F in order to make full contact with the trim panel/grille all the way around (highly important, otherwise its nearly useless). But the CCF3F is also stiffer, so it does provide some stability as well, which helps prevent the trim panel from rattling.

      As you can see, the tweeter fits snug within the opening with the installed strip of ResoNix CCF Decoupler 3F. The CCF3F rings around the midrange were stacked a bit higher than necessary, but the more pressure without causing issues with the trim panel, the better. The clips for this trim panel are very tight, so it held the pressure no problem.

Volvo S60 Door Midbass Speaker Installation

       Okay, now onto the midbass driver installation. Once all of the outer door skin’s sound deadening was done, I was able to reinstall the inner door skins access panel and move on to the midbass installation. First thing I would have normally done is remove the OEM speaker and trace the mounting shape into CAD and creating the template to mount the new midbass driver to the OEM mounting points. Fortunately for me, I already have that design from doing my own car in the past. So I moved on to cutting them out on the laser. While the laser was chugging along, I removed the doors. Yes, removed the whole thing. Believe it or not, it is very easy on this car and is the easiest way to run the speaker wire through the molex plug, which is a very tight fit. I ended up running a 4-conductor 16 gauge wire in, two of which are used for the midbass, and the other two just in case. It always pays off to plan ahead and build in redundancies.

       Door removed. I made sure to protect the fender with a clean blanket. Ended up not needing it since Volvo makes it pretty easy to do this, but better safe than sorry.

       Here you can see the vehicles side of the molex plug. At the bottom, you can see a circle. That circle has a small opening where you can run wire through. I ran the wire in the removed door first, and left PLENTY of slack on the side exiting the door that will be ran into the vehicle. This was a bit difficult as it is, as mentioned, a very tight fit. Patience and the right tools made this work in the end without the need to modify the plug in the slightest, I then brought the door on its stand close to the vehicle so I can run the wire through the other part of the plug that is mounted to the car.

       Things get tricky again when running the wire into the car from the door.

       1) The two circular openings in the plugs mate up to each other, so there is NO room for slack or bends or twists in the wire. When you run the wire all the way through into the car, you need to pull it tight as you bring the plugs together.

       2) The molex plug runs into an enclosed cavity in the kick panel that doesn’t have any real access besides for a tightly packed grommet with wires run through it. You need to make a small slit in the bottom of the grommet and get very lucky fishing the wire into it. It took about 15 minutes per door to do both steps, so not impossible, just frustrating and tedious.

       The wire in the door was ran to the midbass opening, where it was zip tied out of the way along the structure of the opening. It was terminated with an XT30 connector, and dressed with the ResoNix OEM exterior tape.

       While the door was off, I also ran the wire for the tweeter, which ended up being the OEM midbass wiring, just repurposed for the tweeter. This was all dressed with the ResoNix OEM Interior tape, which is also the same tape that Volvo uses.

       Midbass driver installation: Continued.

       The 4-layer, 1-inch thick total baffle for the midbass driver was constructed out of black cast acrylic on my laser. The base layer has the mounting pattern for the OEM mounting points and makes use of the OEM hardware. The driver was secured to the baffle via M4 x 25mm 316 Stainless Tamper-resistant machine screws. Before the driver was secured to the baffle, I also used a strip of ResoNix CCF Decoupler 3F along the entire perimeter of the bottom of the mounting flange in order to create a perfect seal to prevent air leaks. Not only was this done on the bottom of the driver, but this was also done on the bottom of the baffle so that there are no air leaks between the inner door skin structure and the baffle. After that, I also neatly adding two layers of CCF Decoupler 3F to the outer perimeter of the baffle. This served one main purpose. You can see that I extended the outer diameter of the baffle to be larger than the outer diameter of the midbass driver itself. This was so I can mount the ResoNix CCF Strips around the driver without actually adhering it to the driver itself. Sometimes, that has to be done due to size constraints, but in this case it wasn’t necessary. That said, I wasnt able to extend it to fit the full width of the ResoNix CCF Strip without getting nervous that it would hit the door panel and prevent it from being able to be reinstalled. So, I added the ResoNix CCF3F to allow the ResoNix CCF Strips to reside on the baffle, and then also be held up by the extra diameter added by the foam. By doing this, the foam can compress and accommodate any fitment challenges that the door panel introduces.

       Here you can see the ResoNix CCF Decoupler 3F on the back side of the baffle to seal the baffle to the inner door skin.

      ResoNix CCF Strips were also applied to the outer perimeter of the drivers side baffle.

       Here is the passenger side baffle and driver mounted in location before the ResoNix CCF Strips were installed to this side.

       ResoNix CCF Strips added to the outer perimeter of the baffle to seal the midbass driver to the door panel grille. This ensures that all energy generated by the midbass driver is directed out from behind the door and through the grille and into the listening space, instead of a large portion of it travelling behind the door panel, creating more resonance, rattles, distortion, and lost volume.

      The baffles were secured to the inner door skin using the OEM hardware in the OEM locations.

       Once the midbass driver assembly was complete, the door panel was reinstalled and ready to be put back together.

      Midrange & Tweeter grille door trim reinstalled. As mentioned earlier, we stacked up enough foam around the midrange and tweeter to have them sealed to the opening, which ensures the best performance possible.

       The doors are now complete.

OEM Integration & Wiring

       Next up, grabbing signal. In this vehicle we would have had to grab high level signal from the factory amplifier, which works, but is always a hit in the sound quality department. You deal with the factory equalization, crossovers, all pass filters, signal delay, upmixers, compressors and limiters, as well as the distortion and overall poor sound that the usually sub-par hardware causes. Fortunately, we have a work around 🙂

       Thankfully, ResoNix has an OEM interface prototype that we used to grab the digital MOST150 signal that sends audio signal from the head unit to the OEM amplifier. This allows us to decode the signal and get perfect signal from the factory radio. While we do have another interface that works on Volvo’s, it only works up until 2020 (maybe 2021). The 2021/2022 and newer have received a facelift where the Valse Most150 that we offer does not work. This new interface on the other hand, worked flawlessly. It allowed us to take that unadulterated MOST150 signal, and convert it into optical or coaxial outputs. I opted for optical since my brain automatically thinks to run optical when doing an interface, but only later realized that since it has coax output as well, I could have just used our ResoNix Solderless Custom RCA system, which is a bit more reliable. This is actually why I run two optical cables anytime I do optical. You may be able to see an extra optical cable tucked away here.

       Speaking of these interfaces, they are going to be available shortly through ResoNix, and for way more than just Volvo. BMW (yes, even the new BMW’s with Ethernet), Mercedes (yes, even the new ones with coaxial), Land Rover (yes, even the new ones with ethernet), Lexus/Toyota (select models), Cadillac (select models), VW (select models), and more. ETA: Late January 2024.

       Another little teaser… compared to other units on the market, pricing will be competitive 🙂

       Up next is the wiring. All of the wiring from the speakers, the Helix Conductor, as well as power, ground, and remote out, and optical outputs for the interface, and even a few extra wires just in case are routed very cleanly and carefully down the passenger side of the vehicle, and across the back seat. All of it follows along the OEM wire harness and is zip tied every 4~ inches.

      The passenger side midbass speaker wire run down the passenger side.

       Once they were run down the passenger side, they were run across the front of the rear seats.

       EVERY single wire that was ran to the back was terminated in an easy to remove and impossible to mess up way. For the speaker wires, power/ground/remote out for the interface, and conductor, they were ran into a Deutsch connector with 40 slots for easy servicing and removing of the amplifier rack. This was more than enough slots for the wires we had at hand, but why have more than needed? Again, planning and keeping the possibility of issues in mind. Experience shows that while I may be able to do a perfect install, and the interface we are using may be perfect in any way, one day Volvo might come out with an over-the-air update that renders that interface inoperable with their new update. So always planning ahead, I also ran high-level input wires just in case. I tested the interface before doing any of this, so I knew that it worked out of the gate, but we do have a plan b just in case Volvo changes something. This isn’t unheard of, so I planned ahead for it.

       These Deutsch Connectors arent your average connector. Weather sealed, high current, and easily servicable. They make for an awesome solution, but come with a very high price. This connector set and all of the pins run about $300, and the specific crimpers for it, another $60 for the pins of this size. Expensive, but worth it for these situations. This, along with some of the other things I implemented, allow the amplifier rack to be fully removable in less than 5 minutes.

       Moving on from the wire harness bundle, we have the main power wire and fuse holder. The fuse holder is located right next to the battery, and is easily serviced by popping up the battery cover. The fuse holder resides on a right angled bracket that is bolted to the car. The fuse holder is a very small design in which the cover easily slides off when needed. You can see it partially slid off in this photo.

      The main power and ground wires were dressed in flame retardant tech flex and run up to the rear drivers side corner of the trunk, where it would be able to pop over the top of the OEM trim, but be hidden behind the amplifier rack cover panel that we build. These were terminated with an Anderson connector, so it can be easily removed from the amplifier rack for again, easy serviceability for parts that may need to be serviced. Again, any parts that I deemed not serviceable by anyone not qualified were dealt with using tamper resistant screws.

Volvo S60 B-Pillar Sound Deadening

       While we ran the wiring, the B-pillars had to be removed, which was perfect, because they are a nightmare when it comes to rattles in this car. I ended up treating them with ResoNix CLD Squares and ResoNix Butyl Rope. I spoke to the owner of this car about doing this before hand and received his permission. The upside, as mentioned, no rattles in the B-Pillar right next to your ear. The downside, I have to permanently affix the height adjustment of the seat belt, since this is the mechanism that rattles like no ones business. When the owner dropped the car off, I marked where his seating position was, where his seat belt height was adjusted to, and marked/taped it all in place so it it was set up correctly for him.

       Looking at this and the following photos, you can see the many areas where small pieces of plastic are free to move and do as they please, and being in close proximity to each other is just a nightmare of rattles waiting to happen.

       I first started with a piece of ResoNix CLD Squares on the body of the B-Pillar to reduce resonance as a whole from the structure. Then I moved on to using ResoNix Butyl Rope where any small plastic panels may have the opportunity to vibrate against each other. As mentioned, the only down side of this is that it holds the seat belt height adjustment mechanism in place.

       The HVAC vent that resides in the back of the B-Pillar that fires at rear passengers is also a rattle hazard. I used ResoNix Butyl Rope to handle this as well.

Volvo S60 Rear Deck & Trim Sound Deadening

       Next up was sound deadening the rear deck and rear deck trim panel. I started with the trim panel. Pictured here is the back side of it. You will see a thin OEM sound absorbing material. This fits into the memory foam piece that is molded between the rear deck and the back side of this rear deck trim, so this was a good guide for cutting out with our ResoNix Fiber Mat 25, which is a much better sound absorber than polyester based sound absorbers. The reason for this, the fibers for polyester sound absorbers are much larger in size than what we have with our ResoNix Fiber Mat. This means that sound energy is less likely to vibrate them as it passes through the material, which means it cannot convert as much sound energy into mechanical and thermal energy. This equates to a less effective sound absorber, and is why we opted to replace it with ResoNix Fiber Mat 25.

       The child seat hook trim and their covers on the rear deck are also a problem. They are secured to the rear deck trim in a way that promotes rattles. Their covers also are prone to rattling against them. These will be dealt with accordingly.

       First, the OEM sound absorber was removed, and ResoNix Mega CLD Squares were installed onto the back side of the rear deck trim. This reduces the amount that the panel can resonate, which will reduce rattles, as well as make the subwoofers more accurate as their resonance will no longer be able to color their output.

       Next up, dealing with the child seat hook trims and their covers. You can see how loosely this and the cover are secured together, and being so light and flimsy, will be a problem. I know they were in my car before I treated them, so I took care of these before they were a problem here.

      First things first, small pieces of ResoNix CCF Decoupler 3S to decouple the cover from the trim in the areas it could vibrate against. The CCF3S is thin and soft enough to work with these super tight tolerance areas that cannot handle extra material and extra pressure.

      Then, I used ResoNix Butyl Rope around its contact points. This helps secure it in place, as well as decouple it from any surfaces it may rattle against.

       Next up, tracing the OEM sound absorber onto ResoNix Fiber Mat.

      ResoNix Fiber Mat installed. It is now ready for installation. But not before we treat the rear deck structure.

       Here we can see the bare rear deck. It is mostly a thin piece of steel, and with the amount of bass we will have in this car, it will definitely resonate. I opted to use ResoNix Mega CLD Squares here to get the best performance for resonance reduction possible. I did as much coverage as I possibly could using as large of pieces as I reasonably could. Remember, a bunch of small pieces is not nearly as effective as one larger piece.

      ResoNix Mega CLD Squares installed. I made sure to take note of and steer clear of any holes that the rear deck trim clips into, and any wiring and sensors that may be here. I also clearly stayed away from the seat belts as we do not want to hinder their function.

      I also installed some ResoNix Mega CLD Squares on the floor right where the subwoofer enclosure will reside.

Volvo S60 Amplifier Rack Layout & Wiring - Helix P Six Ultimate & P One MK2

       Next up, the amplifier rack and its wiring. I did my absolute best to keep this as clean and serviceable as possible. As you can see, we used the Deutsch Connector for all of the speaker wires, conductor wires, and wires for the MOST150 interface. The RCA’s from the P Six Ultimate from the P One Mk2 are of course the ResoNix Solderless Custom RCA System. We opted for RCA instead of optical for two reasons. First, easier to set up for headroom and overlap in the gain structure to get the output we want. Second, perfect length. We do not have custom length custom optical cables…. yet.

       As mentioned earlier, we used an Anderson connector on the main power and ground leads as well for easy disconnect there, and also used an optical connector for easy disconnect of the optical input signal.

Volvo S60 Helix Conductor DSP Controller Custom Installation

       The Helix Conductor was added to where the OEM cigarette lighter socket originally resided. I made a custom housing for it that fit right into the location, painted it a matching satin black, and was able to fit it in a way that looks factory, allows the OEM cover to hide it when needed, and most importantly, is easy to reach and operate.

Volvo S60 Custom Subwoofer Enclosure For Audiomobile Encore 12's

       Up next was the subwoofer enclosure. Since we needed the spare tire to still be accessible and the customer wanted a good amount of output from the subs, this was a big ask considering the trunk size in this vehicle is very small. Its quite possibly my only gripe with owning this car. That leaves us with having to build a pretty dang small sealed enclosure. It ended up being 2 separate chambers at 0.9 cubic feet per side. Not much, but the Audiomobile Encoure 12’s handled it VERY well. As a matter of fact, they played flat down to 10hz in this car with this enclosure. Incredible.

       The enclosure was constructed out of 18mm void free baltic birch, and was finished in black carpet.

       I also treated the inside with ResoNix CLD Squares, and ResoNix Fiber Mat 45. Some will say this is unnecessary. I say car audio as a whole is unnecessary. So if its all unnecessary, might as well do everything you can to make the time, money, and effort worth it. All of the small things add up, and the sum is a better sounding car than it would have been otherwise.

       Yes, the enclosure shouldn’t resonate, and it “didn’t” without it. But the truth is, EVERYTHING resonates. And enclosure like this just has a very high resonant frequency. Constrained Layer Dampers don’t change the resonant frequency like some think. Instead, they use sheer resistance to actually reduce resonance as a whole. So yeah, knocking on it, there is a very audible difference. Weather it makes the subwoofers perform and integrate into the system as a whole better or not, who knows. It only took an extra few minutes and a few extra pieces to do the larger panels on the inside.

       The enclosure was secured in 3 locations. Two in the rear and one in the front. The locations in the rear actually use OEM bolts that reside right outside of the spare tire. The one in the front, I used an M8 Riv-Nut and Bolt to hold it in place.

       Fiber Mat 45 was installed over the entire interior of the box in 1 layer. Fiber Mat 45 has proven to be MUCH more effective than standard polyfill, again, due to its extremely small fibers that it consists of. These smaller fibers, being much easier for passing sound energy to vibrate, allow it to absorb sound more efficiently.

       The Audiomobile Encores… very impressed with these. The build quality, the output, the sound quality, the low frequency extension, even in a ridiculously small enclosure, etc… I will definitely be using these again.

       The subwoofers were also installed with Stainless tamper-resistant screws.

       Update! Uploaded 2 days after this build was initially posted.

       I am glad to see that so many are excited to see us back at it. I’m also glad to see people interested and curious in what we are doing to the point where I have received countless questions and comments on the Volvo S60 install that I recently posted. The most common question is, “How are the Audiomobile Encore subs?”… To summarize it, this is my first time using them, and I will be using them again. Even though we had to place them in an extremely small enclosure, they played flat down to 10hz, with an F3 of just below 8hz, which I assume is only due to the natural roll off of the DSP/amplifier. I cant wait to do more installs with these.

Amplifier Rack Installation & Beauty Panel Fabrication & Installation

       The amplifier rack secures to the back of the enclosure, and all of the wiring clips right in within seconds.

       A beauty panel was constructed for the amplifier rack. At first, we were going to hide everything. That was, until the client saw my trunk and wanted something similar that showed off the amps in a very simple yet clean fashion. This panel (and the amplifier rack) were also constructed out of baltic birch.

       Once the beauty panel was complete, it was upholstered with matching charcoal carpet, and was fitted with a subtle white LED strip above the amplifiers. The panel secures via pressure on the sides of the amplifiers, as well as on the sides of the trunk panels. It fits seamlessly and is secure, yet removes in seconds to access the amplifier rack.

That Wraps This 2022 Volvo S60 Custom Car Audio System Installation!

       That wraps it up for our first car audio install at our new location! If you have any questions, feel free to ask. If you are interested in having a high-performing sound system installed or an already existing one improved upon in your vehicle, feel free to reach out! Again, I am very excited to be back doing this, and am especially grateful that I am able to make this a fun side-gig as opposed to my full time career.


Interested in a similar install or just have questions? Feel free to reach out to us at any time!
Contact Us

How to sound deaden car doors

How to Sound Deaden a Car: A Comprehensive Guide to Quieter Rides

Are you tired of road noise disrupting your peaceful drives, or your sound system being diminished by a bunch of rattles and resonance? Sound deadening your car is an effective way to enhance your driving and music experience by reducing unwanted noise. This comprehensive guide will explore four categories of sound treatment products – each playing a crucial role in achieving a quieter ride. We’ll cover everything from Constrained Layer Damper Sound Deadeners to Noise Barriers, along with basic installation guidelines for each.

For the FULL comprehensive sound deadening guide, please check out our Reference Information & Guide page. 

Understanding Sound Deadening Products

       So, there are many different types of sound deadeners, sound absorbers, noise barriers, and decouplers out there. Each and every one of these product types serves a specific task in reducing sound inside of a vehicle. 


1. Constrained Layer Damper Sound Deadeners

       Constrained Layer Damper (CLD) Sound Deadeners are essential in minimizing vibrations and rattles in your vehicle. Products like the original ResoNix CLD Squares, heavy-duty ResoNix Mega CLD Squares, or the lightweight ResoNix Lite CLD Rectangles are designed to dampen the vibrations of your car’s metal and plastic panels, significantly reducing the noise inside the cabin. They are particularly effective in dealing with low-frequency resonance noises, which are common in automotive environments.

2. Sound Absorbers     

       Sound Absorbers, such as ResoNix Fiber Mat 25 and 45, ResoNix Guardian, and ResoNix Lockout play a pivotal role in absorbing airborne sounds. These materials are typically made from fibrous or foam materials and are perfect for covering large surfaces like door panels and car ceilings. They work by absorbing sound waves, preventing them from reflecting back into or entering the cabin.

3. Decouplers

       Decouplers, like the ResoNix Fiber Mat 25 & 45, ResoNix CCF Decoupler 7S, ResoNIx CCF Decoupler 3S, and ResoNix CCF Decoupler 3F are designed to break the path of sound transmission. They create a physical separation between two surfaces, preventing noise from passing through. This is especially useful for areas where panels or parts of the car are in direct contact, leading to noise transmission.

4. Noise Barriers

       Noise Barriers, such as the ResoNix Barrier, are the final layer of defense against noise. These heavy, dense materials block external noises from entering the car. They are particularly effective against road and wind noise, making them an essential component for a sound deadening or sound proofing project.

Check out this detailed video playlist on how to sound deaden a car like us!

Lamborghini Huracan AWD Sensonum Sound System DSP Amplifier Sound Deadening ResoNix Sound Deadener
ResoNix Sound Solutions Lamborghini Huracan Door How To Sound Deaden What is Fiber Mat 25 45 sound absorber for cars
Eric H ResoNix Sound Solutions CCF7 1 v2
Volvo S60 R Design ResoNix Sound Solutions Sound Deadener CLD Squares Barrier Fiber Mat CCF7 Guardian Blackhole Tiles Accuton Automotive Mass Loaded Vinyl

Basic Install Guidelines For Sound Deadening Materials


1. Installing Constrained Layer Damper Sound Deadeners

To install CLD Sound Deadeners like ResoNix CLD Squares:

       .  Clean the surface where you’ll apply the deadener.

       .  Measure and cut the deadener to fit the panel.

       .  Peel off the backing and apply it to the car panel. Use a roller and apply light pressure, ensuring no air bubbles.


2. Installing Sound Absorbers

For installing Sound Absorbers such as ResoNix Fiber Mat:

       .  Clean and dry the area of application.

       .  Cut the absorber to size, taking the contours of the area into consideration.

       .  Secure it in place using the ResoNix Fiber Mat’s built-in peel-and-stick adhesive.


3. Installing Decouplers

For installing Sound Absorbers such as ResoNix Fiber Mat or ResoNix CCF Decoupler:

       .  Clean and dry the area of application

       .  Cut the decoupled to the required size.

       .  Place it between the two contact points to reduce buzzes, rattles, and noise transmission.


4. Installing Noise Barriers

To effectively install Noise Barriers like ResoNix Barrier:

       .  Locate areas with high external noise intrusion.

       .  Measure and cut the ResoNix Barrier material.

       .  Apply it appropriately, preferably with 100% coverage to create a solid barrier against external noise. 


       Conclusion: Sound deadening your car can significantly improve your driving experience. By understanding and utilizing these four types of products, you can create a quieter, more comfortable cabin environment. Whether you choose to DIY or seek professional help, sound deadening is a worthy investment for any car enthusiast or daily commuter.

Remember to explore these products further and consider their installation for a noticeably quieter ride. Your ears will thank you!

       Remember, check out our Reference Information & Guide page for an extremely detailed breakdown on how to sound deaden your car. If you have any questions, feel free to contact us anytime!

How to sound deaden car doors

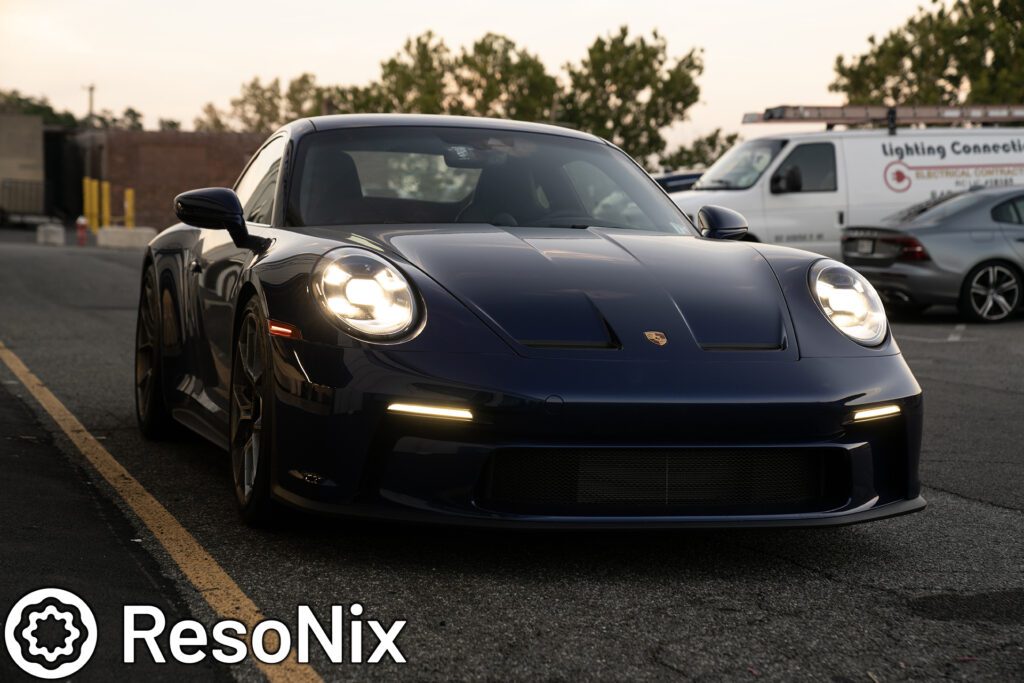
Porsche 911 GT3 Sound Deadening & Noise Reduction

Elevating the Porsche 911 Driving Experience: The Magic of Sound Deadening

       In the realm of luxury sports cars, the unique allure of Porsche 911 sound deadening and interior noise reduction is becoming increasingly recognized. Every Porsche 911 owner knows the thrill that comes with turning the ignition and hearing that iconic engine roar to life. The 911 isn’t just a car; it’s a symphony of mechanical wonders. But like any intricate symphony, unwanted noise – rattles, buzzes, tire hums, and the oft-debated exhaust drone – can creep into that harmonious experience. These unwelcome guests can detract from the pure joy of driving one of the most legendary vehicles in automotive history. However, there’s a solution that many Porsche enthusiasts swear by: sound deadening.

       For those passionate about their 911s, the pursuit of perfection is never-ending. While its natural acoustics have a charm of their own, ensuring that every note is intentional and desired can transform the driving experience from merely thrilling to absolutely euphoric. Enter the world of sound deadening – a subtle art and science that promises to attenuate the disturbances, letting you focus on what truly matters: the unparalleled pleasure of piloting your Porsche 911. In this post, we’ll delve into how sound deadening can serve as your personal conductor, orchestrating every auditory aspect of your drive to pure perfection.

Understanding the Triad of Noise Disturbances in the Porsche 911

       For the Porsche enthusiast, the 911 isn’t just a vehicle – it’s an extension of oneself, a statement of style and performance. However, amidst its brilliance, some Porsche 911 owners have brought to our attention three distinct types of noises that can affect the driving experience. Understanding these noises is the first step to achieving the pinnacle of auditory pleasure in your 911.


1. Rattles and Buzzes: The Unwanted Companions

       The intricacy of a Porsche 911’s design means that over time, parts can become susceptible to vibrations, leading to rattles and buzzes. Whether it’s the dashboard, door panels, or the occasional loose fitting, these sounds can be distracting, especially when cruising at low speeds or on bumpy roads.

       Sound deadening materials can be strategically placed to reduce these annoyances. These materials absorb vibrations and prevent them from reaching the car’s interior, ensuring that the only sound you hear is the pure, unadulterated note of your engine. Remember, sound reduction isn’t always about completely eliminating noise, but oftentimes refining it. By targeting these rattles and buzzes, we make the Porsche 911 experience even more sublime.


2. Tire Noise: The Road’s Echo

       One of the most common grievances is the hum or roar of tire noise. As the rubber meets the road, vibrations are produced. At high speeds or on rough terrains, these vibrations become more pronounced. The wide and performance-oriented tires of the 911, while exceptional for grip and handling, can sometimes be culprits for this noise.

       Thankfully, sound deadening can combat tire noise. By applying sound reduction materials beneath the cabin and around the wheel wells, the noise generated by the tires is significantly diminished. The result? A quieter cabin that allows for conversations, music appreciation, or simply soaking in the purr of that flat-six engine without the interference of tire noise.


3. Exhaust Drone and Body Resonance: The Deep Hum

       A Porsche 911’s exhaust note is music to many ears. However, at certain RPMs, the exhaust can produce a drone – a continuous, low-frequency hum that reverberates within the car’s cabin. This, coupled with the natural resonance of the body, can sometimes create a sound environment that’s less than ideal.

       Sound deadening shines once again in addressing this issue. By introducing materials that absorb these low-frequency sounds, one can mitigate the exhaust drone and the resonance of the body. This ensures that what you hear is a clear, crisp exhaust note – a sound that embodies the essence of the Porsche brand without the overbearing hum.

       In the journey of enhancing the auditory experience of your Porsche 911, understanding and addressing these noises is paramount. Sound deadening doesn’t just reduce noise; it refines and elevates the driving experience, allowing you to connect even more deeply with your beloved 911. Whether it’s the chatter of rattles, the echo of the road, or the drone of the exhaust, sound reduction is the key to unlocking pure, undisturbed driving pleasure.


Buckle up, it’s about to get very detailed..

Before we get into this, it is important to note that every situation is different, every application is different, and everyone’s needs/wants are different. For our specific clients goals, which was to reduce outside noise and drone without adding too much weight, while still retaining the enjoyable sound of a 911 GT3 engine at higher RPM’s. If you would like guidance that is specific to your situation, please do not hesitate to reach out to us.

Contact ResoNix

Below is the full installation log that we posted on Rennlist

       Hey everyone! Nick from ResoNix Sound Solutions here. I wanted to show a solution that I have for something that I see and hear a lot of 911 owners, especially GT models complain about: unwanted rattles and resonance. 911’s, believe it or not, are probably the one car model that I get the most inquiries about regarding reducing unwanted rattles, resonance, and gravel noise. Maybe tied with Tesla Model 3/Y and Ford Broncos for the most inquiries, but, whatever.. The point is, this is a commonly asked about problem and I finally got my hands on a brand new GT3 Touring that I was able to document exactly how I would go about reducing unwanted rattles and resonance without taking away from the enjoyable sound of the engine and exhaust of this car at higher RPM’s, and without adding too much weight.


We ended up using for Porsche 911 Sound Deadening:


Or, you can check out our ResoNix Porsche 911 Sound Deadening Treatment Kit to easily purchase.


       These products were used in the doors, rear parcel shelf/quarter panel area, and the wheel wells. In total, we added approximately 40lbs and had a drastic difference before and after. On to the build log


       Hello everybody! Yes, it has certainly been a while. But I am back and providing you all with install photo goodies, as well as sound treatment before & after data!
That said, I have recently rented a small shop with the intentions of hosting training classes, and doing installs, but that has also had to be put on pause until an unknown date due to having to get everything back and set up in the new shop. We have a good amount of crazy installs lined up, and those will start as soon as I can, but this vehicle in particular wanted to have something done first that I could do without anything but my hand tools, and something we are the experts of the subject in our industry: Sound Treatment.

       My client took delivery of this 2023 Porsche GT3 Touring recently, and immediately noticed how unnecessarily loud it was, but not in the ways you’d expect a naturally aspirated daily-drivable race car from a luxury brand such as Porsche would be. The panel resonance, rattles, and body drone was absolutely through the roof, and was to the point where his wife didn’t even want to drive in the car with him. The problems were relayed to me as accurately as possible, and we came up with a game plan to reduce the rattles, drone, and tire/gravel noises that my client described to me. That said, when on the phone, I was almost in disbelief at the level of noise he was claiming, especially considering it is the Touring model. I have driven many Porsche’s, including GT3’s, but never a 992 GT3, or a GT3 Touring. It just didn’t make sense that the car would be THAT loud. Upon drop off and my initial test drive with it, I immediately understood where he was coming from. It was bad. Lets get into the “before” details of what I personally heard.


Porsche 911 Sound Deadening Treatment Locations Of Interest

       Doors: The doors were the first thing that stood out to me because as soon a I started the car, the doors started rattling at idle. Very weird, and definitely not something I would expect out of a car like this. The rest showed up while driving. The wind noise through the doors and resonance from the door was drastic. It sounded like a hollow drum, just while driving. The drone and wind noise from it at speeds over 50mph were really bad.

       Rear Parcel Shelf/Quarter Panel Area: The rear portion of the vehicle was the worst offender. It seemed as if every bit of the body under the plastic trim panels were having a party. The drone from resonance was insane. You could tell that this wasn’t just a loud exhaust causing this noise, but was in fact being caused by resonating panels generating a noise of their own. Once again, this entire area sounded like a hollow drum, but did so at all speeds, even at idle and low RPM’s it was obvious. You also heard a ton of tire noise coming from the quarter panel areas, which brings us to our next and final problem area..

       Wheel Wells: The wheel wells are usually the largest source of noise in any given vehicle that doesn’t have a loud engine/exhaust. While they weren’t the loudest source of noise to my ears, they certainly were more offensive in this car than most others. That can be attributed to three things. First, the tires themselves. The tires on a sports car such as this are very hard, and the sound they make slapping on the pavement is much less forgiving than most other tires. Second, is the suspension of the vehicle. A stiffer and sportier suspension will mean the tires are mechanically coupled to the body of the vehicle more so than a vehicle with a “looser” suspension. This means that more energy can be transmitted from the tire into the body of the vehicle, which can then radiate from the body as sound energy. Third, is the overall construction of the wheel wells. The thinner the metal, the weaker the panel, the less sound absorbers and noise barriers they use, etc. all affect how much sound can be transmitted through it, as well as how resonant this part of the vehicle is as a whole. In this car, the rear wheel wells sounded like a damn wind tunnel, which was surprising upon disassembly of this area, as Porsche utilized a healthy dose of sound absorbing material as well as a molded and decoupled noise barrier over the interior wheel well. Apparently, it wasn’t nearly enough. The front wheels were also not very forgiving. I would say about 30% of the wheel well is “open” and allowed rocks to be slung into the body of the car, creating very loud “ping” sounds. Rocks also got sent onto the very flimsy wheel liners, and created a very loud “pop” noise. So from the wheel wells, we dealt with wind noise, overwhelming tire noise, resonance, and pings/pops from rocks being thrown up by the aggressive tires.


       After discussing the situation with the owner of the vehicle, a plan was formed. I originally proposed a solution that treated the doors, wheel wells, rear interior, as well as the front floor boards and center console area. We decided to skip the front floorboards and center console area since that area would have utilized ResoNix Barrier, and the owner didn’t want to add too much weight.

       We ended up with the following. Doors received ResoNix CLD Squares, ResoNix Fiber Mat 25, and ResoNix Guardian. The rear interior received ResoNix CLD Squares and ResoNix Fiber Mat 45. The wheel wells and fender liners received ResoNix CLD Squares and ResoNix Fiber Mat 25/45.


       For those that are unaware, the ResoNix CLD Squares are the highest performing CLD (Constrained Layer Damper, also known as “sound deadener”) product on the market. The function of a Constrained Layer Damper is to reduce resonance in the panel it is adhered to. Constrained Layer Dampers do NOT block or absorb noise, regardless of what other companies say in their marketing material about their constrained layer damper products. How much the end result is contributed by a CLD is very dependent on the vehicle and the panels you are working with. If the car you have has thin sheet metal with no real structure to it and is overall very resonant, then doing just a Constrained Layer Damper will have a very meaningful end result. That said, most noise in a vehicle is not generated from panel resonance. Most of what you hear while driving a car is going to be tire and wind noise. This is where ResoNix Fiber Mat comes in and does the heavy lifting. ResoNix Fiber Mat is the very best automotive sound absorber on the market, and also acts as a panel decoupler to prevent panel-on-panel vibration. ResoNix Fiber Mat is to be used anywhere we can get it in our offending areas in order to absorb sound that passes through to reduce sound transmission from noise that originates outside of the car, as well as generated by the resonating panels that reside behind the Fiber Mat.


Note about Constrained Layer Dampers. They perform best in larger singular pieces. Not a bunch of smaller pieces. They also aren’t very useful on panels that aren’t resonant. Areas that are structural do not really benefit much from the application of a CLD. Sure, it never hurts, but in an application where we are trying to save weight, such as doing sound treatment in a GT3, we can skip this structural areas without second thought. If you can knock on it with your knuckle and there is no ringing, CLD application to that area won’t be as useful compared to an area that does ring.

Note about sound absorbers, such as Fiber Mat. Sound absorbers work by imparting an acoustic impedance to the sound energy that is trying to travel through it, and by the cells or fibers (depending on what the absorber is made of, Fibers are vastly superior for our application) vibrating and moving as sound energy passes over them. This reduces the overall amount of sound energy due to a large portion of it being converted into mechanical and thermal energy. In order for this product to work correctly, those fibers need to be able to move. What I am getting at here, packing in and compressing as much ResoNix Fiber Mat into an area wont work nearly as well as filling an area without compressing it. More is always better when it comes to sound absorbers, but that rule goes out the window the second you start compressing it. Compressing Fiber Mat does have other benefits, such as providing stability to the panel it is pushing against, but for general automotive sound reduction, we want to stay away from this.


       Now that we are done with that essay, let’s move on to this Porsche 911 Sound Deadening install!

Porsche 911 Sound Deadening: Doors

       Alright, first up for this Porsche 911 Sound Deadening installation, the doors. Specifically the door panels. These are easy to do on this vehicle for two reasons. First, the door panels are very easy to remove and work with, and two, the door panels themselves don’t have a lot of area that can be worked with for sound treatment products due to many moving parts and service areas, as well as the general shape of the door panel. But, there is still enough workable area, as well as problem areas that need to be focused on.

       First up, we started with ResoNix Butyl Rope, and using that to get in between various overlapping parts of the door panel. The point of this is to prevent this overlapping parts from buzzing and rattling against each other. ResoNix Butyl Rope is the perfect product for this.

       Second, we apply ResoNix CLD Squares to the large/flat areas. Many people seem to be under the impression that you apply CLD only to the metal of the vehicle. This is not the case. Plastic panels also have a lot of resonance, which allows them to act as a speaker of sorts, which generates noise. Applying CLD to plastic panels that resonate will not only help lower this noise, but also lower their ability to rattle against other panels.

       Third, we use ResoNix Fiber Mat (25 for this vehicle) to help absorb sound entering through the doors, as well as decouples the door panel from the inner door skin, preventing vibration.

       And lastly, we used small pieces of ResoNix CCF Decoupler 3S to act as a thin yet soft gasket on certain areas that are prone to panel-on-panel buzzes, but have very tight tolerances.

       So, here we have the door panel removed from the vehicle. Like I said, not many easy areas to work with for a CLD and Fiber mat, but any door panel is always treatable to a degree.

       These next few photos will show the areas where layers of the door panel overlap and can buzz against each other. This is where we push some ResoNix Butyl Rope in to prevent this. This is the first step in treating any door panel as you will most likely be applying CLD over some of these areas, blocking off future access. This area in particular is in the center of the door panel.

       As mentioned, ResoNix Butyl Rope was pushed into the gaps in order to prevent these areas from buzzing against each other.

       Next up for this Porsche 911 Sound Deadening install was the ResoNix CLD Squares installation. As mentioned before, we need to focus on the large, flat areas, and we want our pieces of CLD to be as large as possible without any cuts or breaks, and we also want to use a flat roller, such as the one ResoNix offers. We also need to pay attention to stay away from service areas, such as lights and wires/wire attachment points, as well as moving parts, such as the door latch.

       Applying the ResoNix CLD Squares made a noticeable difference to the door panels while driving as it drastically reduces the amount of resonance coming from the door panel itself, as well as the buzzes and rattles caused by turning the volume up on the sound system. Speaking of the stock Bose sound system, while still atrocious sounding, the sound treatment did improve its performance to a noticeable degree. Much better low end response and midbass impact with much less distortion.

       I used a piece of the wax paper that comes with the CLD to make a template for this area. Very quick and easy for complex shapes without having to reduce the effectiveness by cutting it into multiple smaller pieces.

       Next up for the Porsche 911 Sound Deadening install was the ResoNix Fiber Mat 25. All of the areas that we treated with ResoNix CLD Squares were covered with ResoNix Fiber Mat 25. We also need to keep this away from any service points or moving parts. Also be careful to not block, cover, or impede the attachment hooks.

       Note: ResoNix Fiber Mat can be cut with heavier duty upholstery scissors, insulation shears, or something like the WORX wireless electric scissors. When cutting, it is perfectly okay if the edges arent sealed. The product will be fine, it is able to handle the harshest automotive elements, even with the sides open.

       The last step for the door panels was spot treating a small area that I suspected of being a cause of some audible buzzing. For this, I used ResoNix CCF Decoupler 3S, and cut it into small pieces. The area I applied it to either makes contact, or is very close to making contact with the doors inner skin, and while it is not possible to say that the specific rattle I heard previously was fixed by this, it was a quick and easy treatment that I consider preventative maintenance. Why I didn’t use Fiber Mat here is simple. Its just too small of an area that had too thin of a tolerance. Fiber Mat was too thick and “clumsy” to work for this area.

       Next up for the Porsche 911 Sound Deadening install, the doors themselves. First things first, I removed the access panel and the midbass speaker so I can easily access the outer door skin, which is way more important to treat than the inner door skin. The reason why is very simple. The outer skin is much flatter and has little to no structure to it. Inner skins are usually full of dips, crevaces, bends, and supports, so it naturally is very strong and has little resonance.

       Anyways, once the outer door skin was accessed, first thing I did was remove the hardly-applied CLD strip that was installed from the factory in the lower portion of the outer door skin. That was pretty easy to remove since it was hardly stuck down. I covered it with as much ResoNix CLD Squares as possible, in as large of sheets as possible. Dont worry about covering every single nook and cranny, but do pay attention to not impede any of the moving parts.

       Please note, multiple layers are damn near useless of a constrained layer damper. These products do not work by adding mass. They work by constraining the panel they are adhered to via the shear forces generated by the viscoelastic butyl rubber sandwiched between the panel its applied to and the aluminum constraining layer. One layer of a good Constrained Layer Damper is all you need.

       Once the ResoNix CLD Squares were applied to the outer door skin, I started prepping for the installation of ResoNix Guardian. ResoNix Guardian is a composite of Hydrophobic Melamine foam and Mass Loaded Vinyl, and is topped with an acoustic fabric facing.

       ResoNix Guardian’s main purpose is to be a rear-wave sound absorber (hydrophobic melamine) and sacrificial layer for the rear wave’s energy (mass loaded vinyl), but is obviously also going to be able to absorb as well as block outside noise that is entering through the doors. For this product and considering its purpose, the more coverage, the better.

       ResoNix makes Guardian in 12″ x 12″ squares, and the user is meant to cut them to their desired shape and size. The harder, but cleaner way to install them (and in theory, more effective if you are trying to get the benefits of the build in MLV noise barrier) is to follow the same idea as CLD.. in as large of pieces as possible. This presents challenges getting them installed into the door, because the adhesive layer is EXTREMELY sticky, and can cause issues if you cannot get them into the door without touching anything. An easier way to install them is to cut them into smaller pieces and install as closely as possible. I opted for the more difficult route. I have done the easier route, and it is in fact much easier. But I’m always up for a challenge and like things to be perfect.

       What I do is use the wax paper from the CLD to create templates, and then use those to cut my shapes. If I want it to be easier, I just do the bulk in 4″ x 4″ squares, and then make some smaller pieces to fill in the smaller areas.

       The templates were traced onto ResoNix Guardian using a silver sharpie, they were cut to shape, and then installed. If going this route, I highly suggest putting them in the door and general area first, and then peeling them. This way, you do not risk touching the adhesive on anything that it shouldn’t be stuck to.

       Another tip: peel off nearly all of the backing paper, and then very lightly apply it back down. This way it is easy to peel from the inevitably weird angles you will be working with.

       Once the ResoNix Guardian is applied, you can apply CLD to the access panel, and reinstall it along with the midbass speaker. In this car, there is zero need to apply CLD to the inner door skin.

       And that’s all for the doors. As mentioned, just reinstall everything and enjoy!

Porsche 911 Sound Deadening: Rear Parcel Shelf, Quarter Panels, & C-Pillars


       Next up for the Porsche 911 Sound Deadening installation, the rear. Doing the treatment here was the most tedious out of the 3 areas we tackled, but also the most beneficial in this vehicle. Also, I want to make a note to all of those saying the GT3’s don’t have sound deadening. They do. They actually have way more than I expected. But they are either using it in ways that are ineffective, or the products aren’t very good considering how loud the car is, stock. Especially considering the difference after we did our treatment. They have a large piece of CLD on the rear parcel shelf, they have two large sound absorber pads on the rear quarter panels, and they have a decoupled and molded MLV noise barrier over the wheel wells.

       Anyways, when removing the interior from the rear to prep for the Porsche 911 Sound Deadening install, I thought I was kinda screwed since I saw that level of OEM sound treatment, playing devils advocate to myself that if this wasn’t doing the trick, nothing will, especially since all of the main parts are covered/treated. But, on I went.

       The only places to really apply ResoNix CLD Squares in the rear are in the rear seat bottoms, the rear parcel shelf (after removing the OEM CLD, which was pretty easy to do), and in the quarter panels and on the top of the wheel wells, which I later found could be accessed by removing the OEM sound absorber and Noise Barrier.

       The parcel shelf was straight forward. Just remove the OEM CLD, and install ResoNix CLD Squares over as much area as you can. The OEM CLD feels thick and strong, but is clearly not a quality product and doing much, because the difference was drastic. The rear seat area was also straight forward. Just apply CLD as needed.

       For inside of the quarter panels, I installed ResoNix CLD Squares as far as I could reach, which as much coverage as I could get. Once that was taken care of, I fully stuffed the area with ResoNix Fiber Mat 45 to absorb any sound that is travelling through there from the tires, or any other road/wind noise. This was a large open area that sees a lot of turbulence, so this was very important, and explains why Porsche tried their best with their sound absorbing pad. Remember, do not install it to the point where you are compressing it. Fill the voids with the product still fully lofted. This will net the best results.

       The C-Pillars and rear “wall” area, which are a big area for wind noise, were treated with a healthy dose of ResoNix Fiber Mat 45. I paid careful attention to use as much as possible, but not to build it up so much that it extended past the mounting points of the interior trim panels. The rear pockets that are found in the area between the C-Pillars/wheel wells were also stuffed with Fiber Mat 45.

       First up for the rear section of the Porsche 911 Sound Deadening installation, remove the poor-performing factory CLD and replace it with ResoNix CLD Squares. Then, apply CLD to the rear seat bottoms, and the small shelf above them. In these next few photos you will be able to see the open cavity that is in between the B-Pillar and wheel well arch. This is how you access the quarter panel. It is a HUGE area that is a large source of the noise you hear from the rear. You can also see better angles of the pocket in the rear corners below the C-Pillar/behind the wheel well arches.

       Please note, it looks like I forgot to get an install of the quarter panel cavity being treated with CLD and stuffed with Fiber Mat. You will be able to see this in my video that will be coming out following this installation log. Long story short, as much coverage of CLD and as much fill of Fiber Mat as possible. For the top of the wheel arches, I applied ResoNix CLD Squares across its whole length.

       Once the parcel shelf, seat bottoms, and wheel wells/quarter panels were done with ResoNix CLD Squares treatment, I moved on to installing the ResoNix Fiber Mat 45 into the C-Pillars and rear wall areas. Remember, as much as possible without compressing it.

       Some of the rear panels also received a bit of ResoNix Fiber Mat 45 in areas they could fit. This was the only picture I took of this. This wraps up the entire rear section before the re-installation of the rear trim panels.

Porsche 911 Sound Deadening: Wheel Wells & Fender Liners


       Alright, last but not least for the Porsche 911 Sound Deadening installation, the wheel wells. First I had to get the car up on stands so I could take the wheels off and remove the wheel liners to treat them, as well as to work on the wheel wells.

       Note: To anyone doing this on a Porsche with Centerlocks, you NEED the appropriate torque wrench to reinstall them properly. Not just the adapter, but they need to be torqued very specifically. If you do not have the tools or knowledge, do not do this yourself.

       Another note, as soon as you take the wheels off, cover the hubs with something like latex gloves or lightly cover with a paper towel. You do not want anything to get into the threads for the centerlock, and you do not want to get antiseize ANYWHERE. One drop of that stuff can paint an entire house silver.

       Once the wheels were off and the liners were removed, I treated the rear wheel wells with a healthy dose of ResoNix CLD Squares in the areas that are hidden by the liners.

       Now, the wheel liners themselves. First step, cleaning them with isopropyl alcohol. Next, FULL coverage in ResoNix CLD Squares, minus the mounting points and away from the edges (fitment purposes). The point of full coverage is simple, but a bit hypocritical to one of the things I preach about CLD products. So, in a normal application for CLD, such as on a door skin, or trunk, or roof, etc, noise from the outside is transmitted through the body of the car. Remember, sound is just the movement of molecules. Sound traveling through the air, can also travel through solids, such as body panels, and then transmitted back into the air, and this is how we end up with hearing outside noise in a car. Here’s the thing. All of those panels that I just mentioned are fully coupled to, and are a part of the cabin. Fender liners on the other hand, are hardly coupled to the body of the vehicle, and the sound energy that is making into the cabin from them is super miniscule. Considering this, loading them up with a lot of mass from the CLD can create a noise barrier of sorts, therefor effectively blocking noise from passing. Still doing this in as large of sheets as possible.

       This also DRASTICLLY reduces the amount of noise from gravel being thrown into the from the tires. Its more of a lower frequency thud instead of a louder “pop” type of noise.

       Once the ResoNix CLD Squares were installed, ResoNix Fiber Mat 25 was installed on top of them, also staying away from mounting points or the edges. Staying about 1 or so inches away from the edge that meets the rim of the quarter panel allows for proper fitment.

       The fender liners were then re-installed. Once they were installed, I took some of the wax paper and made templates of the open areas of the front wheel wells that rocks/gravel could hit. ResoNix CLD Squares were painted with a healthy layer of Rubberized undercoating, and then a layer of close-matching paint, and then were cut to match the templates, and installed on these open areas. The point here is to be a much softer thing for rocks/gravel to hit as opposed to the metal, which will help reduce the rock ping noises further.

Once this is done, install the wheels, and our Porsche 911 Sound Deadening install is complete!

As mentioned earlier, if you would like specific guidance for your installation, please do not hesitate to call or email us at any time. Thank you!

Contact ResoNix

How to sound deaden car doors

What Sound Absorber Is Best To Reduce Noise In Your Car

       In the world of cars and cruising, there’s a hot topic making the rounds: “What is the best sound absorber for cars?” It’s like the secret sauce for turning your vehicle into a peaceful haven. You see, we often get caught up in the horsepower, banging tunes, and plush seats, but there’s one unsung hero we tend to forget – sound absorbers. These unsung champs have a knack for hushing up the noise inside your ride, making it comfier and quieter. So, hop in as we take a spin through the realm of sound absorbers and figure out which ones are the absolute best for your car. Whether you’re a die-hard music enthusiast, a daily commuter yearning for some peace, or just someone who craves a noise-free journey, we’ve got your back. Let’s roll and discover the key to making your drive smoother and more enjoyable.

What Are The Different Types of Sound Absorbers For Cars

       So, there are many different types of sound absorbers out there. They can essentially be split into two different categories. One being Porous sound absorbers, and the other being Fibrous sound absorbers.

       A porous, open-cell foam sound absorber is a specialized material used to reduce and dampen sound within an environment. It is characterized by its porous structure, which allows sound waves to enter and be absorbed rather than reflected. This absorption occurs as sound energy penetrates the open-cell foam and is converted into heat through friction and air movement within the material. Open-cell foam sound absorbers are commonly used in various applications, such as acoustic panels and home theater rooms, to improve sound quality and reduce noise levels. Their versatility and low cost make them a popular choice for creating quieter and more acoustically controlled spaces. While there are some options for porous sound absorbers for cars, the options are slimmer than one would think.

       A fibrous sound absorber is a material designed to reduce sound via absorption within a given space. It is typically composed of fibrous materials that also capture and dissipate sound waves through friction, and airflow resistance. These materials are known for their ability to transform sound energy into both thermal and mechanical energy within their structure, effectively minimizing noise levels. Fibrous sound absorbers find applications in various settings, including soundproofing walls, acoustic panels, and most importantly automotive insulation, where they enhance sound quality and create quieter environments. Their versatility and efficiency make them a valuable tool in improving acoustic performance and reducing unwanted noise. For sound absorption in a car, or even camper vans, and even mass transit vehicles, these have recently progressed from the old recycled fabric jute products of the 90’s.


Which Sound Absorber Should You Use In Your Car?

       Well, which sound absorber material you should use will depend on your goals, application, and budget. There are pro’s and cons to each type, do’s and dont’s for each type, and intricacies all around. Following, we will do our best to explain each and every type that is applicable for sound absorption in an automotive environment. Below, we will dive into three of the main options to use as sound absorbers in a car, or any other vehicle for that matter.

ResoNix Sound Solutions Egg Crate Convoluted Acoustic Open Cell Foam sound absorber for cars
sound absorber for cars Porsche 911 GT3 992 991 997 996 Sound Deadening Sound Proofing Noise Reduction Exhaust Drone Sound Deadener CLD Constrained Layer Damper Closed Cell Foam Fiber Mat Sound Absorber Decoupler Guardian Hydrophobic Melamine Foam
ResoNix Sound Solutions Fiber Mat 25 sound absorber for cars
Porsche 911 sound absorber for cars Porsche 911 GT3 992 991 997 996 Sound Deadening Sound Proofing Noise Reduction Exhaust Drone Sound Deadener CLD Constrained Layer Damper Closed Cell Foam Fiber Mat Sound Absorber Decoupler Guardian Hydrophobic Melamine Foam
ResoNix Sound Solutions Lamborghini Huracan Door How To Sound Deaden What is Fiber Mat 25 45 sound absorber for cars

Standard Open-Cell Acoustic Foam

       The standard sound absorber that you will find when searching for “sound absorber” on Google or Amazon is going to be a Polyurethane-based open-cell foam. Sometimes they come in “egg-crate” shape, or wedges, or pyramids, etc. But they’re almost all basic polyurethane open-cell foam. The reason why it is so popular is very simple. Price. It is extremely cheap to manufacture and is very abundant. For sound absorption, it is a pretty decent performer, especially considering its low cost. However, there are a couple of major issues with polyurethane-based acoustic absorption foam when it comes to automotive sound absorbers and the environment they will be subject to. Polyurethane Open-Cell Foam will soak up and hold onto water and moisture like a sponge, and it is not very durable in the long term. It will break down from UV rays, moisture, and just falls apart over time in general. 

       The second a sound absorber is saturated with moisture, it stops being able to act as a sound absorber. It also opens up to the can of worms that are mold, mildew, and pre-mature corrosion of your vehicle. So, while it may be a good choice to cheaply sound treat your home recording studio, it has no place in a car. 


Hydrophobic Melamine Acoustic Absorption Foam

       While standard acoustic foam isn’t a good or reliable option as a sound absorber for cars, there are still foam-based options out there for automotive sound absorption use. Hydrophobic Melamine Foam is the most common in the aftermarket for a variety of reasons. Not only is its acoustic absorption performance better than the standard polyurethane acoustic foam, but it is also fully water resistant throughout its entire volume. This means that the water and moisture that it will inevitably come into contact with in a vehicle will have no chance of being absorbed, so there is no worry of mold, mildew, premature corrosion, or acoustic absorption performance reduction due to saturation. Considering the automotive environment, these cautions are extremely important to consider when using a porous material as a sound absorber in a car. 

       That’s not where the benefits end. It also has incredible thermal insulation properties and is highly resistant to heat. Hydrophobic Melamine Foam can be used not only for sound absorption in applications such as camper van builds, marine applications, and general automotive use, but also act as a great thermal insulator to keep more consistent temperatures in your application. The only downside to Hydrophobic melamine is the cost. It’s just a more expensive material as it is much more difficult to manufacture and fabricate into desired shapes.

       Standard Hydrophobic Melamine Foam sheets will soon be offered by ResoNix Sound Solutions, but in the meantime, we currently offer our ResoNix Guardian. ResoNix Guardian is a product that consists of two layers of Hydrophobic Melamine foam that is tailored for acoustic absorption performance and has a layer of 1Lb/Sq.Ft. Mass Loaded Vinyl sandwiched in between. This product takes acoustic absorption and adds the benefit of a noise barrier for noise-blocking properties as well. Our Reference Information & Guide page will be able to shed light on the differences between sound absorption and noise blocking. 

       ResoNix Guardian is a top-of-the-line sound absorber for door-mounted midbass speakers, inside marine, industrial, and commercial equipment rooms, boat engine hatches, and many other applications where you need an extremely resilient and high-performance sound absorber and/or thermal insulator.


ResoNix Fiber Mat – Automotive-Grade Fibrous Sound Absorber

       ResoNix Sound Solutions is currently the only company offering an OEM-rated, automotive-grade fibrous sound absorber. ResoNix Fiber Mat 25 and Fiber Mat 45 are the result of modern materials engineering and is new to the automotive sound absorber game. What makes it different? Well, its entire construction! Instead of being an open cell foam, it is comprised of microscopic melt-blown polypropylene fibers that are assembled in a way to produce the ideal acoustic impedance for sound absorption while also being able to convert sound energy into mechanical and thermal energy via the vibrations of said microscopic fibers for even further sound absorption. Until recently, foam was the best and only real option for sound absorption in a car, but ResoNix Fiber Mat has been able to smash through previous sound absorption standards by the previous standard products. 

       Not only  is ResoNix Fiber Mat the best sound absorber per given thickness, but it is also hydrophobic and will not grow mold or mildew, it can withstand very high temperatures, cuts very easily, and can fit into many locations in vehicles, and is also versatile enough for plenty of commercial and industrial applications.

       Currently, ResoNix Fiber Mat is the best sound absorber per given thickness on the market, and is also one of the most price-friendly as well. ResoNix Fiber Mat is best used on door panels, rear decks, fender liners, headliners,interior quarter panel areas, on the back of pretty much any interior plastic trim you can imagine, and even to fully insulate camper vans, equipment enclosures, and more. 

If you have any questions about which sound absorbers are best suited for your specific car, camper van, transportation vehicle, or commercial and industrial use, feel free to contact us anytime. Thanks!

How to sound deaden car doors

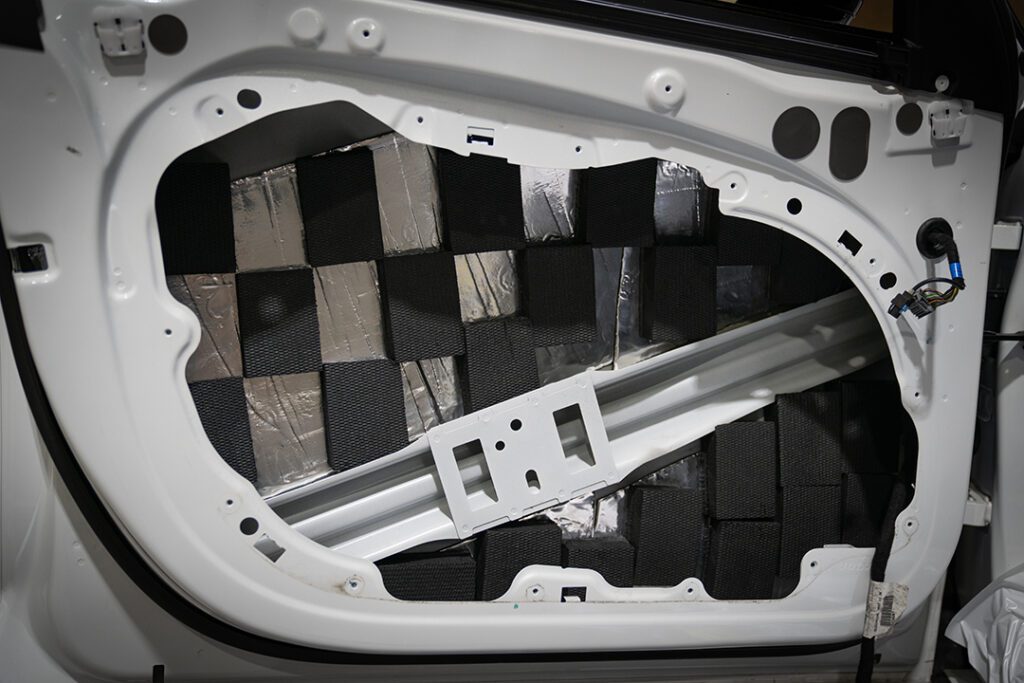
Blackhole Tiles or ResoNix Guardian

Which door cavity rear-wave sound absorber is right for you?

       Blackhole Tiles or ResoNix Guardian. Which sound absorber is best for your car doors, and why? Well, first we need to discuss what they are, and why it is important to have a sound absorber inside your door cavity, especially in car audio installations that feature a door-mounted midbass driver.

       You can read about sound absorbers and noise barriers and composites that are comprised of the two, and how they work in our Reference Information & Guide article. A quick summary, sound absorbers made out of fibrous materials absorb sound by deforming randomly at a microscopic level as sound passes through, converting sound energy into mechanical and thermal energy. The porous materials absorb sound by creating friction against sound waves as they pass through. Noise Barriers are a limp, inert mass that reflects sound away, preventing it from entering the targeted space. Both Blackhole Tiles as well as ResoNix Guardian feature foam-based acoustic absorbers, as well as a floating layer of MLV noise barrier. They both feature a peel-and-stick adhesive backing for easy installation. They both come in at a similar price point per square foot. So which one should you use? 

The Differences Between ResoNix Guardian & Blackhole Tile

       The main difference between the Blackhole Tiles and ResoNix Guardian is the sound absorbing foam layers. Blackhole Tiles feature a standard polyurethane open-cell foam with embossed facing. The bottom layer is 1/4″ thick, while the top layer is 1″ thick. It also features a sealing agent around its sides to help prevent water intrusion into the foam. While it does feature this sealant, we had to make the decision to stop selling it after many customers mentioned that they were absorbing and holding water. 

       ResoNix Guardian is mostly the same, in that it is the same thickness, features 1lb/square foot Mass Loaded Vinyl, and peel and stick adhesive for easy installation, but takes things in a different direction with the composition of the foam. Instead of the standard polyurethane open-cell foam, it uses a Hydrophobic Acoustic Melamine Foam. Melamine foam offers many benefits over more common polyurethane foams, but for our purposes, we are mostly concerned with the better acoustic absorption performance, as well as the fact that it is able to be manufactured in a way that is completely hydrophobic throughout its entire volume. This ensures that no matter where you install or, or what shapes and sizes you cut it to, water will never be able to absorb inside of the material. This means it’ll remain free of mold and mildew, and the products sound absorption performance won’t be affected by water clogging the open pores of the foam. 

       The adhesive is also notably different. While we cannot speak for the Blackhole tiles, but we have also had customers report them falling off. We decided to go with an extremely strong acrylic-based adhesive that can withstand the rigors of the automotive environment: heat, cold, moisture, chemicals, you name it, ResoNix Guardian’s adhesive will never let go.

       ResoNix Guardian also features polyester acoustic facing. This is the black fabric on the face of the product. While some may think this layer is for looks, it actually serves multiple purposes. This specific material provides a very specific acoustic impedance to further help sound absorption of low frequencies, particularly in the midbass region. Many versions of the same material are available, but since we are mostly using this product for midbass absorption inside of door cavities, we opted to go with the version that targets the best performance under 120hz. This facing is also meant to help stabilize and protect the top layer of the Hydrophobic Melamine foam. If you have ever worked with Acoustic Melamine, you know it is a bit brittle and can be fragile. This layer helps ensure your ResoNix Guardian will not end up damaged.     

       We opted to offer ResoNix Guardian in a 12″ x 12″ size piece so customers can easily cut them into their desired size and shape to fit anyone installation needs. Both sound absorbers for your car doors work well, but ResoNix Guardian is a clear winner in performance, longevity, reliability, and value. If you have any further questions about ResoNix Guardian or any of our other offerings, please feel free to reach out anytime. Thank you!

Blackhole Tiles ResoNix Guardian Sound absorber for car doors Mass Loaded Vinyl
ResoNix Sound Solutions Guardian Hydrophobic Melamine MLV Composite sound absorber for car doors Mass Loaded Vinyl

How to sound deaden car doors

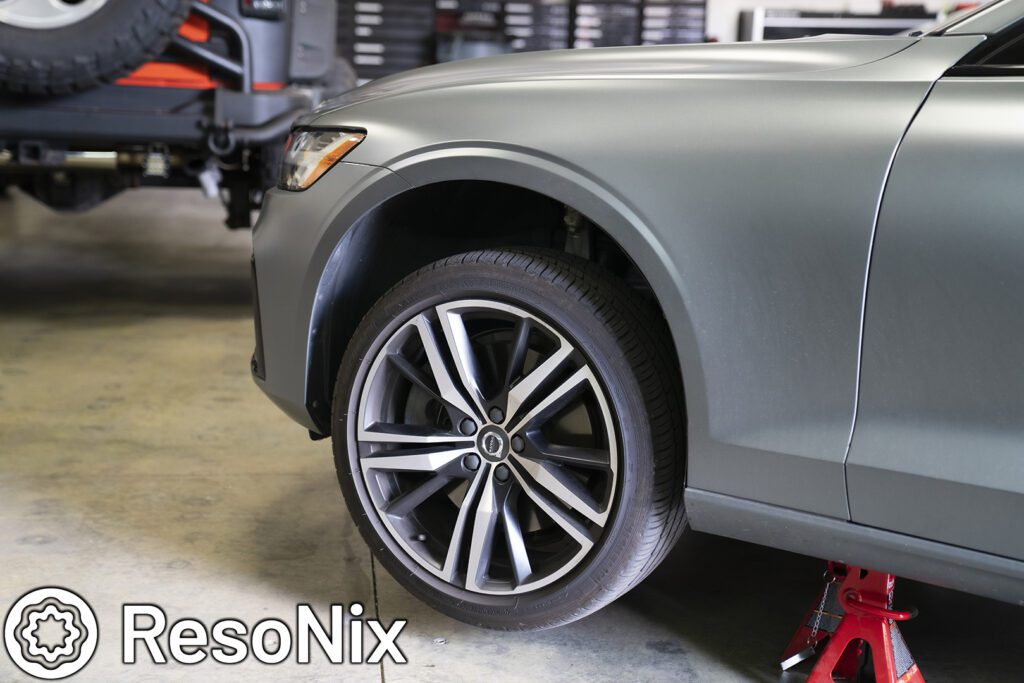
How To Reduce Sound In Your Car By Sound Deadening Your Wheel Wells

An excerpt from our Reference Information & Guide page

Sound proofing Your Wheel Wells With ResoNix Sound Deadener & Sound Absorber

Added 11/13/2022

Supplies needed

   . ResoNix CLD Squares

   . ResoNix Fiber Mat 25 and/or ResoNix Fiber Mat 45 (depends on how much space you have and what you can fit)

   . Optional and preferred: ResoNix Barrier

        Note: ResoNix Fiber Mat is perfectly fine in this location and exposed to the elements. It will not hold water, it will not degrade, it will not grow mold or mildew. This is the very same material that is used in these locations by car manufacturers such as Mercedes.

       Wheel wells are one of the most offensive sources of noise in a vehicle. 


1. Sources of Road Noise in Wheel Wells


Tire Noise: This is generated by the interaction of tires with the road surface. Different textures and materials on the road can cause varying levels of noise. For example, rough asphalt or gravel produces more noise compared to smooth tarmac. The noise is primarily due to the vibrations and air being compressed and released by the tire treads as they make contact with these surfaces.


Impact Noise: When a vehicle travels over bumps, potholes, or debris, the impact is transmitted through the tires and into the wheel wells. This impact creates noise, which can be directly transmitted into the cabin if not adequately insulated.


Spray and Debris: In wet conditions or on loose surfaces like gravel, particles can be thrown against the wheel wells. The sound of these materials hitting the metal or plastic of the wheel wells can be quite loud, adding to the overall noise level inside the vehicle.


2. Pathways of Noise Transmission


Structural Transmission: Noise from the wheel wells can be transmitted to the vehicle’s cabin through the vehicle’s structure itself. The metal and other materials used in car construction can conduct sound waves from the wheel wells into the cabin.


Airborne Transmission: This type of noise spreads through the air gaps and enters the cabin through openings or less insulated parts of the vehicle’s body. Even small gaps can significantly affect how much road noise enters the cabin.


3. Methods of Soundproofing Wheel Wells


Damping Materials: Applying damping materials like mats or pads made from dense material, such as our ResoNix CLD Squares, reduces the airborne transmission of noise through the wheel liners caused by road noise. While ResoNix CLD Squares are typically used to reduce resonance by constraining the panel, they can, in this VERY specific case, work as a mass loaded noise barrier since the wheel liners will not really be able to transmit mechanical energy into the cabin. It works by adding mass to the wheel wells, thereby reducing the ability of the structure to vibrate and transmit noise. Again, this is not the main point of CLD sound deadening materials, but it will behave this way in this specific instance.


Absorptive Materials: ResoNix Fiber Mat can be used to line the wheel wells. This material absorbs sound waves, preventing them from reflecting off the hard surfaces of the wheel well and entering the cabin. 


Barrier Materials: Heavy, dense materials, such as ResoNix Barrier, can act as a sound barrier, blocking the direct pathway of noise into the vehicle cabin. These are usually installed as part of a composite system that includes both absorptive and damping materials. As mentioned before, the ResoNix CLD Squares pretty much take on this role, but adding ResoNix Barrier allows even further noise blocking. This is only for advanced installations though as it will be difficult to install.


4. Impact of Soundproofing on Driving Experience


       By mitigating the noise originating from the wheel wells, the overall noise level inside the cabin is significantly reduced, leading to a quieter and more enjoyable driving experience. This reduction in noise can decrease driver fatigue, increase the effectiveness of in-car communication and multimedia systems, and generally make the vehicle feel more refined and comfortable.

       In essence, soundproofing the wheel wells addresses one of the primary entry points for external noise into a vehicle, making it a key area to target for those looking to enhance their driving experience through noise reduction.


       Below is what I did in my own vehicle, a 2019 Volvo S60 R Design. Please note, that the exact approach will be different on every vehicle. This can be due to how much room there is to work with, moving parts, or more. Please use your best judgment.


Removing Your Vehicles Fender Liners

       First up is obviously removing the wheels and wheel liners. During this process you are going to want to evaluate what you can fit, what parts of the body of the vehicle are going to need the most attention, etc. Remember, resonant panels will need it most. Its crude, but a simple knock with your knuckle will let you know what parts of the body need treatment. More on this part below, but on this particular vehicle, the body was relatively non-resonant, and the wiper fluid reservoir blocked a lot of access on the drivers side. Due to this being planned as a few hour-long project and was recovering from a medical procedure, I did not decide to remove the reservoir and instead worked around it. While getting a closer look, I also noticed that I had gained access to the back side of the fender and the airspace behind it. I decided to also apply ResoNix CLD Squares to the back of the fender and apply ResoNix Fiber Mat 45 on top to fill the airspace. 

Applying ResoNix CLD Squares To Your Fender Liners

       Next up, treating the wheel liners with ResoNix CLD Squares. Before you do anything, you should clean the liner with isopropyl alcohol thoroughly. In some cases, it is even recommended to sand the plastic with a low-grit paper to encourage the best adhesion possible. In my case, I didn’t feel it was necessary considering how well the ResoNix CLD Squares adhere to pretty much any material and surface you will find in a car. 

       Once you have the panel prepped, apply full coverage of ResoNix CLD Squares. In the case of doing wheel liners, I wouldn’t recommend less since the liners are mostly decoupled from the body of the vehicle, so not only do you get resonance control of the plastic liners, but it also acts as a noise barrier. Remember, treat all panels in the largest pieces of CLD Squares possible.  

       Note: We will only be treating the back side of the liner. Leave the exposed side untouched.

       Optional: if you have the time and budget, I would also suggest a full coverage layer of ResoNix Barrier over the layer of CLD Squares for further noise blocking. In my case, I did not add this as I was restricted on time, and was recovering from a medical procedure and couldn’t afford the even heavier lifting that Barrier would impose.

Installing ResoNix Fiber Mat Onto Your Vehicles Wheel Wells

       Once the liner is fully treated with ResoNix CLD Squares, we can start our full coverage application of Fiber Mat 45. Remember, when it comes to absorption, more is merrier. Full coverage is highly recommended, and if you can fit, the more layers the better. Be sure to take note of suspension components, wiring, or any other parts of the car that may need to be worked around.

       Once the wheel liner is covered, that’s it. You’re nearly done and its almost time to re-install it. Before re-installing it, you should explore treating the body of the car with ResoNix CLD Squares. Once that is done, re-install the liner and enjoy 🙂

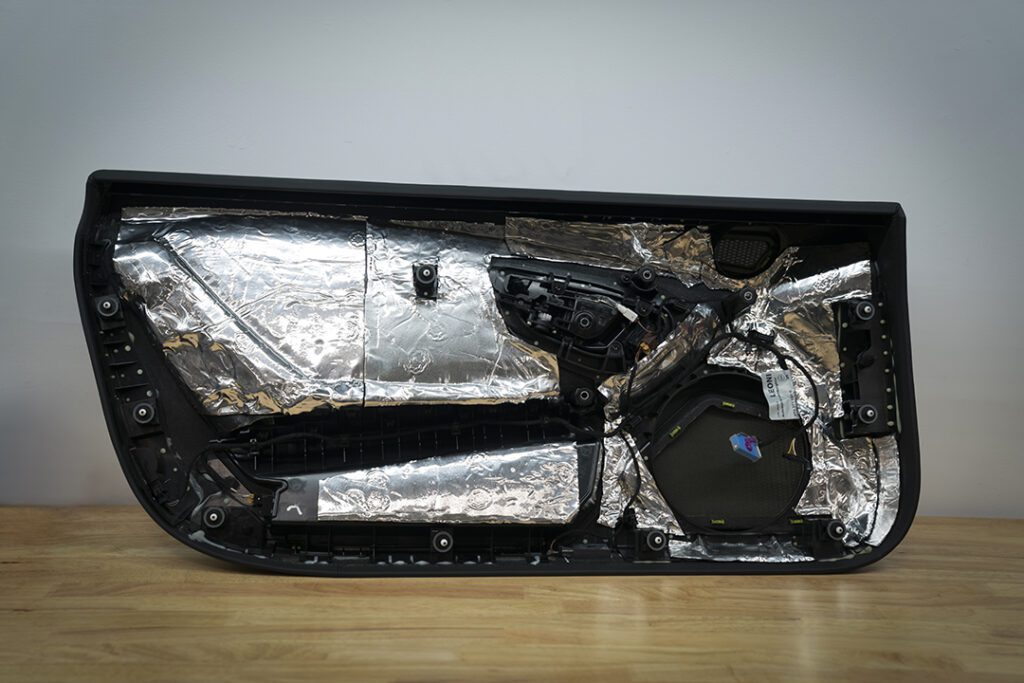
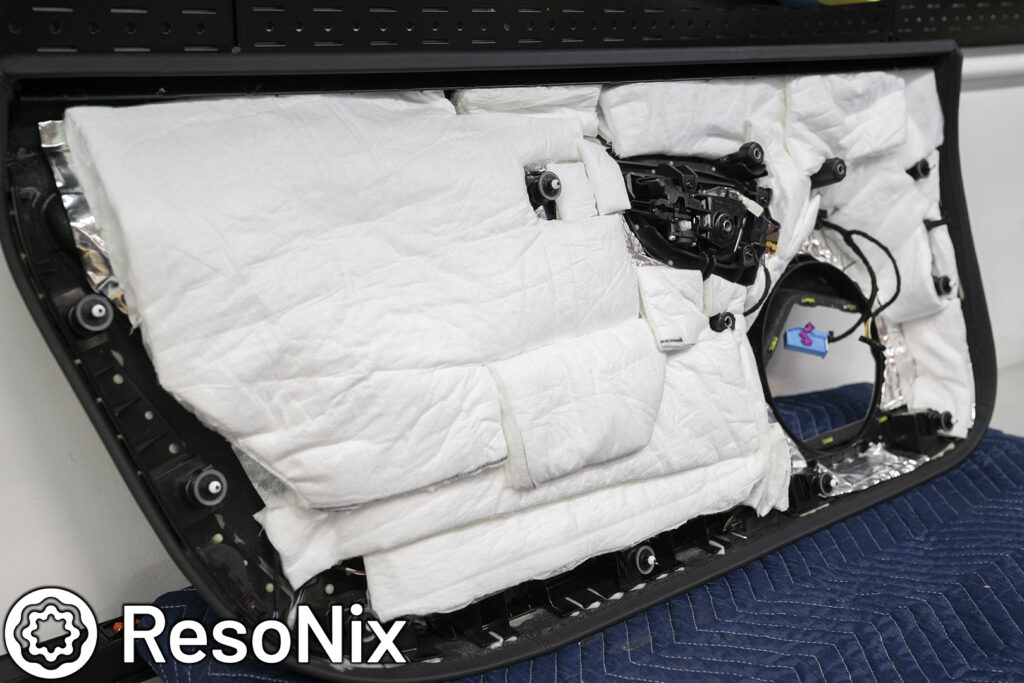
How To: Sound Deadening Car Doors The Right Way

Sound Deadening Car Doors: Here at ResoNix Sound Solutions, it’s no secret that end-result performance is our main priority. It’s also no secret that there is a lot of misinformation, poor advice, and marketing disguised as guidance that plagues the automotive sound treatment groups, threads, and discussions. The point of this article is to show you how we here at ResoNix sound deaden car doors for the best end result possible. This post is taken from the “Installing It: Doors” section of our Reference Information & Guide page. The installation is done in a Lamborghini Huracan Evo, but applies to pretty much any vehicle.


NOTE: This guide is for SOUND DEADENING your car door, not sound proofing. There is a difference. Sound deadening your door, which is what we are covering in this article, is the approach you would take when you want to treat the part of the vehicle, in this case the doors, for audio performance improvements only. Sound proofing is the approach you take when you want to reduce outside noise from entering the vehicle. The approach is similar, but there are some small differences. For the doors, the only difference would be a full application of ResoNix Barrier added to the inner door skin after CLD application.  

Installing it: Sound Deadening Car Doors

New Version. Written 12/17/2022

       Hey everyone, Nick here. I finally have an updated guide for you on how to sound deaden car doors. This one being in a Lamborghini Huracan that we did. This new guide features almost everything you need to know and need to see to sound deaden a car door. I say “almost everything” because EVERY car, every situation, and everyone’s goals are different and may require some adapting to your specific situation. The best thing you can use going into sound treating your doors, or any part of your vehicle for that matter is the information provided in this entire article, but most importantly your own common sense. We have worked on many cars, but we may not have worked on your car. Considering this, I will do my best to lay this out and explain everything on how to sound deaden car doors as clear as possible, but your situation may have a portion that requires an additional step, or a different approach. If you feel this door installation guide, and everything else posted in this entire article do not answer all of your questions, feel free to reach out and we can help guide you, and even update the article to provide more clarity. Alright, so lets hop into it.. 

       This 2020 Lamborghini Huracan came in with the request for a high-end sound system that could also get plenty loud, as well as a few other services, but there was one problem.. It’s a 1600hp, soon to be 2400hp track car. Since this is a track car, of course it has an ice box for the turbo system in the front trunk and a half cage that resides behind the seats in the cabin. This meant there was nowhere to install a subwoofer enclosure or amplifiers. Long story short, we got creative and came up with a solution to achieve high quality and relatively high-volume bass with good low frequency extension for this system. It was to install the Illusion Audio Carbon C10 Shallow Subwoofers in the doors. Normally, installing subwoofers in the door is a huge no-no, but there are a few details to consider in this case that made it work, and work well at that. First, the extremely low distortion of these subwoofers along with their low moving mass and low inductance allowed these subwoofers to not only play their typical 20-80hz range, but also extend up to 300hz no problem. The Lamborghini Huracan comes with an 8″ midbass in the OEM lower door location, and were sure we could fit this 10″ shallow subwoofer to use it as a subwoofer as well as a midbass and have it acoustically mate up to the 3″ midrange in the pillars. It ended up working very well, but for now, lets focus on HOW we got this to work so well. The careful and meticulous installation of ResoNix Sound Solutions sound treatment product offerings. 

General Synopsis on How To Sound Deaden Car Doors

Outer Door Skin (part of the door that is the outermost layer) 

       100% coverage with ResoNix CLD Squares. This is used to damp mechanical energy that is caused by the speaker, and regular driving. ResoNix has the best performing Constrained Layer Damper on the market and is responsible for making the great end results that we achieved out of this install possible. Once we finished with the full coverage of ResoNix CLD Squares, we topped them with full coverage of BlackHole Tiles (now replaced by ResoNix Guardian), also supplied by ResoNix. ResoNix Guardian is a 12″ x 12″ x 1.375″ sheet that is constructed out of a 1/4″ Hydrophobic Melamine foam layer, a MLV noise barrier layer, another layer of 1″ Hydrophobic Melamine foam, and a non-woven polyester acoustic facing that has a peel-and-stick adhesive and are naturally fully waterproof. The absorption properties of this product achieves a few things. First, and most important, it absorbs acoustic energy inside of the door cavity that is created by the rear wave of the speaker. Absorbing this rear wave will lower the amount of acoustic energy that can excite the door skins, and it helps reduce standing waves in the door cavity. Both help clean up the sound and improve transient response of the system. The other benefit of Guardian is it helps block and absorb any noise entering the vehicle from outside of the doors. Another small thing we did with the outer door skin was use ResoNix Rope in sections between the crash bar and the outer door skin. This helps stabilize the outer skin even further.

Note about Blackhole Tiles and ResoNix Guardian: These are NOT a replacement for a standard constrained layer damper. They are a supplement and help further enhance performance by a different means of acoustic suppression.


Inner door skin 

       On the inner door skin, we were pretty lucky. On the Huracans, the inner skin is thick and has 3 dimensional curves, which helps increase rigidity. The access hole is also not too large or complex in shape. We ended up doing as much coverage within reason with the ResoNix CLD Squares, and then using ResoNix Barrier to replace the flimsy plastic access panel cover. This ResoNix Barrier is secured over the access hole using stainless machine screws and provides a thin yet rigid plate that can seal off the access hole, yet still be serviceable when needed and is also thin enough and moldable enough to fit the curves and tight tolerances.


Door panel 

       The door panel is what I usually worry about most. There are so many plastic trim pieces, overlapping parts that aren’t fully secured, tight spots, flimsy material, etc etc. Thankfully, the Huracan door panels are very strong on the grand scale of door panels. We covered as much as possible in ResoNix CLD Squares, and also used ResoNix Fiber Mat 25 and Fiber Mat 45. The Fiber Mat products are exactly what they sound like. A mat that is constructed of a synthetic fibrous material. It is exactly what you see in some vehicles from the factory, but the car manufacturers usually use it sparingly, probably due to budget. The Fiber Mat product kills two birds with one stone. First, it is an acoustic absorption material. It is used to absorb outside noise when entering the vehicle, and to absorb acoustic energy behind panels. Secondly, it is an excellent decoupler. A decoupler is a product that is thick enough yet compliant enough, like a pillow, that can be placed between panels and prevent them from vibrating against each other by providing cushion between them. Many other companies only use closed cell foam for this, but to date, this is by far the best decoupling product we have used, and its great that it also acts as an absorber.


       All of this combined, even after having a 10″ subwoofer in each door running on 300 watts each, there were no rattles in the doors. That speaks volumes to both the quality of the materials used, and the installation of them, no pun intended 🙂

Detailed Explanation On Sound Deadening Car Doors

How to sound deaden car doors

       First things first, we removed the door panels and inspected what we were working with. When removing the door panel. We find that the inner door skin (the metal part of the door that is closest to the interior of the cabin) has a medium-sized access panel/hole, and everything else is sealed and pretty sturdy. That said, there are still plenty of areas to treat. From here, we removed the factory 8” midbass speaker to assess the door cavity and outer door skin.

Removing The Access Panel & Door Speaker

       Once the speaker and access panel were removed, we were able to inspect the outer door skin and door cavity. Again, a relatively normal door cavity and outer door skin. Nothing different or unique to worry about. Just a flat outer door skin with a crash bar right across the middle, which is the case for pretty much any car we come across.

How to sound deaden car doors

ResoNix Sound Deadening Treatment On The Outer Door Skin

       First up with the sound treatment portion, applying ResoNix CLD Squares to the outer door skin. First things first, we cleaned all of the surfaces that would be treated with isopropyl alcohol and a rag to remove all dirt, oils, and grease. Once that is done, we can move on to installing the CLD Squares. Remember, it is VERY important to keep the pieces that we install as large as possible. We go over why in the CLD section of the Reference Information article. We ended up with about 4.5square feet of coverage (4.5 ResoNix Squares) on the outer skin. We went with full coverage to get the best performance possible and to not leave ourselves second guessing. That said, we understand there is the 25% coverage rule that floats around the internet. First, let’s make it clear where this 25% coverage general rule of thumb came from. It comes from someone who wasn’t doing car audio installations. He was doing general sound treatment for the sake of just lowering the noise floor of the vehicle. Frankly, 25% coverage is not what I personally would consider acceptable for a car audio installation that has a door-mounted midbass driver. In a general sound treatment installation to lower the noise floor of a car, sure, but not in a car audio system. Let me explain why.

       As we know, a CLD’s job is to lower structure-borne resonance by constraining the substrate it is applied to and converting that mechanical energy into heat. When driving under normal conditions, the resonance of the door is purely caused by 2 things. Wind, and the mechanical transfer of energy from the cars wheels and engine into the body. That’s it. Not much resonance will be caused by this relatively speaking. Now when we add a high-powered speaker to the mix and the user wants to get great performance out of that speaker, the doors are getting sealed, and a lot of acoustic energy and pressure is now being created inside of that door and that positive and negative pressure is being applied rapidly to the door. Due to this, the inner skin, and especially the outer skin are resonating MUCH more aggressively than before.

        Now, in almost any sound system, we are hoping to get a door-mounted midbass speaker to extend down to at least 80hz (accounting for the appropriate crossover as well) without any acoustic low-end roll off, distortion, or resonance/rattles. We also should take note that the resonant frequency (or FS, where an objects natural resonance lies and will resonate the most) of most outer door skins just so happens to be around 80hz. This is unfortunate considering this is the frequency range we are typically trying to recreate in this location, but most doors are going to make that very difficult due to this. 

        Let’s assume we want to do 25% coverage in this case. We now have smaller pieces of CLD that are placed throughout the area of the outer door skin. What this will do is definitely take care of most of the higher frequency resonance as well as some of the lower frequency resonance that will be centered around the panels resonant frequency. But, with that much area left uncovered, it will still allow the panel to flex and resonate at the lower frequencies near its resonant frequency. When doing full, or near full coverage, you are constraining the entire panel, therefor limiting the panel from moving as a while.

       Anyways, onto the installation of the ResoNix CLD Squares on the outer skin..

How to sound deaden car doors

ResoNix Butyl Rope Door Installation

       Once the application of the ResoNix CLD Squares to the outer skin was complete, we can move on to a quick and easy yet highly effective way of further reducing resonance of the outer door skin. What I am speaking of is using ResoNix Rope to couple the outer door skin to the crash bar inside of the door. Now, yes, sometimes they are already “coupled” with another type of adhesive or material from the factory. But it is usually a very light and ineffective material and is just used to provide very minor support. Using ResoNix Rope, you can use a proper material to couple the two together and use the rigidity of the crash bar coupled with the viscoelastic and adhesion properties of the ResoNix Rope to provide even more support and structure to the outer skin.

       One thing to note, do not rip off the factory material to replace it with ResoNix Rope. Only use ResoNix Rope in conjunction with it. Another thing, more is always better, but we usually provide some gaps to allow for water drainage IF the factory adhesive also has gaps. If it doesn’t, you can go for full coverage. In this case, there was some adhesive gaps so we did the same.

Absorbing The Midbass Drivers Rear Wave With ResoNix Guardian 


Next up, Blackhole Tiles (As of 1/30/2023 we suggest ResoNix Guardian instead of BH Tiles) for the outer door skin. As mentioned in the guide, what these do is absorb acoustical energy inside of the door. To quote the guide above..

“The main focus for absorption for automotive sound systems is most definitely going to be inside the doors if you have door-mounted midbass drivers. The purpose of absorption here is to do two things. Less energy makes it from the speaker’s rear wave to the outer door skin, and it lowers the energy that makes it back to the midbass drivers’ cone; both will reduce distortion. Unfortunately, you cannot just go and stick any old acoustic foam in your doors since it will hold moisture, grow mold, and prematurely rust your doors. You need something that can absorb AND is highly water-resistant or even fully waterproof. While our Fiber Mat products can work for this, I get nervous about window mechanisms interfering and causing issues. ResoNix Guardian is a safer bet to use here. ResoNix Guardian is a unique product, and there is nothing else like it on the market. We have managed to create a waterproof product that absorbs sound, insulates from heat, and even provides a noise barrier floating inside it. Now, most install this in a checker pattern in their doors, but if you go ahead and do full coverage, you can get some noise blocking and heat insulation out of them as well.”

So yeah, since we have a LOT of energy that will be produced in this specific vehicle, we opted for as much coverage as possible.

Something to note: If you are budgeting to only do partial coverage in your doors, definitely try to get 100% coverage in the area that’s directly behind the speaker and taper out from there.

Another note, since I get asked this more often than I would have guessed.. No, these do not replace a Constrained Layer Damper such as ResoNix Squares. They do two different things and are used in conjunction with each other to reach an end goal. If you had to use one, Constrained Layer Damping is more important.

Once this is done, the outer door skin is complete and we can move on to the inner door skin.

Using ResoNix Sound Deadening To Treat The Inner Door Skin

       Moving on to the inner door skin. The most important aspect of treating the inner door skin is to seal the access holes using what many people would call a “block off plate”. Now, after enough time and experience in this field, I can say that while sealing these access holes is the most important part of treating the inner skin, it is highly recommended that you go about it in a way that is easily serviceable. There are many ways to go about sealing these holes. You need something that is solid and rigid. Being able to hold us to the elements is also highly recommended for obvious reasons.

Using ResoNix Barrier To Create Door Block-Off Plates To Cover Access Holes

       The most common ideal way is to use a relatively thick and rigid plastic, usually ABS, and cut out plates that can be secured to the inner skin around the perimeter of the access holes. This is only a good option if the inner door skin is flat and doesn’t have any meaningful curves to it. If it has curves, you are most likely not going to be able to use a thick enough material that will be able to both conform to the shape while also sealing the hole and being rigid and free of resonance. When using a plastic material to block off access holes, You will want to apply CLD to the plastic block off plate, and also provide a gasket for where the plastic meets the metal. I would suggest foam, such as ResoNix CCF7.

       Another but lesser-known ideal way, a way that yields, in my experience, the same end result from the first method listed above, is to use ResoNix Barrier as the block-off plate. Our Barrier product, while rigid and strong, is thin and moldable. This is an excellent option to use if your car has a three-dimensional shape to the opening and the block off plate needs to conform to this, or if you do not have the ability to make block off plates out of plastic, as you can cut our Barrier with heavy duty scissors. Using ResoNix Barrier is what we did in this specific install since the inner skin is curved and has a three-dimensional profile to it. In order to secure it, we use riv-nuts secured to the inner skin and machine screws with fender washers to hold it in place.

       The third way, and least preferred way, is to just use CLD as your block off plate. While I would say this isn’t a terrible idea for small holes, this is not ideal for anything bigger than say 20 square inches for two reasons. One, it is not what I would consider rigid enough to act as a proper block off plate and cause resonance of its own. Same goes for using MLV for this task. They are just not rigid enough for the job. Another reason, serviceability. Once CLD is stuck on, it is NOT fun to remove. Don’t take that chance.

       Once the block off plates are taken care of, you can apply your CLD to the inner door skin. I like to get the block off plates figured out first so I know where to not plate the CLD. You can see the CLD (along with the riv-nuts for the block off plates) installed into the photos above, along with the finished photos below.

       Remember, as large of pieces as possible. Little itty-bitty pieces are damn near useless. If the area doesn’t have the ability to accept a piece that is at minimum, and I’m really going minimum here, 8 square inches or larger, do not bother. I typically do not do pieces that are smaller than 20 square inches for the inner door skin. For the door panel and other areas, this is not the case since not every panel is the same and CLD can be used for purposes such as holding two pieces snug together while damping them to prevent their contact rattles. You can see a few examples of this in the reference section above in the CLD installation photos. But if using it just to treat resonance, I tend to not bother with anything that wont take 20 square inches or larger.  Once the inner skin is sealed and treated with CLD, you can move on from here and treat any wires or modules that are mounted to the doors using CCF7 to decouple or use as a gasket, and you can use our VW/Audi OEM Non-Woven Tape to wrap any wire bundles to prevent any rattles or buzzes from them. Once this is done, it is time to move on to the door panels.

How to sound deaden car doors

Using ResoNix Sound Deadener To Treat The Door Panel

       Alright, now on to the most complex part of doing a door deadening installation, the door panel itself. This is the part of the doors I get the most questions about, and honestly, I cannot reliably answer most of them since EVERY door panel is different, and every door panel will require slightly different approaches to its spot treatment. I do my best to cover this in the other pictures below that are not of this Lamborghini and hope that is enough to help everyone out there. That said, our goals for the door panel include killing resonance, reducing panel on panel vibration (this includes both the door panel to inner door skin, and the overlapping layers of the door panel vibrating against itself), as well as acoustic absorption to reduce the amount of energy that makes it through the door panel cavities.

       Lets start with step one, which would be all of the little spot treatment. Remember, every car is different and you will have to use the information here combined with your own common sense to figure out what parts of this door panel are going to vibrate against themselves and cause audible buzzes.

       From our previous door guide..

“As mentioned previously, door panels can be made up of multiple different layers and pieces. If these layers are easily separated and you can hear then vibrate against each other when you knock on the panel, you will want to spot-treat the area where they meet with closed cell foam or even butyl rope. It’s also a good idea to hold door panel clips into place with our VW/Audi OEM Non-Woven Tape or butyl rope to prevent them from vibrating against their housing.

Below, you can see a door panel that we did for a 2014 Mazda CX5. Not only did we use CLD Squares on the large, flat surfaces of the panel, we also used the Non-Woven OEM Tape, ResoNix CCF7, and ResoNix Rope to decouple various parts of the panel from one another to prevent any audible buzzes or vibrations. If you zoom in on the second picture, you can see some of the areas that we treated circled in red.”

       I prefer to treat this first, because once you apply the larger pieces of CLD Squares, you can no longer take it off and work on the small stuff underneath, so make sure all of your spot treatment is done before you start laying down your large pieces of CLD.

       Note: why we used old pictures and other door panels for this is because the Lamborghini door panels are built very well from the factory and didn’t require much spot treatment. This 2014 Mazda CX5, different story.

How to sound deaden car doors

       Remember, do not waste your time with super tiny pieces unless it is used to prevent two things from vibrating against each other.

How to sound deaden car doors

Using ResoNix CLD Squares To Reduce The Resonance Of Your Door Panel

       Once we are done with spot treatment, we can move on to resonance control of the door. This is when we install the larger pieces of CLD Squares. Remember, focus on the large, flat areas and use as big of pieces as you can to get the most constraining of the panel possible. Again, every car is different and will require a different approach. But my advice comes back down to focusing on the area around the speaker, and any large flat areas. Focusing on the area around the speaker should be obvious as to why, but in case it is not obvious, it is because this is the source of the energy in the door and its always best to stop it or reduce it as soon as possible, same reason why I suggest full coverage behind the speaker with ResoNix Guardian.

How to sound deaden car doors

Using ResoNix Fiber Mat To Absorb Sound & Decouple Your Door Panel

       Once that is done, it is time for Fiber Mat 25 or 45 (which one depends on how much room there is). One thing to note about Fiber Mat 25 and 45 is that you do not want to stuff it to the point where it is compressed. It absorbs best in its resting state, but there are areas of the door where it will need to be compressed, and is overall better serving the end result by doing so, as it is also acting as a decoupler for the door panel. As you can see, we didn’t just put one sheet of Fiber Mat over the door panel and call it done. While that is fine to do, when trying to get the most out of your install, it is best to fill all cavities and voids to get the most absorption possible (remember, fill, but do not stuff to the point where you really have to compress the material too much).

       Thankfully, our Fiber Mat has an automotive-grade peel-and-stick adhesive to make the installation easy.

How to sound deaden car doors

Using ResoNix CCF Strips To Direct Sound Energy Out Of The Door And Into The Listening Space

       Once that is done, it is almost time to install the door panel. But first, the very last thing you want to do is seal the gap between the speaker and the door panel. ResoNix Strips are perfect for this. This couples the speaker to the door panel and prevents energy from getting into the area between the door panel and the inner door skin, and helps funnel that energy out of the door panel grille. Remember, you want your midbass speaker mounted close enough to the panel that the 1” thick strip will contact the door panel and provide a seal. If it doesn’t contact the door panel all the way around and seal the speaker, it isn’t really doing anything beneficial. In the first picture, you can see another Huracan that we did. Here, we used a baffle/speaker setup that allowed the ResoNix Strip to be placed onto the door panel itself. Sometimes its better to do it on the door panel, like in that particular case, but usually it is better to install it on the speaker, as seen in the second photo. We fabricate a ring that acts as a washer over the flange of the speaker and install the ResoNix Strip onto that, but that is a lot of extra work for those without the tools to make that quick and easy, so you can do it how you see fit. You can see the second photo of another Huracan that we did where we installed the ResoNix Strip onto the fabricated ring that secures the midbass driver down.

How to sound deaden car doors

Once that is done, install your door panel correctly and enjoy your silent doors.

Tech Tip: Helix DSP Software Tech Tip - Setting Up Differential Rear Fill & Using Real Center

       Helix DSP Differential Rear Fill is a commonly sought-after rear speaker setup for car audio hobbyists using any of the Audiotec Ficher DSP’s. It is used for its ability to help “enhance” the front speakers by simulating the late reflections of a larger room. Implemented correctly, this can result in a sound system that feels larger than the boundaries of the vehicle. How it works is simple. It is a Left minus Right/Right minus Left signal. This L-R/R-L signal is a sum of left and right, but the reversal of polarity of one side results in the cancellation of all of the correlated information and leaves you with only the left and right information. Once the signal is set, you can add extra delay (again, to help simulate the reflections of a larger room), adjust crossovers, equalize, level adjust, etc to fit your needs/taste. When equalizing differential rear fill you will either need to use uncorrelated (stereo) pink noise, or just temporarily turn off the differential signal as correlated (mono) signal will not play through the differential signal routing. 


Things To Note

. From personal experience, you want your rear speakers as high, wide, and far back as possible for this to work well. Down low in the rear doors does not work well, but can still be better than nothing for some.

. I recommend using 3″ or so wideband/full-range speakers. This allows for an easy installation that gets you the full 200-20,000hz spectrum needed.

. Before applying the extra delay, I still recommend setting delays to account for the path length difference to the listener.

. High pass this signal no lower than 250Hz or so. You do not want any bass or mid-bass frequencies in your rear fill as it is harder to de-correlate them to your front speakers. 

. Speaking of crossovers, if your front stage is a 3-way, it is best to just match your rear fill high pass filter to your front midrange high pass filter. This way you do not have to worry about possible phase issues and cancelation when playing with lower delay settings. Technically, the appropriate crossover to use would be 12db slopes, this only yields no issues if your front midrange crossover slopes are also 12db, or if there is enough delay applied to the rear speakers to decorrelate them from the front speakers. I personally use a 12db LR or 24db LR high pass, and a 6db BW low pass (if I decide to use a low pass at all).

. As you can tell, I am not speaking in definites. Nothing about differential rear fill is technically accurate to the source material. You are PURPOSELY adding something that was never meant to exist, so dialing this in by ear to fit your subjective wants/needs/taste is highly encouraged. As a starting point, I typically end up with at least 14ms of delay, usually more, and start by matching the high pass crossover to the front midrange, run the top end wide open, and go from there.


Things You Can Try

. Give Stereo Rear Fill a try instead of differential signal, with or without the extra delay. You might prefer it. I find these setups are better for those who prefer something that feels more “fun” and energized as opposed to perfect SQ. This is usually what I end up with when doing lower rear door speakers for customers.

. Instead of using Left minus Right/Right minus Left, you can use the Real Center and Virtual Channels of certain Audiotec Fischer DSP models to do Left minus Center/Right minus Center. What this will do is give you hard left on the left speaker, and hard right on the right speaker. With a traditional differential signal, you get left and right on both sides.


Speaking of Audiotec Fischer’s Real Center..

       In the vast majority of applications, only the sum of the right and left front channels is used to generate a signal for the center speaker. However, this means that the spatial stage image is restricted and the sound on the driver’s side ultimately only takes place between the left front speakers and the center speaker. The same applies accordingly to the passenger side, where the stereo panorama is reduced to the area between the center speaker and the right front speakers.

Audiotec Fischer’s proprietary “RealCenter” is a much more complex approach in which the center loudspeaker only reproduces the monophonic elements of the music, i.e. only the information that is simultaneously available on the right and left front channels. Stereophonic information that is only contained in the left or right channel is not fed to the center speaker.

The advantage: The width of the spatial stage image, which is generated by the stereophonic components, remains completely unchanged with the RealCenter, since these are still only reproduced by the left and right front speakers.


Advice:

Without Virtual Channel Processing:
       For a proper operation of the algorithm it is mandatory that the “Front Left” and “Front Right” signals must be present on channels A and B, as well as a sum of “Front Left” and “Front Right” on the actual center channel.

With Virtual Channel Processing:
       For a proper operation of the algorithm it is mandatory that the “Front Left” and “Front Right” signals must be present on virtual channels “Front L Full” and “Front R Full”, as well as a sum of “Front Left” and “Front Right” on the virtual “Center Full”.

NOTE: Real Center is technically not an upmixer, but instead a center signal extractor. There is a difference. Personal experience.. while possible, it is NOT EASY to get a great sounding 2-seat system, but it does help with getting something that is definitely better than a traditional mono center. 

Be sure to check out our Audiotec Fischer DSP PC Tool Software Setup Part 1, here.


We also have a full automated tune video featuring Automatic Time Measurement, Tune EQ, & More, here.


If you have any specific requests on tech tips regarding the Audiotec Fischer DSP PC Toll Software, or anything else related to car audio or sound treatment, please email us with a request. Thank you!

ResoNix Sound Solutions Audiotec Fischer Helix Brax Match Differential Rear Fill How To

What Is Sound Deadening?

       Sound deadening in cars is a process that involves the use of materials to absorb or dampen sound waves and vibration. This process can be applied to various parts of a car, including the doors, roof, trunk, and floor. The goal is to reduce noise and vibration that can be distracting, uncomfortable, or even harmful to your hearing. It is also used by many to improve the sound system in their vehicle.

       There are a handful of main types of sound deadening materials for cars. Constrained Layer Dampers (commonly referred to as Sound Deadener) are by far the most common and widely known. There are also Sound Absorbers, Decouplers, and Barriers. Constrained Layer Dampers and are applied to the body and interior panels to reduce structure-borne resonance. This is arguably the first and most important step. Absorptive materials, such as Hydrophobic Fiber Mat, absorb sound waves and convert them into heat energy. Decouplers help isolate two panels to prevent them from rattling against each other. Barrier materials, such as ResoNix Barrier, block sound waves from passing through into the car’s cabin.

How Does Sound Deadening Work?

       Sound deadening in cars works by reducing the transmission of sound waves and vibration through various materials. When sound waves or vibration hit a surface, they can be reflected, absorbed, or transmitted. The amount of sound or vibration that is reflected or transmitted depends on the density and thickness of the material.

       Sound deadening material, constrained layer dampers specifically, are a vibration damping system. This system consists of a viscoelastic core sandwiched between a stiff outer aluminum constraining layer, and the panel it is adhered to. When the structure to which the damper is attached vibrates, the viscoelastic core of the damper dissipates the energy of the vibration by using its natural shear forces and converting the mechanical energy into heat. This reduces the amplitude of the vibration and, therefore, the noise and wear and tear on the structure.

Why Do You Need Sound Deadening in Cars?

       Sound deadening in cars is essential for several reasons. First, it can make your ride more comfortable and less fatiguing by reducing road noise and vibration. This can make long drives much more pleasant and less stressful.

       Second, sound deadening in cars can improve the sound quality of your audio system. By reducing background noise and vibrations, as well as resonance that causes distortion, you can hear your music or podcasts more clearly and at lower volumes, and have it retain clarity at higher volumes.

       Finally, sound deadening in cars can help improve the resale value of your vehicle. A car that is quiet and comfortable to drive is generally more desirable than one that is noisy and uncomfortable.


Conclusion

       Sound deadening in cars is a critical process that can make your driving experience much more comfortable and enjoyable, and drastically improve your sound system. Whether you’re looking to reduce road noise, improve audio quality, or increase the resale value of your vehicle, sound deadening materials can help. By understanding how sound treatment works in cars and why it’s essential, you can make an informed decision about whether it’s right for your vehicle.

       If you have any specific requests on tech tips regarding anything else related to car audio or sound treatment, please email us with a request. Thank you!